Connections that move orders: signing, payment, POs, and receipts
Let recorded events move an order when the facts are enough, and keep staff approval where someone still needs to check the furniture or the agreement.
The OrderPilot team·

Monday’s list has 23 orders still marked Order, although their POs went out last week. By Tuesday, customers are asking whether anything has started. At the factory, fabric is being cut; back at the shop, the status is still enjoying last Tuesday. In this illustrative store, purchasing has done the work and the order record needs to catch up.
OrderPilot’s status map connects recorded work to the next stage. A connection says when to check, what else must be true, and what actions go with the move. Let it handle facts such as payment or receipt, and give staff the decisions that need a person: the right fabric on the acknowledgment, or a sofa ready to leave the warehouse.
Choose between an event and a fact that stays true
A “when it happens” connection responds to an event occurring while the order is in its starting status. “A payment is made” and “A PO is sent” are examples. A payment from before the order entered that status is not a fresh event merely because the connection now exists.
A “while it’s true” connection checks a condition that can already be true when the order arrives. “The order is signed,” “The order is fully paid,” and “All PO units are received” are examples. The distinction matters when an order reaches a stage after another part of the work is already complete.
The picker also includes review decisions, customer change requests, refunds, partial and full shipment or delivery, Shopify cancellation, and items handed over. Choose “Staff press Next status” when a person makes the decision. The connection panel’s hints explain the scope of each choice, including whether it concerns part or all of an order.
The status-map overview explains the larger process. Begin with the actual handoffs in your store, then choose the event that represents each one.
Build a connection around one clear decision
When identifies the event or continuing fact. Only if adds the conditions needed before moving, using order and line information. Then attaches useful actions to the connection, such as an order tag, an activity note, a staff notification, or turning customer payment on. The destination says which stage the order will reach.
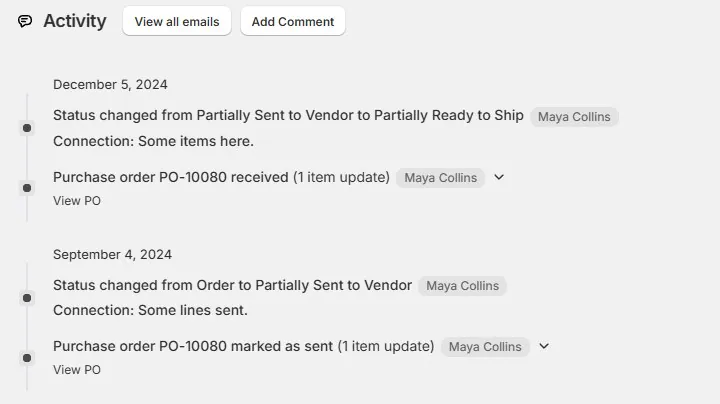
A sofa receipt can arrive while another shipment on the order is still outstanding. Pair the receipt event with the coverage condition that fits the intended move, or use the receiving system connection. That lets the map distinguish progress on one shipment from completion of the order’s receiving.
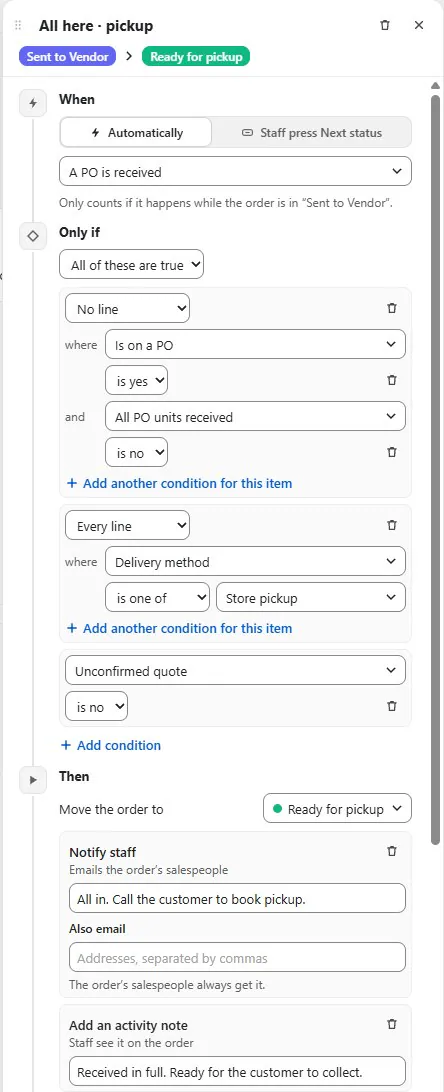
On a split order, set the connection’s scope for the whole order or each part. The table may be collected while the sofa is still waiting for delivery. Match the completion email to that scope so the customer gets a useful update about the piece that has actually moved.
Recipe 1: record that purchasing has sent the order
Use the purchasing system connection for the move to Sent to Vendor, and add an “Awaiting acknowledgment” tag as a Then action. The stage records the PO going out; the tag gives purchasing its next job when the factory answers.
A mixed order might contain a sofa to purchase and a table already in stock. Use the system connection’s coverage logic for that combination. The signed-sale-to-arrival workflow follows both lines through their different paths to the customer.
Recipe 2: let staff confirm the acknowledgment
Keep In Production as a staff move when purchasing needs to approve the vendor’s acknowledgment. From the PO-sent stage, the buyer compares fabric, finish, quantity, and promised timing, then presses the next step. Add an activity note pointing to the checked acknowledgment so another buyer can pick up the job.
Read the factory’s answer for substitutions, rejected fabrics, or questions before recording acceptance. The Next status guide shows staff which moves are ready and what information each one is waiting for.
Recipe 3: tell the delivery coordinator when receiving is complete
Use the receiving system connection to reach Ready to Ship, then add Notify staff for the delivery coordinator. If the store collects the balance at this stage, add Turn customer payment on. Put any separate inspection approval before the public ready message so the update matches the store’s handover process.
A staff-controlled inspection step gives receiving room to resolve a scratch, wrong fabric, or missing hardware. The receipt records the quantity; the inspector records whether the piece can proceed. Once both jobs are complete, the coordinator has a clear starting point for the handover.
Notify staff emails the order’s salespeople and any supported additional staff addresses entered for the action. Set customer email separately for public updates. An internal receiving handoff can alert the team, followed by a customer message when the piece is ready to arrange delivery.
Recipe 4: record delivery and assign the follow-up
Use the recorded full-delivery position for the Delivered move and its configured customer email. For later personal follow-up, add a tag the team can work from. A tag records the task; a staff member sends the follow-up.
For example, give an associate a weekly list of tagged deliveries to review. They can resolve an open delivery issue or ask how the piece is settling into the room. OrderPilot has no review-request campaign feature, but the delivery record gives staff the context for a useful personal message.
Put the most important connection first
When several connections could apply from the same status, the priority list sets their checking order. The first whose When and Only if are satisfied makes the move and runs its actions. The map can then evaluate connections from the new status and move onward if their conditions are met.
Suppose full payment and a general payment event lead to different destinations. Put the desired full-payment outcome first in the priority list, then test an order with that payment position. The list makes the intended decision explicit.
Show system connections reveals the app’s own moves, including backups. Their core logic and built-in status names are fixed. Adjust the permitted actions, notifications, and priority, then name your own statuses and customer-facing groups to suit the store.
Decide deliberately whether to check existing open orders
Publishing makes the revised map available for later checks. For staff with the required permissions, Check open orders now evaluates existing orders and can move them immediately. Test representative orders first, then choose when the live order list should be checked.
The initial status-engine switch-on protects earlier orders from advancing solely on old facts at that baseline. Later published conditions can affect open orders when checked. Treat the open-order check as part of putting the new process into use, with staff ready for the moves and messages it produces.
Use the status-map testing guide with a normal order, a partial receipt, a payment already recorded, and a customer change awaiting a decision. Review each resulting stage and message together so the customer’s update matches the work recorded.
Let POS payments count when they reach the order record
A supported Shopify payment, including the POS checkout path, contributes to the order’s payment events once synchronized. If the register has completed the payment and the order is still waiting, follow the transaction through synchronization. Once the payment reaches the order record, the map can evaluate the move from that fact.
Choose the payment route for the store’s plan: OrderPilot POS Take Deposit and native percentage deposit terms require Plus; Admin deposit orders before placement work on any plan. Then take a sample payment through the route and inspect the connection it triggers.
Keep a production change request with the people who can approve it
Route a change request on a signed or paid order to the people who can assess it. Staff review the customer’s request and factory position, apply an accepted change, and obtain a fresh signature when the customer-facing agreement changes. The production instruction then follows the accepted revision.
The map offers separate events for asking, accepting, and resolving changes. Use them to give each decision an owner. A request can flag staff attention; acceptance and resolution can move the work forward once the responsible people have made those decisions.
Shopify Flow handles store automations through its own triggers, conditions, and actions. Shopify, Shopify Flow. The furniture Flow recipes cover that tool, while OrderPilot’s status map connects work inside the order process.
Start with the connection whose event and outcome your team can explain most clearly. Test it, publish it, and inspect a resulting order history before adding complexity. The next step is testing a status-map change before your team sees it.
Sources
A receipt records quantities. It does not replace the person checking the sofa.