Your first week with OrderPilot: a setup plan for a furniture store
Settle the details customers see and the access your staff need, then rehearse a whole sale. This suggested sequence keeps the first week focused.
The OrderPilot team·

Monday, 9 a.m. OrderPilot is installed, the coffee is hot, and the sales lead wants to know whether Saturday's customers can get a quote on the iPad. Before answering, imagine the first quote going out with another showroom's logo, a new associate seeing vendor costs, and the customer's email disappearing into spam. Those are setup decisions arriving in the wrong order.
A calmer first week starts with what customers will see and what staff may do. The five-day sequence below is a suggested working plan, not a promise about how long setup takes. Move at the pace your catalog and team need. Finish with one complete rehearsal sale before the first real customer receives anything.
Day one: establish the business and staff access
Start with the store identity and the people responsible for each part of the sale. A beautiful sofa configuration will not rescue paperwork that sends the customer to the wrong address.
In Settings › Business & locations, group your locations under the brands customers recognize. A retail brand answers “whose showroom is this?” A location answers “which showroom is handling this order?” Keep those decisions separate. Review the location's contact details, logo, receipt terms, and payment information against the paperwork you actually hand to customers.
Use a sample quote to look at the result. The team should recognize the selling location immediately, and the customer should know which store to contact. If you have several showrooms, repeat the check for each one. The locations and brands guide explains the distinction in more depth. Next, open Settings › Staff & roles. Use the starting sales, operations, and administrator roles as a discussion aid. Who needs to see vendor cost? Who may change a price? Who can place an order despite an unmet requirement? Which locations should each person work in? Answer with the person's job in mind, including whoever covers that job on a day off.
Test with a sales account, not only the owner's account. The owner can easily miss a permission problem because everything opens for them. On the register, vendor costs are kept out of OrderPilot's POS screens; access at the Admin desk still deserves its own review. Our starting-role guide helps divide those responsibilities. Give each decision an owner before moving on. The catalog owner settles option names. The operations lead settles purchasing handoffs. The person responsible for customer messages signs off the sender and wording. This is a working arrangement for your team, not another status field to maintain.
Settings search helps when nobody remembers where a choice lives. Type the subject, such as “deposit,” rather than opening every page in turn. Leave a short list of unresolved decisions beside the setup plan. Otherwise, a discussion about who approves discounts can quietly become a discussion about every discount ever given.
Day two: build a small catalog that teaches the whole job
Your first useful catalog needs representative products, not every vendor's entire collection. Choose pieces that exercise the decisions your staff make most often: size, upholstery grade, finish, and a combination the maker does not offer.
For an illustrative rehearsal, build a Madison sofa from the sample vendor Atelier Nord. Give it a choice of sizes, fabrics, and leg finishes. Add the right prices and costs to the options. Include a “shown when” rule that hides a leg finish on a frame that cannot use it. The point is to reproduce a real selling conversation, including the moment an associate has to explain why a particular combination is unavailable.
Read the configuration aloud while looking at the vendor book. “Natural” is a remarkably busy word in a furniture store. Give the fabric and wood finish names enough context that the next person can distinguish them without holding the swatches.
The product-template guide covers how the model and its choices fit together. Reusable option bundles are useful when related pieces share a fabric library. Keep the first template small enough to inspect properly, then reuse a structure you trust.
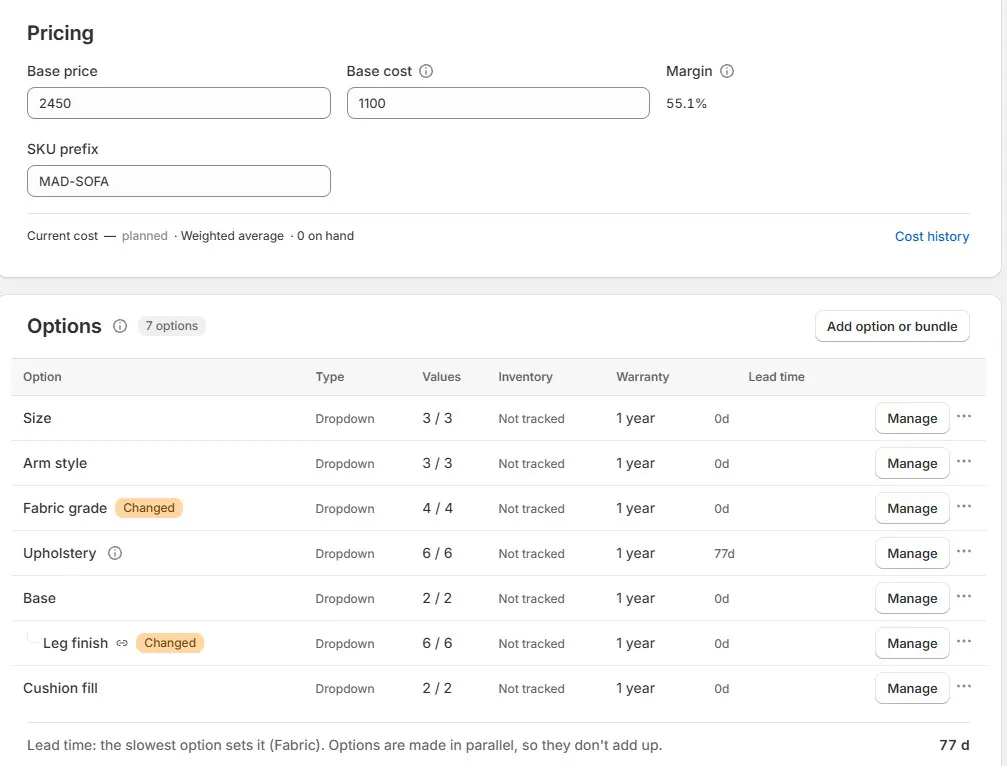
Lead time belongs in this catalog review too. OrderPilot shows the selected configuration's lead time on the Admin order line and can show it in the online options block when enabled. It does not print that lead time on the quote PDF or PO. Decide how your team will explain the expected wait in its customer conversation and written message, especially when one fabric takes longer than another.
Keep rehearsal templates in Draft while you refine them; draft templates do not write products to Shopify. Activation changes that boundary. A practice quote also has its own Shopify synchronization behavior, so a draft template is not a private training mode for the whole app.
Once the sample works, move to the vendor's broader catalog. Settings › Products provides a validate-then-apply CSV import. Read the validation results, correct the rows it identifies, and review the proposed changes before applying them. A spreadsheet that opens neatly is not necessarily a catalog that prices correctly. The catalog-import guide covers the spreadsheet itself. If your team says “supplier” rather than “vendor,” settle the Admin wording while training starts. Consistent language makes the first demonstrations easier to follow.
Day three: read the paperwork and messages as a customer
Paperwork and emails should be reviewed together because customers experience them together. They open a message, read the quote, and decide whether they understand the purchase well enough to proceed.
Start in Settings › Branding with the brand section and the customer-facing assets. Review the logo, store name, and the location details that feed the documents. Then add the terms your store uses, including additional terms for the categories or templates that need them. Open an actual sample PDF rather than judging the setup from a logo preview.
Merchants control the brand section, location and bank details, terms, named salespeople, and reference; PDF fonts, layout, columns, and validity settings are staff-only controls. Concentrate the first review on the contents your customer needs: the agreed piece, its configuration, the price, the store contact, and the terms.
Ask operations to read the purchase order as well. A customer document and a vendor document have different jobs. The quote should help the customer recognize their sofa. The PO should let the maker identify the exact specification, quantity, destination, and cost. The document guide explains which record belongs at each handoff. Choose a numbering convention before the team starts inventing references around the existing one. A job name can help staff find an order without turning its number into a compressed history of the sale. The numbers, tags, and fields guide separates those jobs so the same information does not end up everywhere.
Next, use the guided setup in Settings › Messages & notifications. Set the sender, select the email theme, add the logo, and decide which events should send customer emails. Read the resulting message from the customer's point of view. Does it explain what to do next? Does the reply address lead to someone who will answer?
For mail from your own domain, the domain records and sending checks need attention before the first real quote. The sending-domain guide walks through that work. Authentication helps establish who sent a message; a successful setup is not a promise that every inbox will place it in the primary folder. Send the rehearsal message to an inbox your team controls. Open its attachment and links on a phone. Reply to it and see where the answer lands in your configured workflow. Check both the message's appearance and the staff handoff. A handsome email is still unfinished if nobody knows who answers it.
Day four: agree what moves an order forward
Your status map should describe decisions the team can act on. Begin with a real special order and ask what has to happen before the next person can work on it.
A process might include a specification check, vendor acknowledgment, and a receiving inspection. These are examples to discuss, not a list of statuses every store should add. A useful status tells someone what is happening or what they need to do. A status that means “ask the owner” usually needs a clearer decision behind it.
In Settings › Quotes & orders › Statuses, put the detailed staff steps under simpler customer-facing groups. Staff may need to distinguish an acknowledgment from an inspection. The customer needs a clear account of their furniture's progress. Built-in system statuses keep their names; your custom statuses and customer-facing groups can use your store's wording.
The day-one status guide helps turn the discussion into a draft map. For the fuller model, read about status-map connections. Use “When,” “Only if,” and “Then” to describe the move, and test the draft against a sample order before publishing it. Decide what signing, payment, a sent PO, and received goods should each mean. A deposit does not tell receiving that a sofa arrived. A sent PO does not prove the maker has accepted a change. Keep automatic moves tied to events that genuinely establish the next stage, and leave judgment calls with the person responsible for them.
Set order requirements alongside the map. A category can require a signature before placement. Optional manager review can add an approval step. Decide who handles an exception and what explanation that person should leave. The deposit and signature guide covers these choices together.
Use the right deposit route for your Shopify plan:
| The job | Setup to understand | First-week test |
|---|---|---|
| Request a deposit without Plus | Enable Deposit orders in Settings › Quotes & orders › Delivery & stock; create the deposit from Admin on a quote or draft | Open the separate deposit order's pay link and reconcile its payment to the main record |
| Use native percentage deposit terms | Shopify Plus | Read the amount due and remaining balance before payment |
| Take Deposit in OrderPilot on POS | Shopify Plus and the order's deposit terms | Rehearse the handoff into Shopify POS checkout |
| Enforce a minimum-deposit rule | Shopify Plus for the native deposit requirement | Test the unmet requirement and the authorized exception path |
| Require a signature | The relevant category or template requirement and staff permissions | Try the order before signing, then after signing |
On a non-Plus store, a paid deposit order does not satisfy the native minimum-deposit rule. Agree a deliberate placement review for that route. The main record still carries the payment and remaining balance, so the team can make the handoff from the same information.
Day five: rehearse the floor and website together
The showroom rehearsal should use the device and staff access the team will actually use. Put OrderPilot's Orders, Create Order, Create Quote, and Print Receipt tiles on the iPad's Shopify POS home screen, then sign in as a sales associate.
Shopify's retail migration guide includes a POS test transaction and says to set up payments before connecting payment hardware. Follow Shopify's setup for the store's payment method and equipment alongside the OrderPilot rehearsal. Keep training transactions separate from customer business. Build the Madison sofa quote while sitting beside the sample piece. Find the fabric, change the finish, and read the price back. Add a regular Shopify product so the team sees a mixed quote. Select whether each piece comes from stock or needs ordering, then agree whether it will be delivered or collected.
The showroom iPad setup covers the device's working arrangement. The customer-beside-you walkthrough concentrates on the selling conversation. Both matter: staff need to know where the action is and when to use it without making the customer watch a training exercise.
On the website, start with Request a quote. Add the options block, Add to Quote button, and quote cart using the theme setup. Decide which products customers may quote by tag, category, or collection. Preview the customer journey from a product page through the submitted request, then find that request on the staff side. The theme-block guide explains how those pieces work together. Review a product that should be offered and one that should be excluded. The test is whether the customer can express the intended purchase clearly and your team receives the choices needed to answer it.
Follow one sample sale all the way to purchasing
The final rehearsal should reveal gaps between settings, not simply prove that each screen opens. Use sample names and inboxes, and keep the purchasing handoff unsent.
Say the Madison sofa sells for $2,400 before tax and delivery, and the agreed deposit is $1,200. On a non-Plus rehearsal, use the Admin deposit-order route before placement. On Plus, rehearse the native route your team has chosen. Tax and delivery must be accounted for separately; these round figures only make the deposit arithmetic easy to inspect.
- Create the quote with the agreed fabric, size, and leg finish. Read the saved configuration back against the sample vendor book.
- Send it to the team's test inbox. Open the quote and its signing link on a phone.
- Sign the agreed version. Return to the staff record and find the signature evidence.
- Complete the deposit using the chosen test payment arrangement. Check that paid-to-date and the balance match the transaction.
- Apply the store's placement review, including any requirements. Create a draft PO from the configured lines and compare the specification with the quote.
- Leave the PO unsent, record the rehearsal result, and resolve anything that required an unexplained workaround.
Use an isolated development or training store for a full rehearsal that must not touch live Shopify data. Sample names alone do not isolate a live store: activated templates, synchronized drafts, payments, notifications, and POs can have real effects. A live-store walkthrough needs a narrower, deliberately controlled scope. Decide that scope before the team begins.
Ask someone who missed the original demonstration to pick up the record. Can they find the agreed fabric, payment, next task, and draft PO? That handoff is a better readiness test than the setup owner's ability to repeat their own steps.
What can wait until the basic sale works
Later setup should follow your store's immediate obligations. Warranty configuration can be a later workstream when it is not part of the first sales, but settle coverage before promising it or selling an extended plan. The first warranty defaults guide explains the choices.
QuickBooks Online purchasing and stock-cost integration also deserves a separate, deliberate exercise with the person responsible for accounting. Keep your established bookkeeping process in place until the QuickBooks connection and mappings have been rehearsed. A connection is not a substitute for agreeing where each transaction belongs.
Detailed commission rules and portal styling can follow once the core sale is understood, provided the team already has an agreed way to track credit and answer customers. A later workstream still needs an owner and a date to revisit it; otherwise “week two” becomes a very long season.
Existing open special orders need their own cutover plan. They bring old deposits, signed terms, vendor commitments, and partly completed deliveries with them. Follow the open-order migration guide before recreating those obligations.
For a stuck setting, begin with search, then use the Academy for the specific procedure. Sidekick can help start supported work, including a prefilled quote that staff review and save. The help guide explains which route suits which question.
A printable first-week checklist
- Day one: assign brands and locations; review contact details and receipt terms; agree staff roles and location access; test a sales login.
- Day two: build a representative sample template; inspect prices, costs, choices, and rules; validate the broader catalog import before applying it.
- Day three: review customer and vendor documents; settle numbering; configure the sender and notifications; open a test email and its links on a phone.
- Day four: draft and test the status map; agree signature and payment requirements; name the people responsible for approvals and exceptions.
- Day five: rehearse the POS quote and website request; follow the sample sale through signing, a controlled test deposit, and an unsent draft PO.
- Before live use: close the rehearsal issues, explain the handoffs to the team, and give deferred work a named owner.
Start with the brands and locations on your paperwork. Once the store identity is right, the rest of the first sale has a sound place to begin.
Sources
- Migrate your retail store — Shopify Help Center.
The first useful test is whether someone else can pick up the sale without repeating the showroom conversation.