Adding the options block and quote cart to your Shopify theme
Let shoppers choose the furniture they want and send the configuration to your team, using product pages that still look like your store.
The OrderPilot team·

Consider a sectional that would sell for $6,800 in a customer's chosen configuration. Its product page says “Call for price.” At 11 p.m., the shopper cannot do much with that instruction. The fabric and arm style remain in her head, and your team has nothing to answer in the morning.
OrderPilot's options block and quote cart give that visit a next step. The shopper chooses the piece inside your theme and sends a request containing those choices. Start with a representative product, preview the whole journey, and follow the request into the shared Inbox before opening it to customers.
Choose the online job for each product
A product's online mode should match what the store is ready to offer. A piece you want customers to explore needs a different path from one you are ready to quote.
| Mode | The job it serves |
|---|---|
| Not online | Keep the template out of the online selling experience |
| Explore only | Let the shopper examine the offered configuration choices |
| Request a quote | Collect the shopper's choices for staff review and a quote |
Configured-product checkout through the normal Shopify store cart is not available in the current OrderPilot setup. Use Request a quote for this workflow, so the product page, button, and customer expectation agree. Your team receives the configuration and can continue the sale from that request.
The browse, quote, or buy guide explains the commercial decision behind the modes. If your future plan includes direct purchase, first settle which products can be sold without a staff check, how the selling price is determined, and what delivery information is needed. Have the team confirm a supported checkout route before changing the customer promise; a mode label alone does not establish a working checkout.
This belongs in the first-week setup plan after the representative catalog and customer messages are ready. The online page can only ask useful questions when the template contains useful choices.
Add each block where its job is clear
The options block belongs inside the theme's product section, near the product information and next action. It draws the template's choices there; OrderPilot does not replace your whole product page.
Shopify explains that app blocks can be added, previewed, moved, and customized in the theme editor. Begin on a duplicate, unpublished theme so the team can inspect the arrangement before publishing it. A preview is a place to test the storefront layout, not a separate store database. Give the shopper a clear progression. They should see the piece, understand the available choices, and recognize the action that adds it to their quote. Avoid placing the option selector beneath unrelated promotional sections or leaving two competing buttons that imply different outcomes.
| Theme element | What the shopper needs from it |
|---|---|
| Options block | Choose the size, upholstery, finish, and other offered details |
| Add to Quote | Put the selected piece into the request being assembled |
| Quote cart drawer | Review those pieces and their configurations |
| Quote cart badge | Find the assembled request again while browsing |
| Template catalog | Browse the templates you present through that catalog block |
Test the supported block arrangement with your actual theme. Existing customizations, drawers, or quick-view features can affect the experience. “It uses theme blocks” is not a promise that every possible customized theme needs no review. Keep the current published theme available while the revised version is checked.
Make the choices understandable without an associate beside them
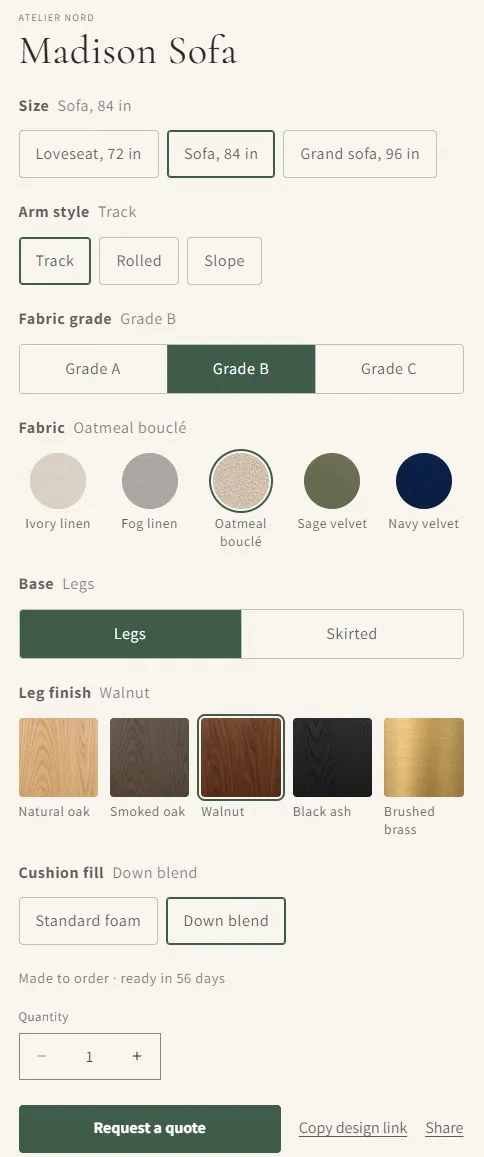
The Online options page lets you arrange each template's options and choose how they appear. Put the important decisions in the order a customer can make them, with labels that match the product description and swatches.
For an illustrative Madison sofa, begin with size, then the offered fabrics and leg finishes. Use swatches where the image helps and clear text where the decision needs a name or measurement. Required choices should be recognizable, and combinations the maker cannot produce should not appear as attractive dead ends. Keep staff-only details out of the shopper's selection. An internal vendor code may help purchasing, but it does not necessarily help someone choose a sofa. “Select purchasing code” is an unusually efficient way to make a showroom appointment sound appealing.
Review both the labels and the images. A dark finish swatch with an unexplained abbreviation can look identical to the next one on a phone. The customer needs enough distinction to make a considered choice, and staff need the selected value to be unambiguous when the request arrives.
If you show lead time, enable it deliberately in the template's online options and explain what the estimate means in the surrounding customer communication. Review a slower fabric as well as the default choice. An attractive default is only one route through the configurator.
Decide which products may enter the quote cart
Quote eligibility rules let the store include or exclude products by tag, category, or collection. Set those rules in Settings › Online store › Quote eligibility, together with the sign-in choice for requests. Test a product on each side of the boundary. A stock accessory offered for purchase should not accidentally lose its intended shopping path because it shares a broad collection with custom upholstery. A product excluded from quoting should not acquire a misleading Add to Quote action elsewhere in the theme.
Price-restricted vendors need a review of what the customer can actually see. Use quote-only presentation where the store has decided the price should be provided in its response, and read the vendor's own policy before choosing that arrangement. Hiding a price is not, by itself, a ruling on the vendor agreement. The price-visibility guide covers the operational choices.
Keep the first rules understandable to the person maintaining the catalog. A rule based on a tag only remains useful if new products receive that tag consistently. Include a recently added product in the next review rather than testing the original sample forever.
Let the customer assemble the whole request
The quote cart can contain configured pieces and regular Shopify products together. That lets a shopper ask about a sofa and the lamp beside it without sending separate messages that staff later have to join.
For a worked example, add the Madison sofa in a selected fabric and a regular table lamp. Open the drawer and read both lines. Change a quantity, remove the lamp, and add it again. The customer should be able to explain the assembled request from what the cart shows.
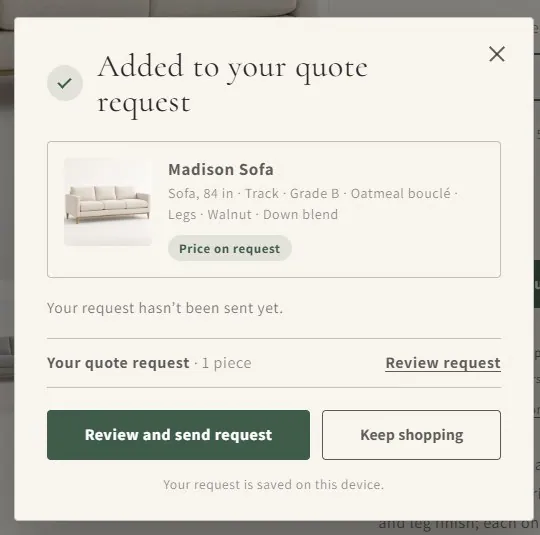
A quote cart is a request-building tool. Make the submission wording clear about what happens next and who will answer. The customer should not mistake a request confirmation for payment, a placed vendor order, or a confirmed delivery date.
Shoppers can also copy or share a design link with a partner. The link reopens the choices at current prices; the store receives no saved-design record until a request is submitted. Test the link on another device and let the actual quote request be the point where staff take ownership of the conversation.
Match the request pages to the store
Customer page styles help the request and confirmation pages feel connected to the theme. Review fonts, backgrounds, corners, buttons, and confirmation wording together, using the available previews.
Keep the functional message easy to find. The Request sent page should reassure the shopper that the request was received and describe the next step your store can actually deliver. Avoid promising a response window your team has not agreed to support. The customer-page styling guide covers the details. Here, concentrate on continuity: the product page, request form, confirmation, and email should identify the same store and describe the same action.
Follow a request into the shared Inbox
The end-to-end test finishes when a staff member can answer the request with its configuration intact. A successful animation or drawer opening is only an earlier checkpoint.
- Choose a sample product and complete its required options.
- Add a regular product and review the mixed quote cart.
- Submit the request using team-controlled contact details.
- Read the Request sent page and acknowledgment email on a phone.
- Find the request in the shared Inbox and compare the selected options and quantities.
- Assign the conversation to the person who will review pricing and answer the customer.
Repeat the test with a missing required choice, an excluded product, and the store's chosen sign-in rule. Inspect the mobile layout for cut-off labels and awkward option selectors, not just whether the request submits.
Publish when both sides are ready: the shopper can describe the purchase, and staff know where it arrives and who answers it. Then use the quote-cart explainer to give the showroom team the same language customers see online.
Sources
- Extend your theme with apps — Shopify Help Center.
The end-to-end test finishes when a staff member can answer the request with its configuration intact.