Mapping your store's process into OrderPilot statuses on day one
Agree what each stage means, who owns it, and what moves it forward. Then build a small status map the team can test before using it.
The OrderPilot team·

Ask three people what “Ordered” means. The salesperson means the customer signed. The buyer means the PO went out. The warehouse means it is still waiting for the furniture. Everyone is describing a real event, but the shared label does not tell the next person which one happened.
Write those events down before opening the status editor. Give each useful stage an owner, a clear entry condition, and a next action. Then translate the process into OrderPilot's staff statuses, simpler customer-facing groups, and a small set of tested connections.
Start with an order the team already understands
The first map should describe a real route through your store. Choose a representative special order and ask the people handling it to describe what happens, in their own words.
For an illustrative sofa order, the conversation might run from quote to signature, deposit, vendor PO, acknowledgment, production, receiving inspection, delivery readiness, and handover. That is a worksheet of events to understand, not a proposed list of app defaults or an instruction to create a status for every event.
Ask a practical question at each point: what can the next person do now that they could not do before? A signed specification lets purchasing know what the customer agreed to. A vendor acknowledgment gives the buyer a commitment to compare with the PO. A receiving inspection tells delivery which pieces are actually ready.
Write the unresolved steps down too. If a fabric is backordered, who speaks to the vendor, who updates the customer, and what is the order waiting for? The exceptions reveal whether the map represents work or merely describes a pleasant version of it.
This is part of the first-week setup plan. For a broader exercise, documenting how the store works helps preserve the judgments that otherwise live with one experienced person.
Add a status only when it changes the work
There is no useful universal target for the number of statuses. Keep a stage when it identifies a responsibility, a meaningful wait, or a decision that staff need to find. Combine stages that leave everyone doing exactly the same thing.
“Awaiting vendor acknowledgment” can be useful because it gives the buyer something specific to chase. “Nearly acknowledged” usually asks the same person to do the same work. The map is not a tasting menu; another course needs a reason.
Separate evidence from labels. A payment entry, a signed document, and a receipt already record events. Your status should help staff act on them, rather than creating another place where somebody must manually repeat the fact.
Use plain descriptions that the newest employee can understand. If “Checked” means “the receiver opened the packaging and accepted the piece,” write that down. Otherwise, one person will use it for reading the acknowledgment and another for walking past the crate.
Group detailed staff work into clear customer progress
Customers see the public group, while the staff statuses carry the operational detail. In Settings › Quotes & orders › Statuses, place the internal steps under the customer-facing stage that accurately describes the order's progress. For example, a vendor-confirmation step and a production-follow-up step could sit within a customer group describing production. A receiving inspection needs a group that matches what the customer should understand at that moment; furniture at your warehouse is not automatically ready for delivery.
Built-in system statuses retain their names. You can name and rename your custom statuses and customer-facing groups, and adjust the supported display details on built-ins. Build the store's vocabulary around those controls instead of planning to rename every system step.
Review public and private statuses with the person writing customer messages. A useful public group answers “where are we in my purchase?” without exposing an internal phrase that needs a phone call to explain it.
Begin with a few connections you can explain aloud
A connection describes what moves the order from one stage to another. Write each proposed move as “When,” “Only if,” and “Then,” and decide whether it should happen automatically or wait for staff.
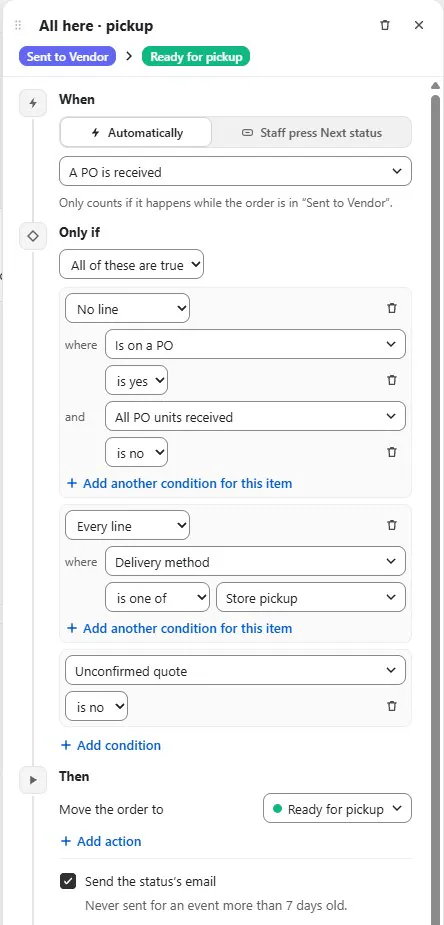
For a first rehearsal, consider the following four event families. These are proposed process questions, not claims that every install already contains the connections or that every event has the same meaning in every store.
| Event | Question to settle before the move | Likely owner of the decision |
|---|---|---|
| Customer signs | Does this establish only agreement, or are other placement requirements still outstanding? | Sales or the approving manager |
| Payment arrives | Is this the amount and payment state the next step actually requires? | Sales or finance |
| PO is sent | Does the stage mean sent, or does it require vendor acknowledgment? | Purchasing |
| Goods are received | Are all required pieces accepted, or is the receipt partial or damaged? | Receiving |
Use automatic connections where the recorded event establishes the intended next step. Use a staff-pressed connection where a person must inspect or judge something. The automatic-connections guide explains the supported events in more detail.
Deposit setup needs special care. OrderPilot's separate deposit orders work on any Shopify plan, but the native minimum-deposit requirement depends on Shopify Plus. A payment event should not be treated as proof that every signature or placement requirement is satisfied. Test the deposit route your store actually uses before relying on its connection.
Test a partial sofa order, not only the easiest sale
The draft map should be tested against a representative order before publication. Choose sample records that exercise the conditions you expect staff to encounter. For a worked example, say a customer orders a sofa and an ottoman. The vendor ships the sofa first, and receiving accepts it while the ottoman remains outstanding. A move that tells the customer the whole purchase is ready would be misleading. Test which recorded quantities and conditions the map uses, and keep a manual readiness decision where the intended outcome needs judgment.
Now imagine the sofa arrives with damage. Received, accepted, and ready for customer delivery are not interchangeable descriptions. The team should be able to explain which record captures the issue and what must happen before a ready-stage message goes out.
Run an unpaid or unsigned example as well. The point of the rehearsal is to discover a move that becomes available too early, or a move that waits for something your process never records. Correct the draft before training staff to depend on it.
Use Next status to show the immediate job
The order page's Next status control shows the available moves and what a waiting move still needs. It turns the map into something useful to the person handling an order rather than leaving it as a diagram in settings. During training, have a salesperson read the waiting reason and explain the next action. Then ask receiving to do the same on its sample order. If the reason makes sense only to the person who built the map, improve the stage description or the underlying process.
The activity history records moves and what triggered them. Use that history when an order is somewhere unexpected. It gives the team a starting point for understanding whether the move came from a recorded event or a staff action.
Change the map through a reviewed draft
You can revise the map later using drafts, tests, publication, and stored versions. That gives the store a controlled way to improve its process; it is not a promise that every edit is harmless to every open order.
Before publishing a revision, test representative open records at the stages being changed. Include a partial receipt, an order waiting for a signature, and any special exception the revision affects. Tell staff what their next available move will mean after the change.
Keep a named workflow owner and a backup with permission to edit the map. Sales, purchasing, and receiving should contribute the process decisions, but every person does not need publishing authority. A shared process benefits from broad input and a clear final editor.
If a revision needs to be reversed, use the supported version tools and review the affected orders. Restoring a map version is a configuration action, not an undo button for emails already sent or operational work already completed. The full status-map guide covers managing the map beyond day one.
Send messages at moments customers understand
Status-triggered emails should explain a meaningful change in the customer's purchase. Decide which stages need a message and which are purely internal, then read the proposed email alongside the public group.
With SMS configured, OrderPilot can send fixed text templates at selected statuses. Choose the supported message that fits; it is not a one-off texting composer. For either channel, test what happens during a partial order and a staff correction so the customer does not receive a confident update before the furniture is ready.
Name who handles questions generated by each message. A production update can prompt a fabric-change request; a readiness message can reveal an access problem at the customer's home. The public stage should lead into an owned conversation when the customer replies.
Complete the day-one worksheet
Use one row for each stage worth keeping. The examples below are labels and responsibilities to adapt, not a default installation map.
| Step | Owner | Signal needed to move on | Customer group | Message decision |
|---|---|---|---|---|
| Specification review | Sales | Customer choices settled | Quote | Explain the next approval |
| Placement review | Authorized approver | Required agreement and payment checks | Confirmed | Send when the purchase is actually confirmed |
| Vendor follow-up | Buyer | Acknowledgment reviewed | In production | Update only on meaningful progress |
| Receiving inspection | Receiver | Required goods accepted and issues resolved | Appropriate arrival stage | Avoid claiming the whole order is ready too soon |
| Delivery readiness | Delivery coordinator | Pieces and arrangements ready | Ready | Explain the customer's next step |
| Handover | Delivery or pickup staff | Actual delivery or collection recorded | Complete for the relevant progress | Confirm the handover accurately |
Agree the meanings, build the draft, and run the sample records through it. Then continue with the status-map guide to turn the first working map into a process the whole store can use.
A useful status changes what someone can do next.