Add freight, duty and other costs to a purchase order
Related guides
- How landed cost and cost layers workInventory and costs · 4 min
- Correct costs after goods arriveInventory and costs · 4 min
- Keep Shopify costs right and read your marginsInventory and costs · 5 min
- Receive a deliveryPurchasing · 5 min
- Send vendor payments, cost of goods and POs to QuickBooksSettings and integrations · 5 min
Add freight, duty and other charges to a purchase order so each received unit carries its share of the cost. Review those charges on the final receipt, then close costs when the PO is settled.
A PO charge covers its chosen goods across deliveries. A receipt charge covers the units in that particular delivery.
Before you start
Can you enter charges?
You need Enter costs and charges. Finalizing or reopening also needs Finalize and reopen purchase orders.
Are vendor costs recorded?
A value-based split needs the cost of the goods it covers.
Is the PO open?
Reopen a finalized PO before changing charges.
Which currency applies?
Enter charges in the shop's currency and check the currency shown beside Amount.
How landed cost works explains allocation and cost layers. This guide follows the charge-entry and review screens.
Add a charge to the PO
Step 1: Open Add charge
In the PO's Charges card, click Add charge. Add charge to opens with the PO number.
The action is hidden on finalized POs and for roles that cannot enter charges.
Step 2: Enter the type and amount
Choose Type: Inbound shipping, Duty/import charge, Brokerage, Insurance, Handling, Tariff or Other charge.
Enter the amount and choose whether This amount is Estimated or Final. New charges start as Estimated.
Add a description and Reference, such as an invoice or waybill number. The charge is now identifiable when you review its allocation.
Step 3: Choose what the charge covers
Under Applies to, choose Whole purchase order or Specific items or options.
For a targeted charge, tick every item or option it covers. A charge on a fabric option changes that option's cost, leaving the rest of the sofa unchanged.
Review the target count before choosing the split method.
Step 4: Choose the allocation method
Choose By value, By quantity or Manual. The window opens on By value.
By weight is unavailable because PO unit weights are not recorded. For Manual, use Review manual split, make the shares add up and choose Confirm this manual split.
A missing vendor cost prevents a value-based split. Set the cost or choose an appropriate alternative.
Step 5: Review the preview and add
The preview appears once you enter an amount. Check Units, Allocated and Landed / unit. The breakdown names each charge, including its reference or description where types repeat.
The footer separates the amount posting to an existing receipt from the amount waiting for another delivery. Click the Add charge button showing the amount.
The Charges card now shows its Estimated or Final badge and allocation.
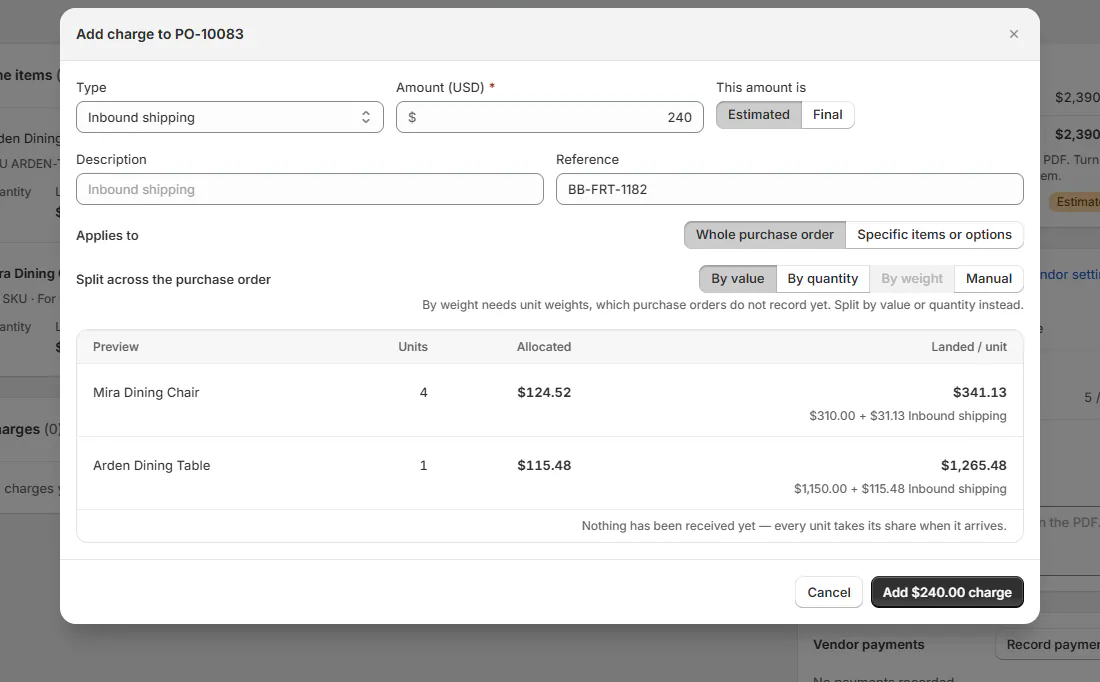
The preview shows each item's share before the charge is saved. Step 6: Update the charge when invoiced
When the invoice arrives, click Edit on the charge. Correct the amount if needed, choose Final, then click Save charge.
To remove it, use Remove charge and read Remove — are you sure? before confirming.
Changing a whole-PO charge after goods arrived records the difference against earlier receipts. Use cost corrections when the vendor cost itself is wrong.
Record charges during receiving
Step 1: Check the goods cost
On the receiving page, enter Vendor cost per Unit or as the invoice Total for the arriving quantity.
The other amount is calculated. Without Enter costs and charges, the field is unavailable and the PO price is used.
The helper shows template components only when they match the PO price. Otherwise, it identifies the PO price and the separate template cost.
Step 2: Add the delivery's charges
Under Additional charges on this receipt, click Add charge. Enter the type, reference, amount and Est. or Final state.
Choose all arriving lines, one line or an option. Receipt charges split by value over the units arriving in this receipt.
Enter quantities first. A charge cannot be allocated to a delivery with no covered units.
Step 3: Check the receipt summary
Review the Landed box and Receipt summary. They show goods, charges and the resulting landed amount.
Read the state: Final, Estimated or Cost missing. A missing vendor cost must be resolved before the total can be treated as complete.
Post the receipt when the quantities and costs match the delivery.
Step 4: Review charges on the final receipt
When the receipt accounts for the last units, Review PO charges before the final receipt opens if the PO has charges.
Keep each charge unless it no longer applies. Tick Cancel beside a charge only when it should be reversed.
Choose Keep charges and post receipt or Cancel charges and post receipt. Without charge-editing access, the review is read only and offers Post receipt.
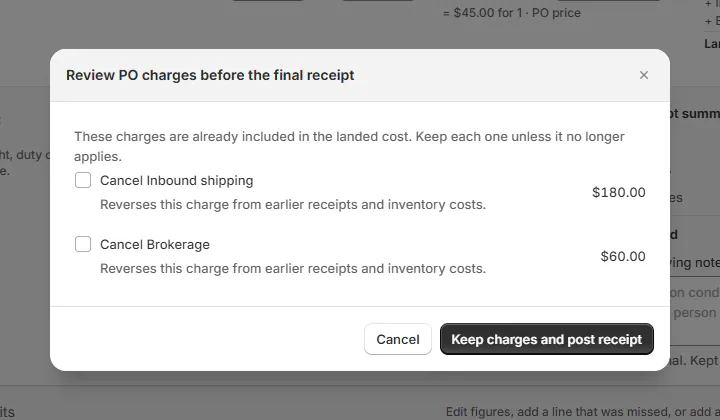
Keep applicable charges; cancel only those that no longer apply. Warning
Cancelling a charge in this review reverses it from earlier receipts and inventory costs. Check the invoice and existing receipts before confirming.
Screen reference
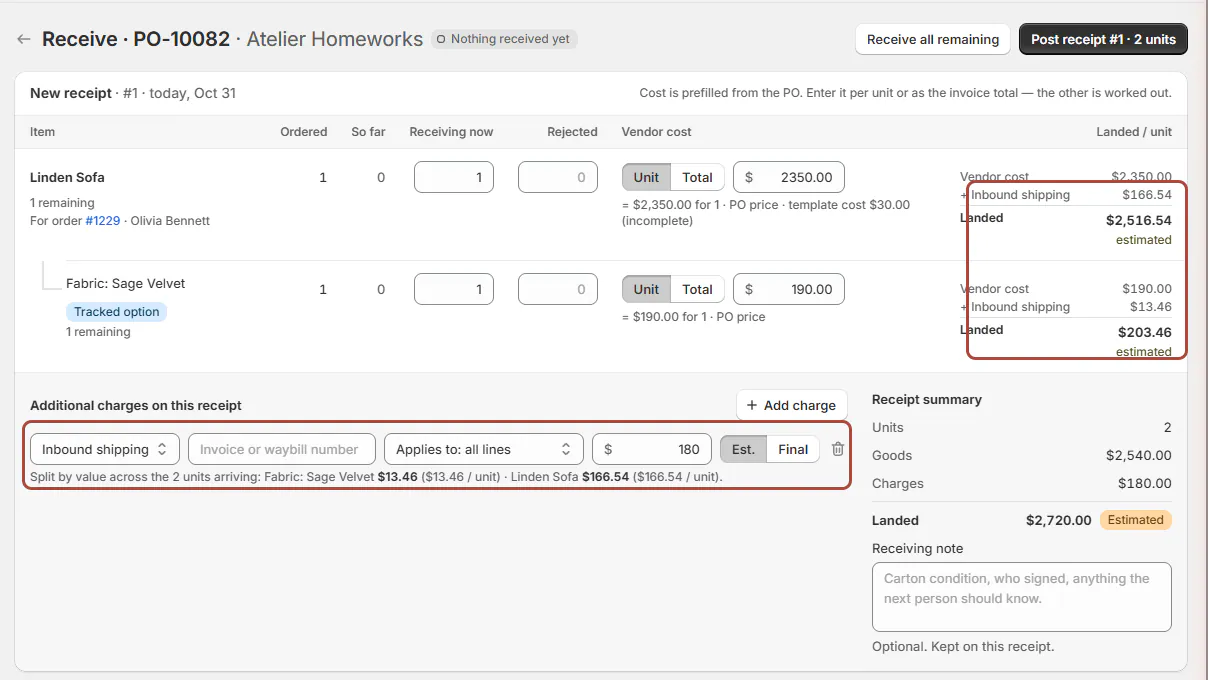
Finalize or reopen the PO
Step 1: Review costs before finalizing
After at least 1 receipt, check missing costs and estimated charges. Use Needs cost review to find unfinished cost work.
Edit confirmed charges to Final and fill missing vendor costs before closing the PO where possible.
Step 2: Finalize the purchase order
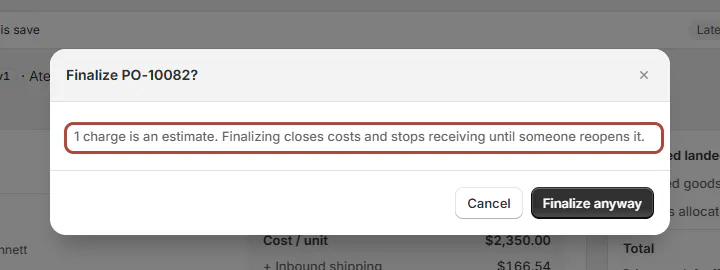
Click Finalize. If units are still outstanding or charges remain estimated, the confirmation describes them and offers Finalize anyway.
Read the effect before confirming: finalization closes costs and stops receiving until the PO is reopened.
The page then shows This purchase order is finalized.
Step 3: Reopen with a reason
Use Reopen to edit or Reopen in the PO menu. Enter Reason and confirm.
Charges, receipts and permitted line changes become editable again. Activity records the reopening reason.
What happens next
Landed costs reflect the saved allocations. Previously received costs change through recorded adjustments, preserving the receipt's history.
Finalization locks charges, receipts and line items; attachments remain available. With QuickBooks connected, it also closes the linked PO through accounting sync.
Example: freight on Priya's dining set
Example · Harlow & Finch Interiors
Confirm costs before closing purchasing
Jo Park manages Birch & Beam Woodworks PO-10003.
- Add estimated Inbound shipping across the dining table and chairs.
- Add Brokerage to the receipt for the chair delivery.
- Edit freight to Final when its invoice arrives.
- Keep the applicable charges on the last receipt.
- Finalize after reviewing the received goods and costs.
If something goes wrong
The split is blocked
Supply missing vendor costs or choose quantity; manual shares must equal the charge.
No target is selected
Tick an item or option, or choose Whole purchase order.
PO charges changed during receiving
Reload and review the current charges before posting the final receipt.
Finalize is unavailable
Receive goods first and check your permission and location coverage.
Reopening needs a reason
Enter why the closed costs must change.
Was this guide helpful?
Thanks. Tell us what was missing at support@meetorderpilot.com.