Group options into bundles
Related guides
- How the catalog fits togetherCatalog · 6 min
- Create options and valuesCatalog · 6 min
- Show or narrow options with rulesCatalog · 4 min
- Create a product templateCatalog · 6 min
- Manage product templatesCatalog · 5 min
A bundle is a reusable group of product options. It lets you manage the choices, their order and their rules together, then attach that group to several product templates.
Templates following a bundle pick up its shared changes, while individual templates can keep their own differences. Prices, costs and lead times set on a template remain that template’s own.
Here, a bundle groups options used to configure products. To add a set of products to a sale together, use a composition.
Before you start
Create the options
Start with options and values, such as Fabric, Leg finish and Monogram.
Check your access
You need Manage the catalog to create and change bundles.
Plan the order
Customers see options from top to bottom. A rule can depend only on an earlier option.
Archived options and order fields cannot join a bundle. Restore an archived product option first if it belongs in your current catalog.
Think about which templates should follow the same choices. A bundle is useful when a change should reach several products together.
Create the bundle
Step 1: Name the bundle
Go to SettingsProductsBundles and click Create bundle. Enter Name and an optional Description.
Use Upholstered seating for the example, then click Create. The bundle editor opens.
The name must be different from existing bundle names. Create stays greyed out until you enter it.
Step 2: Add options
Click Add option and tick Fabric, Leg finish and Monogram. Click Add selected with the selected count.
The options appear in the bundle, and the first one's Manage dialog opens so you can set it up. Every template following this bundle picks up the added options.
Step 3: Put options in order
Use each option's Move up or Move down control. Put Fabric first, followed by Leg finish and Monogram.
Each move saves straight away. The list now follows the order you want customers to see.
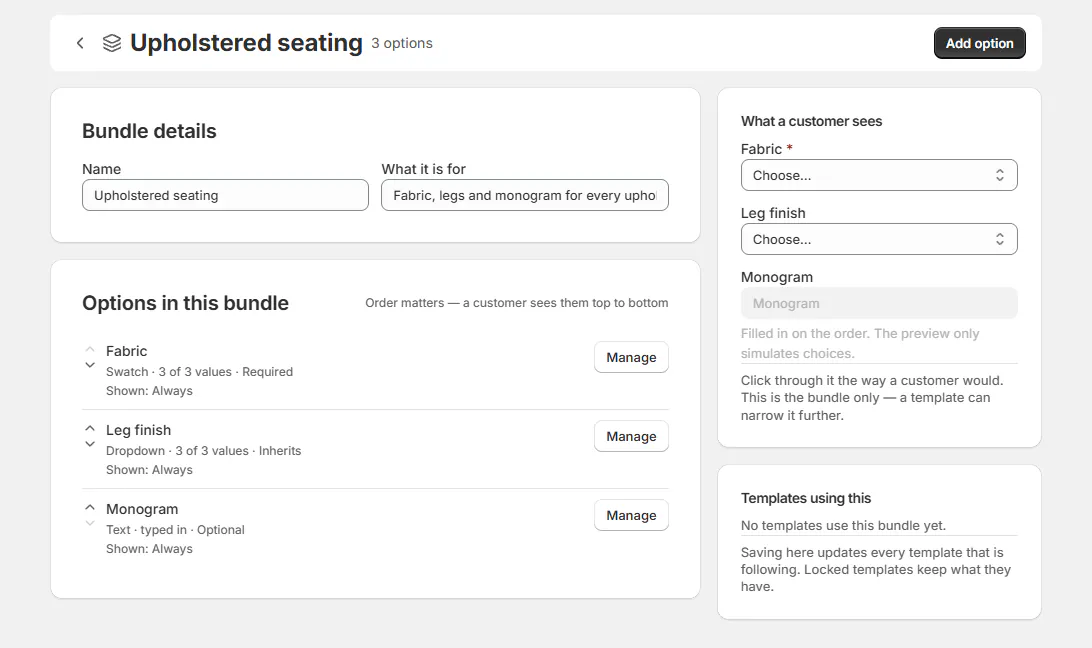
Bundle editor with three options and the What a customer sees preview Step 4: Check the preview
Use What a customer sees to try the choices from top to bottom. Check that the next choice makes sense after the previous one.
The preview shows this bundle only. A template can narrow its values further, so check the finished template as well.
Choose what each option does
Step 1: Set whether a choice is required
Click Manage on Fabric. Under When ordering, choose Required, Optional or Inherit.
Use Required when staff must select fabric. After Save changes, Option updated confirms it, the row reads Required and the preview marks Fabric with *.
Shown to customers as is read-only here. Change its label on the shared option page if every use needs the new wording.
Step 2: Choose the offered values
Under Values offered, click the value chips to offer or hide them. Keep the fabrics this bundle should provide.
Review the row summary, which shows the number offered. Never means no value is offered.
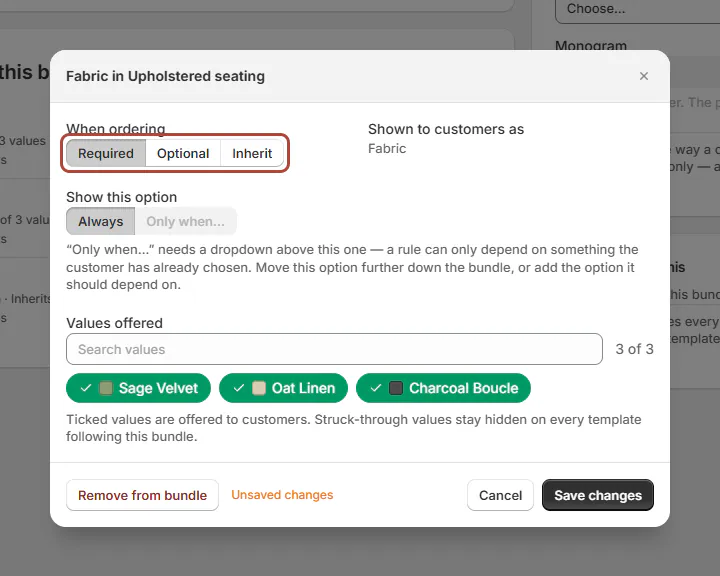
Manage dialog for Fabric: When ordering Required, Values offered chips, Show this option Always Step 3: Set any choice rules
Under Show this option, choose Always or Only when…. Use Narrow the values by another option when an earlier choice limits valid values.
Follow Option rules for the complete setup, then click Save changes. The preview reflects the saved conditions.
An earlier Dropdown must be available for dependent rules. Order the controlling choice above the option it controls.
What Inherit means
Inherit uses the option's own Required flag. The shared option page has no control for that flag, so choose Required or Optional when the requirement matters.
Remove an option or bundle
Step 1: Remove one option
In the bundle editor, click Manage on the option, then Remove from bundle. Read the impact for following templates.
Confirm when the affected templates and dependent rules match your intention. The option is removed from this bundle.
The confirmation also explains rules that stop narrowing when they depended on the removed option. Check those remaining choices before using the bundle again.
Step 2: Delete a whole bundle
Return to Bundles and open Actions > Delete bundle. Read what the following templates keep before confirming.
After confirmation, Bundle deleted appears. The shared options themselves remain in your store.
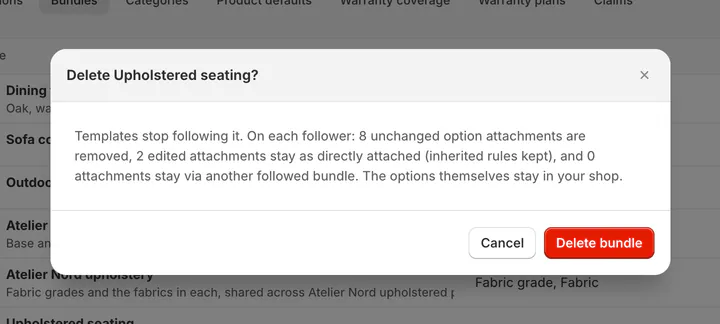
Delete bundle confirmation listing what followers keep Warning
Deleting a bundle removes unchanged option attachments from its followers. Edited attachments stay directly attached with inherited rules, and attachments supplied by another followed bundle remain.
What happens next
Attach the bundle while creating a template. Use Start from these bundles, or Add option or bundle > Bundles > Attach.
Templates read followed bundles live. A later bundle change can therefore affect several products without opening each template.
The Following column summarizes the relationship: No templates, All following or a count such as 1 changed.
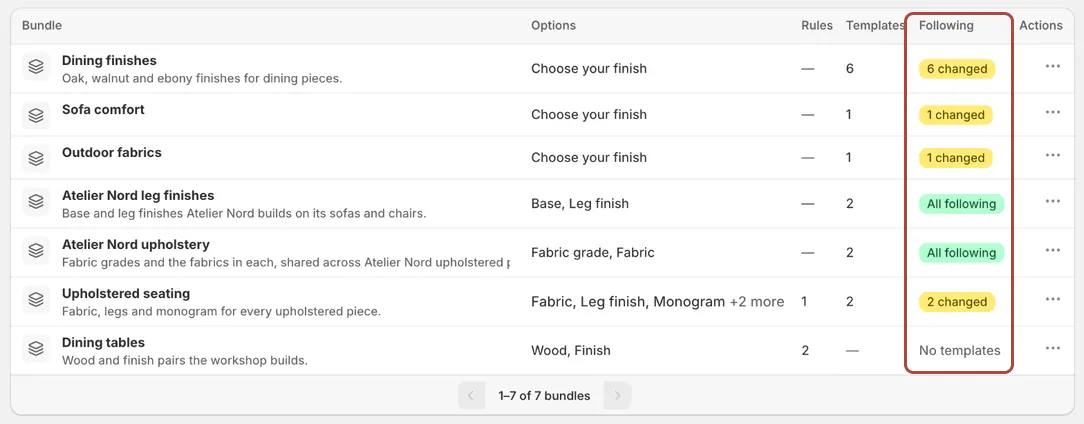
A changed count means some templates altered something the bundle gave them. It does not mean every option on those templates stopped following.
The template's Options card shows From bundles chips and Changed or Locked badges. Its summary identifies how many options changed there.
For exceptions and controls that keep a template's existing choices, read Manage product templates.
Example: shared seating options
Example · Harlow & Finch Interiors
Reuse Upholstered seating
Nora Ellis sets up shared choices at Harlow & Finch Interiors.
- Create Upholstered seating with Fabric, Leg finish and Monogram.
- Set Fabric to Required and Monogram to Optional.
- Attach the bundle to Linden Sofa and Mira Dining Chair.
- Keep the chair's specific Leg finish choices with Keep what is here.
- Add Cushion style to the bundle later.
Both templates gain the new option, while the chair keeps its deliberate Leg finish difference.
The Following column reads 1 changed for this example. The template difference is recorded without losing the shared bundle relationship.
Important notes and tips
Review the customer preview after changing option order. A dependent rule needs its controlling option earlier in the bundle.
Do not use a bundle change to update template prices. Template-specific prices, costs and lead times remain untouched.
When a template's choices differ intentionally, keep that exception visible to the catalog team. Review it before assuming the bundle is broken.
If something goes wrong
The bundle name already exists
Choose another name or edit the existing bundle.
Create is greyed out
Enter a name first.
No options are added
Tick at least 1 option before choosing Add selected.
An option is missing from the list
Check whether it is archived or belongs to the whole order.
An option reads Never
Offer at least 1 of its values.
A template did not follow a change
Check whether that option was changed or held back on the template.
Only when… is greyed out
Put a suitable Dropdown above the dependent option.
Was this guide helpful?
Thanks. Tell us what was missing at support@meetorderpilot.com.