Import and export templates with a CSV
Related guides
- Manage product templatesCatalog · 5 min
- Create a product templateCatalog · 6 min
- How templates sync to Shopify productsCatalog · 5 min
- Set template locations, tax categories and servicesCatalog · 5 min
- Create options and valuesCatalog · 6 min
Export your templates, edit the catalog in a CSV, then check what will change before applying it. The report separates new records, updates, unchanged records and skipped rows.
Use an export for existing products. Start with the starter CSV when creating a new catalog.
Before you start
Understand the templates
Review Create a product template and Manage product templates.
Check permissions
Import needs Manage the catalog, plus selling-price, cost and vendor permissions when the file changes those records.
Use the right file
Save as CSV in UTF-8. The file can be up to 15 MB and 400,000 rows.
Import does not delete, archive, detach or change locks. It does not create categories, brands, locations or bundles, or change an existing template's handle.
Export the catalog
Step 1: Download the current layout
Open Products and click Export. The file downloads with your store and date in its name.
If you cannot view costs, use Export without costs. Base cost, Value cost and Cost override are omitted.

Products header with Import, Export and Add template With no templates, the starter CSV downloads. Above 500 templates, export is queued; Your export of N templates is ready provides Download.
Pins, locks and stock configurations are not carried. Images export as URLs, and Tax category contains the stored Shopify category ID.
Prepare the CSV
Step 1: Keep matching identifiers
Keep Handle in the header and on every row belonging to a template. Existing handles match existing templates.
Options and values match by name without regard to capitalization. Categories use slugs.
A title-only row without a handle creates a new template with a generated handle. It cannot take option rows, so use handles for configured products.
Step 2: Edit the intended columns
Keep only columns you intend to supply or change. Lists use a pipe character; monetary fields use 2 decimal places.
Yes/no fields also accept true/false, 1/0 and y/n. Use the export's wording when possible to avoid unnecessary changes.
Template column reference
| Area | Columns and rules |
|---|---|
| Template identity | Handle, Title, Status. New templates need a title; status is draft or active. |
| Pricing and description | Base price, Base cost, SKU prefix, Description. Blank base cost means unknown. |
| Organization | Categories, Vendors, Vendor display names, Offer all vendors, Bundles. Existing categories and bundles must already exist. |
| Availability | Visibility is All, Locations or Brand, with Locations or Brand supplied as needed. |
| Product rules | Warranty months, Serial required, Physical product, Additional terms. Zero warranty months excludes coverage. |
| Shopify category | Tax category takes a valid category ID; blank means none. |
| Images | Image URLs uses HTTPS links; the first is the thumbnail. |
A filled vendor list replaces that template's vendor selection. New vendor names can create active manual vendors without contact details; the report warns before applying.
Existing vendor records are not edited by the import. Vendor display names are used only when creating vendors.
Step 3: Define options and values
Use Option, Option label, Option type, Option required, Track stock and Option description for shared choices.
Supported types are Dropdown, Swatch, Number, Dimensions, Text and Text area. Existing types can change between Dropdown and Swatch through import.
Option and value reference
Option and value columns
Text choices use Placeholder and Max length. Number choices use Number min, Number max, Number step and Unit. Dimensions uses Dimension parts and a shared Unit; it cannot track stock or have a default size.
Use Option default for a starting selection and Exclude from SKU when needed. Values use Value, Value label, Swatch colour, Value price, Value cost, Value lead time (days) and Value position.
New shared values need rows without a template Handle. Template value rows refer to values already present or defined by those shared rows. Number, Dimensions and Text pricing belongs on the option's own row.
Step 4: Set template-specific differences
Use Sort order, Template required, Auto-offer new values, Offered values, Template default and Shown when for attached choices.
Per-value differences use Offered, Default, Price override, Cost override, Lead time override (days) and Value shown when.
A visibility rule can read
Frame = Wood | MetalorFrame = any. The controlling option must be a Dropdown or Swatch on the template.
Online store column reference
Online store columns
Template controls are Online store, Price line, Show lead time, Also offer Request a quote, Request a quote button and Copy design link text.
Shared options use Option look, Option values per row, Option shape, Option value names, Option shows prices and Class name. Values use Value description.
Template overrides use Template look, Template values per row, Template shape, Template value names, Template shows prices and Hide online.
These mirror online template settings and option appearance settings.
Step 5: Review blank-cell behavior
Omitting a column preserves its existing values. A present blank cell follows that column's rule when updates are enabled.
Blank description, cost, images, terms and override fields can clear existing values. Blank title, status, base price and SKU prefix keep their existing values.
Blank Value lead time (days) clears the duration; 0 means same day. Blank Offered values returns to inherited offering, rather than offering nothing.
Upload, check and apply
Step 1: Upload the file
Click Import and read How importing works. Choose your CSV.
Tick Update existing templates, options and values only when you intend to change existing records. It starts off every time the dialog opens.
Click Upload and check. The app checks the file without writing catalog changes.
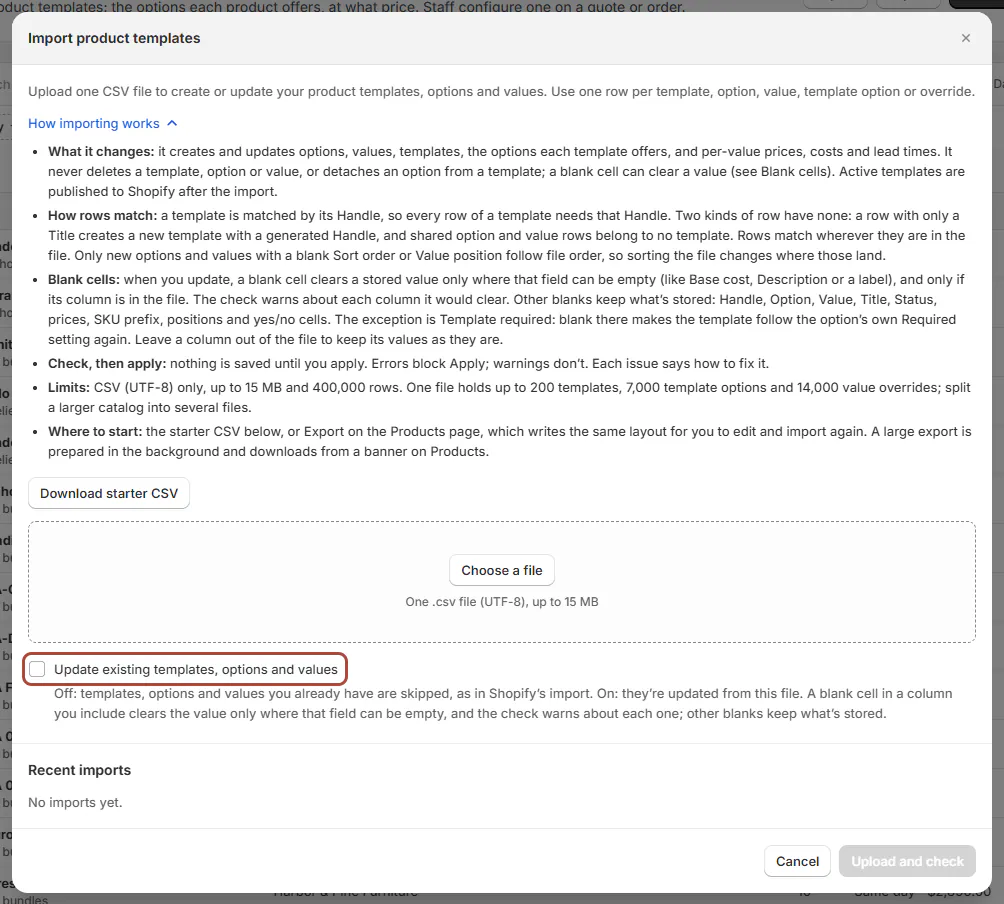
Import product templates with How importing works open and the Update existing checkbox Step 2: Review the report
Read What will be written and its Create, Update, Unchanged and Skipped counts.
Review Issues, including Row, Column, Severity, Message and How to fix. Use Download issues as CSV to work through corrections.
Nothing is written while the file has errors. Fix the file and upload it again.
Check blank-cell warnings
Warning
With updates enabled, a blank cell can clear an existing value. Read every blank-clear warning and remove the column when you want to preserve its current values.
Step 3: Apply the checked file
Click Apply import when the report matches your intention. Watch the progress through saving records, Publishing to Shopify and Finishing.
The run appears under Recent imports. Active templates publish after import; drafts stay drafts.
What happens next
Only Shopify Files image links reach the template's Shopify product. Other HTTPS images remain template links and are skipped by the Shopify media sync.
Tax-category IDs are checked against Shopify. If Shopify cannot be reached, the check fails instead of treating every ID as invalid.
A template's unchanged stored tax-category ID is retained on re-import. See Templates and Shopify products for publication behavior.
Per-file limits
A file can contain 200 templates, 2,000 options, 100,000 values, 7,000 template options, 14,000 value overrides and 1,000 new vendors. The issue list shows at most 500 issues.
Example: prepare dining templates
Example · Harlow & Finch Interiors
Add chairs and tables
Nora Ellis updates Harlow & Finch Interiors' catalog.
- Export the existing catalog and keep a copy.
- Add draft Mira Dining Chair and Arden Dining Table rows with handles and Birch & Beam Woodworks.
- Define shared Fabric and Leg finish choices.
- Check with updates off when only adding new records.
- Review skipped existing rows, then apply the intended additions.
For a later update run, remove an empty Description column if the report warns it would clear existing wording.
If something goes wrong
Existing rows were skipped
Enable updates only if those records should change.
A new copy appeared
A title-only row creates a new handle. Use the existing handle to match a template.
Nothing appeared in Shopify
Only active templates publish, after import finishes.
A Number option lost its price
Put Value price on the option's own row.
The file is refused
Save it as CSV UTF-8; an empty file cannot be imported.
The import did not finish
Review failed rows and their messages before uploading corrections.
A checked file expired
Upload and check it again before applying.
Was this guide helpful?
Thanks. Tell us what was missing at support@meetorderpilot.com.