Automate your workflow: events, conditions and actions
Related guides
- Connect statuses and add Next status buttonsStatuses and workflow · 5 min
- How the status map worksStatuses and workflow · 7 min
- Test, publish and restore the status mapStatuses and workflow · 5 min
- Set up your statuses and customer groupsStatuses and workflow · 6 min
- When an order’s status doesn’t do what you expectStatuses and workflow · 4 min
Move orders automatically when a milestone occurs, and add actions such as tags or staff alerts. Conditions keep a connection focused on the orders that need it.
Build and test the draft before publishing. The published map governs future checks; editing the draft does not change current orders.
Before you start
Learn the map
Read Connect statuses and How the status map works.
Check access
You need Manage order and quote settings.
Define the evidence
Decide which event or condition proves the order is ready for the destination.
A custom stage such as In Workshop needs its own outgoing connections. The app's purchasing connections do not automatically cover a status you add.
Set an automatic movement
Step 1: Choose the trigger
Open a connection and set When to Automatically. Choose When, such as The order is fully paid.
The panel shows the selected trigger and its explanation.
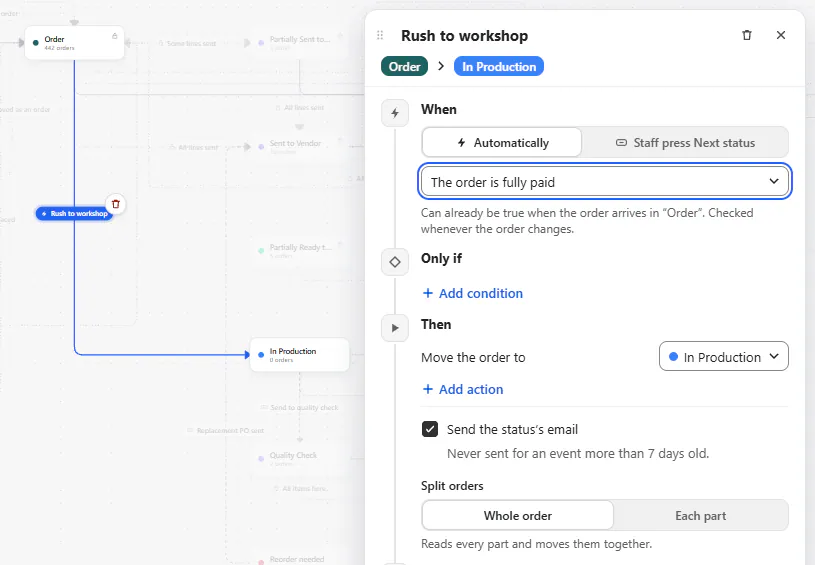
Connection panel set to Automatically with When The order is fully paid An event counts only when it occurs while the order is at the starting status. A while-true trigger can already hold when the order arrives.
Step 2: Set the destination
Under Then, choose Move the order to and confirm the destination. Review Send the status's email, then click Done.
The connection is saved to the draft. You can point it to an active built-in status such as Ready to Ship.
For Items are handed over, also choose How they left: Taken at the register, Collected in store or Delivered by staff.
Add conditions
Step 1: Choose how conditions combine
Under Only if, choose All of these are true or Any of these is true. Click Add condition.
The data picker opens with The order and Each line groups.
Step 2: Define the required facts
Choose the data and enter its required value. For line checks, select At least one line, Every line or No line.
Complete every condition and click Done. The connection now waits for both its trigger and its conditions.
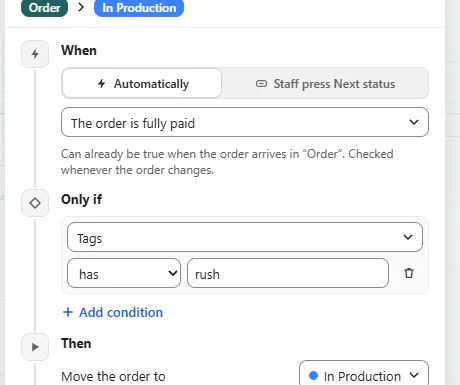
Only if with a Tags has rush condition under an automatic When Without conditions, the trigger alone can qualify. Use the smallest set of checks that proves the intended business state.
Add actions
Step 1: Choose the extra work
Under Then, click Add action. Choose the action and fill its required details.
Action What it does Add or remove an order tag Updates the order and syncs the tag change to Shopify. Add an activity note Records a staff-visible note. Email the customer Sends a selected template. Flag a replacement PO for rejected lines Adds a note; staff still prepare the replacement PO. Turn customer payment on Enables online payment from that point. Notify staff Emails the order's salespeople. Step 2: Choose whether the status moves
Keep the destination when the action accompanies a movement. Choose Runs without moving when only the actions should run.
Click Done. The draft records either a movement or work performed while the order stays where it is.
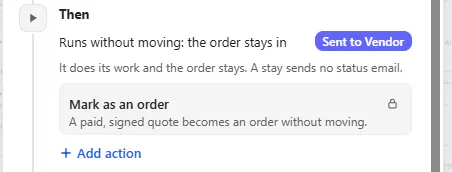
Then on a stay connection: Runs without moving, with the Mark as an order action A connection that stays does not send the status's email. A separate Email the customer action remains an explicit action to review.
Set connection priority
Step 1: Order matching connections
Open Priority and use Move up or Move down within the connection's section.
Review the list from top to bottom. The first connection whose trigger and conditions hold moves the order.
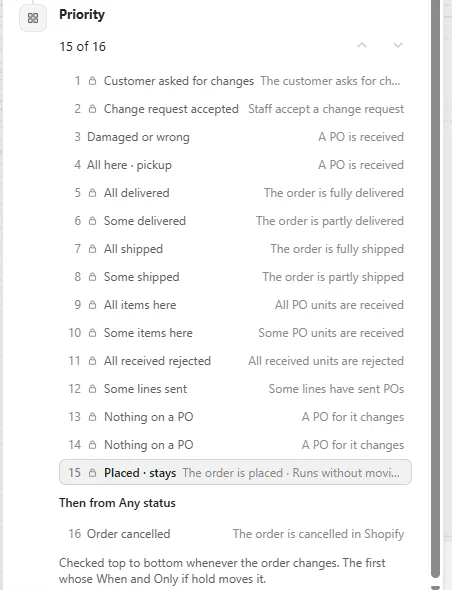
Priority section listing the connections out of Sent to Vendor, then from Any status The same order arranges staff buttons under Next status. Put the intended normal path before an alternative that could also qualify.
Step 2: Save and test the order
Click Done, then test the draft with an order that could match more than one connection.
The test shows which connection wins. Publish only when that result matches your intended sequence.
Where built-in decisions sit
The app's save, review, placement and own Any status decisions run first. The card's connections run in their listed order, followed by the app's stay-in-place connections. Your connections are primary; Show system connections reveals the app's backups.
What happens next
After publication, relevant changes cause orders to follow the new map. Each movement records Status changed from its old stage to the new one.
The Activity note ends with Connection: and the connection name. Use that evidence when checking whether a movement came from your rule.
Publishing alone does not move existing orders. Check N open orders now applies the map without emails.
Example: a workshop stage
Example · Harlow & Finch Interiors
Record confirmation, then wait for receiving
Nora Ellis prepares Harlow & Finch Interiors' workshop workflow.
- Add In Workshop in the In production group with the customer message Your piece is being made by hand.
- Draw a Vendor confirmed staff button from Sent to Vendor to In Workshop.
- Draw In Workshop to Ready to Ship with Automatically and All PO units are received.
- Test Olivia Bennett's Linden Sofa order from Atelier Homeworks.
- Publish the map after checking both movements.
Staff record the vendor call. Receiving the complete order then moves it to readiness.
For a separate payment workflow, connect Order to In Production when fully paid. For rush orders, use an order-placed connection conditioned on the rush tag.
That rush connection can notify staff without moving the order. Test it independently so it does not unexpectedly outrank the intended production move.
Important notes and tips
Warning
A loop of while-true connections can repeatedly move orders between stages. Publishing blocks it until you add a condition that stops the loop or wait for a new event.
Move emails are skipped for events older than 7 days, late syncs, register hand-overs, split delivery parts, online checkout orders and catch-up checks.
Review customer communication separately from movement logic. A successful status change does not prove a notification should have been sent.
If something goes wrong
An empty-condition warning appears
Complete every condition or remove the unused one.
Pick when this connection runs appears
Choose the trigger before saving.
The order did not move
Check publication, the current starting status and whether a relevant change occurred.
Another connection won
Review priority and overlapping conditions in the test panel.
The movement sent no email
Check Status problems for notification settings and suppression reasons.
Was this guide helpful?
Thanks. Tell us what was missing at support@meetorderpilot.com.