Set coverage exceptions for options and products
Related guides
- Set up warranty coverageWarranty and service · 5 min
- How warranty coverage worksWarranty and service · 5 min
- Check and change warranty on an orderWarranty and service · 5 min
- Create and sell extended warranty plansWarranty and service · 4 min
- Require and record serial numbersWarranty and service · 4 min
Give an option a different term from its product, protect a template exception from order-level changes, or set a regular Shopify product's warranty.
Use exceptions for a real difference in coverage, such as excluded fabric or a mechanism with a longer term.
Before you start
Set a base warranty
Follow Set up warranty coverage before adding option coverage.
Check permissions
Option coverage and Shopify-product terms need Manage shop settings. Template exceptions and locks need Manage the catalog.
Open Shopify admin
The Shopify product picker works only inside Shopify admin.
Give an option different coverage
Step 1: Open option coverage
Go to SettingsProductsWarranty coverage. Under Option coverage, choose Manage options. The page shows existing exceptions.
Step 2: Add the option exception
Click Add an exception, choose Apply to, and find the option with Search options. The new exception starts at 12 months.
Step 3: Set the option's term
Edit the months, using 0 to exclude the option. The row shows the resulting rule. Remove exception returns that option to the remaining applicable coverage rules.
Warning
An extended plan doesn't remove an exclusion
An excluded option remains excluded from an extended plan unless an authorized order change lifts the exclusion. Check the order's warranty before promising coverage.
If every option already has an exception at that level, edit the existing rows. Archiving an option changes its exception into named whole-product coverage; review that consequence before reorganizing options.
Add an exception on a template and lock it
Step 1: Open template terms
Open the template's Before an order is placed area, then Warranty, Edit, and Edit terms. The template warranty dialog opens.
Step 2: Save the exception
Click Add an exception, choose Option, and click Add exception. Set the term and save it. A new exception must be saved before it can be locked.
Step 3: Lock the saved option
Open the exception's row menu and choose Lock this option. The help reads Prevent changes on orders. Save the change and check the locked term.
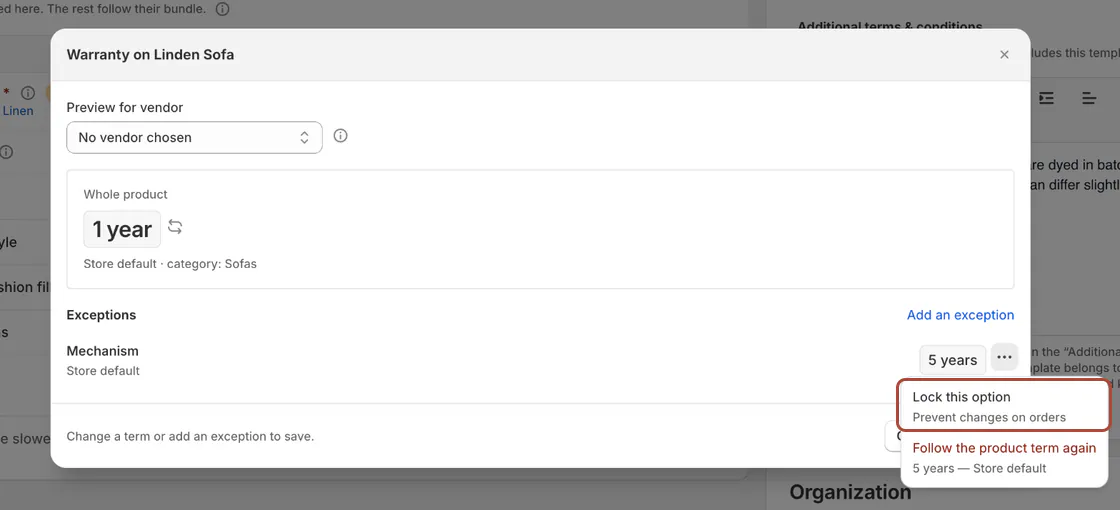
Warranty on Linden Sofa dialog with the Mechanism row menu showing Lock this option. An order line then explains that the option's coverage is locked on the product template. Unlock allows order changes again. Follow the product term again removes the separate option term.
The template options table also includes a Warranty column and Edit warranty. Use that entry when reviewing coverage alongside the option itself.
Set warranty on a Shopify product
Step 1: Choose the catalog product
From Warranty coverage, open By product. Under Catalog products, click Add a product and choose it in the Shopify picker.
The separate Product templates card directs you to edit a template's warranty on the template. Don't add its catalog counterpart as a substitute for that template rule.
Step 2: Choose the coverage
Choose Use warranty rules, Custom warranty period, or Excluded. For a custom period, enter the amount and choose years or months.
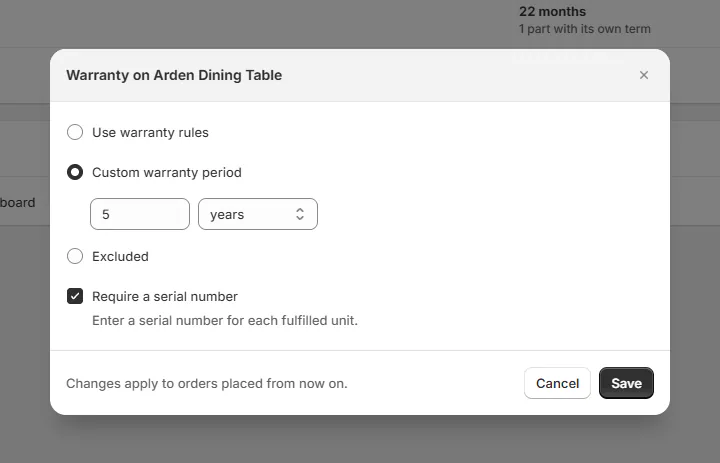
Warranty on Arden Dining Table dialog with Custom warranty period 5 years. Enter a whole number of at least 1 for a custom term. The longest term is 100 years. Use Excluded for no coverage instead of an invalid positive term.
Step 3: Save the product term
Tick Require a serial number if needed, then save. The dialog notes that changes apply to orders placed from now on. Term saved confirms the result. See serial numbers for recording each unit.
Change or remove a Shopify product's term
Step 1: Open the product row
In By product, open the row menu and choose Edit to change its term. The existing settings open for review.
Step 2: Return to the general rules
Choose Remove when the product should use your warranty rules again. Term removed confirms that the product-specific term is gone.
This doesn't rewrite existing sales. Older Shopify product lines sold before they carried warranty aren't backfilled.
What happens next
New lines use the resolved exception or product term. Review warranty on an order shows the source, while Check a product previews template exceptions.
A locked option remains protected even when staff can otherwise override an order's warranty. Review locks when deciding who should be able to make a sales exception.
Example: fabric, mechanism, and table
Example · Harlow & Finch Interiors
Keep three coverage decisions distinct
Nora Ellis sets Harlow & Finch's exceptions.
- She excludes Fabric through Option coverage.
- She gives the Linden Sofa's Mechanism 60 months.
- She saves and locks that template exception.
- She gives the catalog Arden Dining Table a 5-year custom term.
- She requires a serial number for each table unit.
Olivia Bennett's order cannot change the locked Mechanism term. A plan sold with the sofa still doesn't cover Fabric while its exclusion remains.
If something goes wrong
Set a product warranty first appears
Add a default, vendor, category, or product warranty before option coverage.
Add an exception is unavailable
The template has no options, or all options already have terms. Read the displayed reason.
The Shopify picker doesn't open
Open the app inside Shopify admin.
A sold Shopify line has no coverage
Check when it was sold; earlier lines aren't backfilled by a new product rule.
Was this guide helpful?
Thanks. Tell us what was missing at support@meetorderpilot.com.