Send a purchase order to your vendor
Related guides
- Create purchase orders in the PO WorkbenchPurchasing · 6 min
- Edit or cancel a purchase orderPurchasing · 6 min
- Talk to vendors and record what you pay themPurchasing · 5 min
- How purchase orders workPurchasing · 5 min
- Set up vendorsCatalog · 5 min
Send a draft purchase order and its PDF to your vendor, or record that you sent it another way. Check the delivery address and price visibility before the vendor receives their copy.
Before you start
Is the draft ready?
Create the PO, check its lines and meet any enforced vendor minimum.
Is the vendor's email saved?
Check Email Address in vendor settings.
Is email ready?
Complete sending-domain setup before emailing through OrderPilot.
Can you send?
You need Send and cancel purchase orders. Without View costs, recipient choices and downloaded prices are restricted.
If you already sent the PO outside OrderPilot, use the mark-as-sent choice. Recording that fact does not email the vendor.
Check delivery and prices
Step 1: Review where goods will arrive
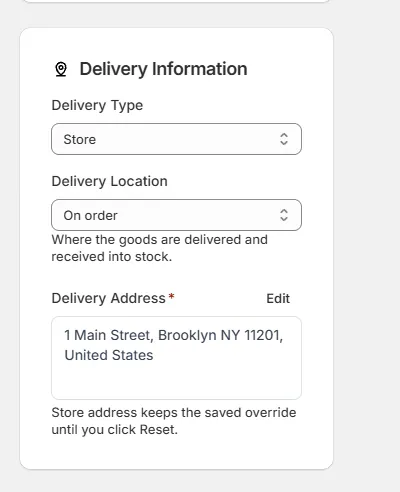
Open the draft's Edit page and check Delivery Type, Delivery Location and Delivery Address.
The workbench creates Store delivery. Customer or Dropship is offered only where the active items belong to one customer and the required shipping details exist.
Standalone POs must use store delivery. Physical receiving needs a subscribed location; a made-to-order location holds commitments instead.
Step 2: Check the delivery address
Confirm the destination against the vendor's instructions. A location supplies the starting address, but a typed override remains in place.
The PDF's Deliver to shows the location for store delivery or the customer's name for customer delivery. Check both the name and address before sending.
Step 3: Choose whether prices are visible
On the PO page, review Show prices on vendor PDF. Its state reads Hidden, All N items or X of N items.
In the workbench, Hide Pricing provides the starting choice. The shop default is explained in purchasing settings.
Vendor email prices follow the PDF. Totals appear only when every line shows a price; hiding prices does not hide internal list totals.
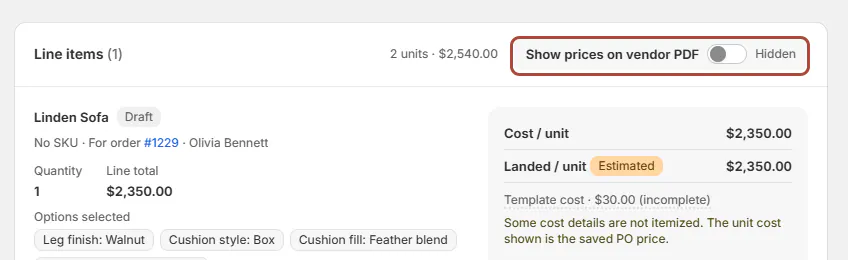
Check the vendor's price visibility before sending.
Send the purchase order
Step 1: Open the email composer
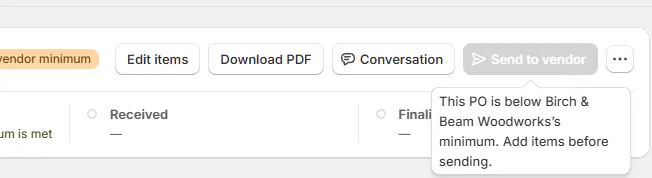
Click Send to vendor on the draft. Your store's chosen word for Vendor can change this label.
With a vendor email saved, Send an Email opens on the Purchase order template. To contains the vendor address.
The location's default CC and BCC recipients are filled in. See sender and copy settings if those need changing.
Step 2: Check the message and attachment
Review To, CC, BCC, subject and message. The attached Purchase order PDF uses the PO number as its filename.
Keep the attachment when the vendor needs the document. It can be removed in the composer, so check it before sending.
Without View costs, you can send only to the vendor and the default copy recipients. Ask someone with cost access before adding recipients.
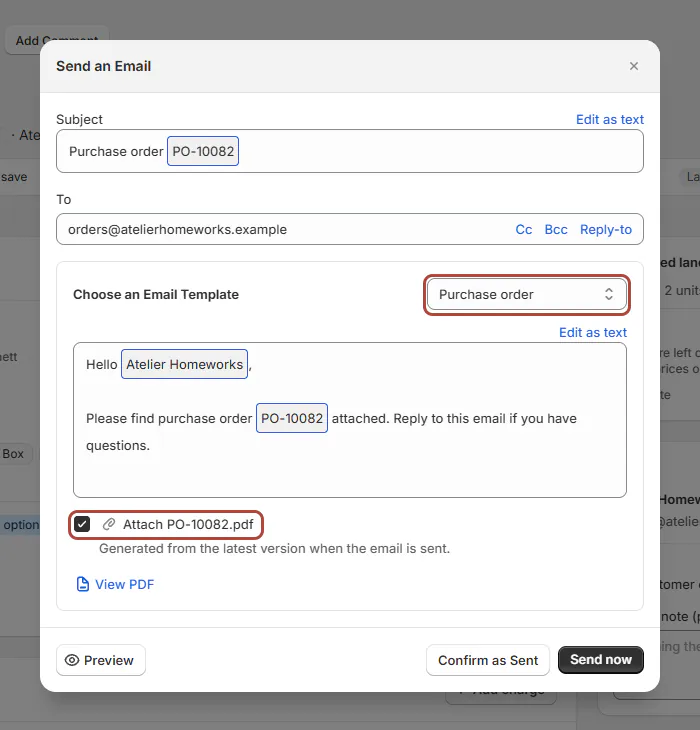
Review the recipient and attached PDF before sending. Step 3: Send now or record an outside send
Click Send now to email the PO. It becomes Sending while the message is submitted, then Sent when the email provider accepts it.
Choose Confirm as Sent instead if you sent it another way. That records the PO as sent without emailing anyone.
Confirm as Sent remains available when email delivery is not ready. Use it only when the vendor actually has the purchase order.
Step 4: Mark a PO without vendor email
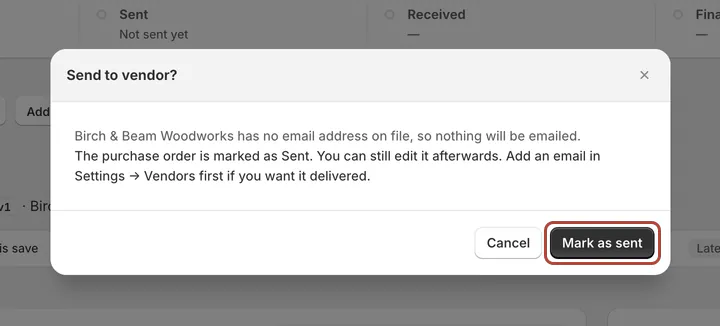
When no email is saved, Send to vendor opens a confirmation explaining that nothing will be emailed.
Click Mark as sent after sharing the PO yourself. The confirmation records Sent and reminds you that no vendor email was available.
You can add an email to the vendor before using email sending on another occasion.
Resend a purchase order
Step 1: Open Resend email
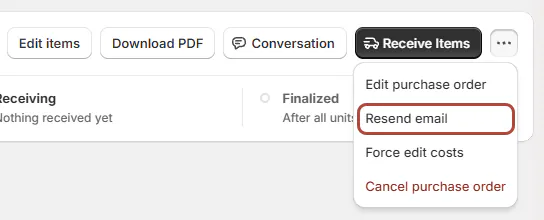
For a Sent or partly received PO with a vendor email, open the PO menu and choose Resend email.
The composer opens without Confirm as Sent. Review the recipients, updated content and PDF attachment.
Step 2: Send the updated copy
Click Send now. The vendor minimum is checked again, but the existing PO status stays unchanged.
A failed resend does not return the PO to Draft. If you changed the order first, PO editing also offers a prompt to send the update.
What happens next
Linked customer orders receive a timeline comment when the PO becomes Sent. Their status follows the store's purchasing connections, such as Sent to Vendor or Partially Sent to Vendor.
The message appears in View all emails. Replies can appear in the PO's Conversation when vendor replies are configured.
A failed initial send returns Sending to Draft. Confirm the status before trying again.
Example: a vendor email and a phone order
Example · Harlow & Finch Interiors
Two ways to record a sent PO
Jo Park has 2 drafts ready at Harlow & Finch Interiors.
- Keep prices hidden on Atelier Homeworks PO-10001.
- Check orders@atelierhomeworks.example and the attached PDF.
- Click Send now and wait for Sent.
- Share Birch & Beam Woodworks PO-10002 outside OrderPilot.
- Use Confirm as Sent to record that second send without another email.
Important notes and tips
What the PDF shows
The PDF includes the vendor's ordered items, options, quantities and Vendor notes. SKU appears unless the vendor's Include SKU on PO items setting is off.
Visible unknown or zero costs print as Not set. Side Label, per-line customer and order details, and receiving notes do not print. There is no signature slot.
After receiving, your own downloaded copy can add Received Cost, Landed Cost and Received quantities. With prices hidden on the vendor PDF, it shows only Received. The emailed vendor copy always shows the order as placed.
The design follows PDF branding.
Screen reference
If something goes wrong
The vendor minimum is not met
The PO's banner shows the shortfall (for example 8 short). Add the required items before sending.
Send now is unavailable
Check email readiness. Confirm as Sent records an outside send without delivering an email.
The PO is no longer a draft
Reload it and use Resend email where available.
Sending takes longer than expected
Refresh to check the status. If it remains stuck, contact support with the PO number.
An extra recipient is refused
Remove them or ask a person with View costs to send.
Location subscription required appears
Ask the owner to review location coverage. Viewing remains available while the listed actions are blocked.
Was this guide helpful?
Thanks. Tell us what was missing at support@meetorderpilot.com.