Walkthrough: one sofa from quote to delivery
Where are you working?
Related guides
- Create a quote or orderQuotes and orders · 6 min
- Handle a customer's change requestQuotes and orders · 5 min
- Get a quote signedPayments and signatures · 5 min
- Sign in the showroom: on the iPad, by QR code or on paperPayments and signatures · 5 min
- Take a depositPayments and signatures · 5 min
Follow Olivia Bennett's Linden Sofa from the first quote to the moment it leaves for her home. The showroom and back office work on the same sale.
Harlow & Finch Interiors sells the sofa, Atelier Homeworks makes it, Sam Ortiz handles the customer conversation, and Jo Park manages receiving.
Before you start
Read Quotes, drafts and orders to distinguish the local draft, Shopify draft and placed order.
For the iPad route, complete POS setup. Native percentage deposits taken through Shopify POS need Shopify Plus.
This example uses the same product and customer throughout. Each linked guide contains the detailed controls, permissions and troubleshooting for its stage.
The stages
- 1Build the quoteRecord Olivia's sofa, options and delivery.
- 2Agree the detailsHandle her change request and obtain the current signature.
- 3Collect the depositUse the correct payment route and check what is placed.
- 4Order and receiveSend the vendor purchase order, record freight and receive the sofa.
- 5Collect the balanceConfirm payment before the goods leave.
- 6Deliver and closeRecord handover and finish the purchasing costs.
The stages describe the work. Your shop's status names and automatic transitions can differ.
Build Olivia's quote
Step 1: Create the app quote
Follow Create a quote or order for Olivia Bennett at the showroom. Add the Linden Sofa template.
Choose Sage Velvet and Feather Blend, and add White Glove Delivery. Check the customer address, vendor and quote summary before creating it.
Step 2: Create the POS quote
Tap Create Quote, add Olivia Bennett, then add and configure the Linden Sofa. Use Sage Velvet and Feather Blend.
Add White Glove Delivery and check Ships to. Create the quote; it opens on the POS order screen.
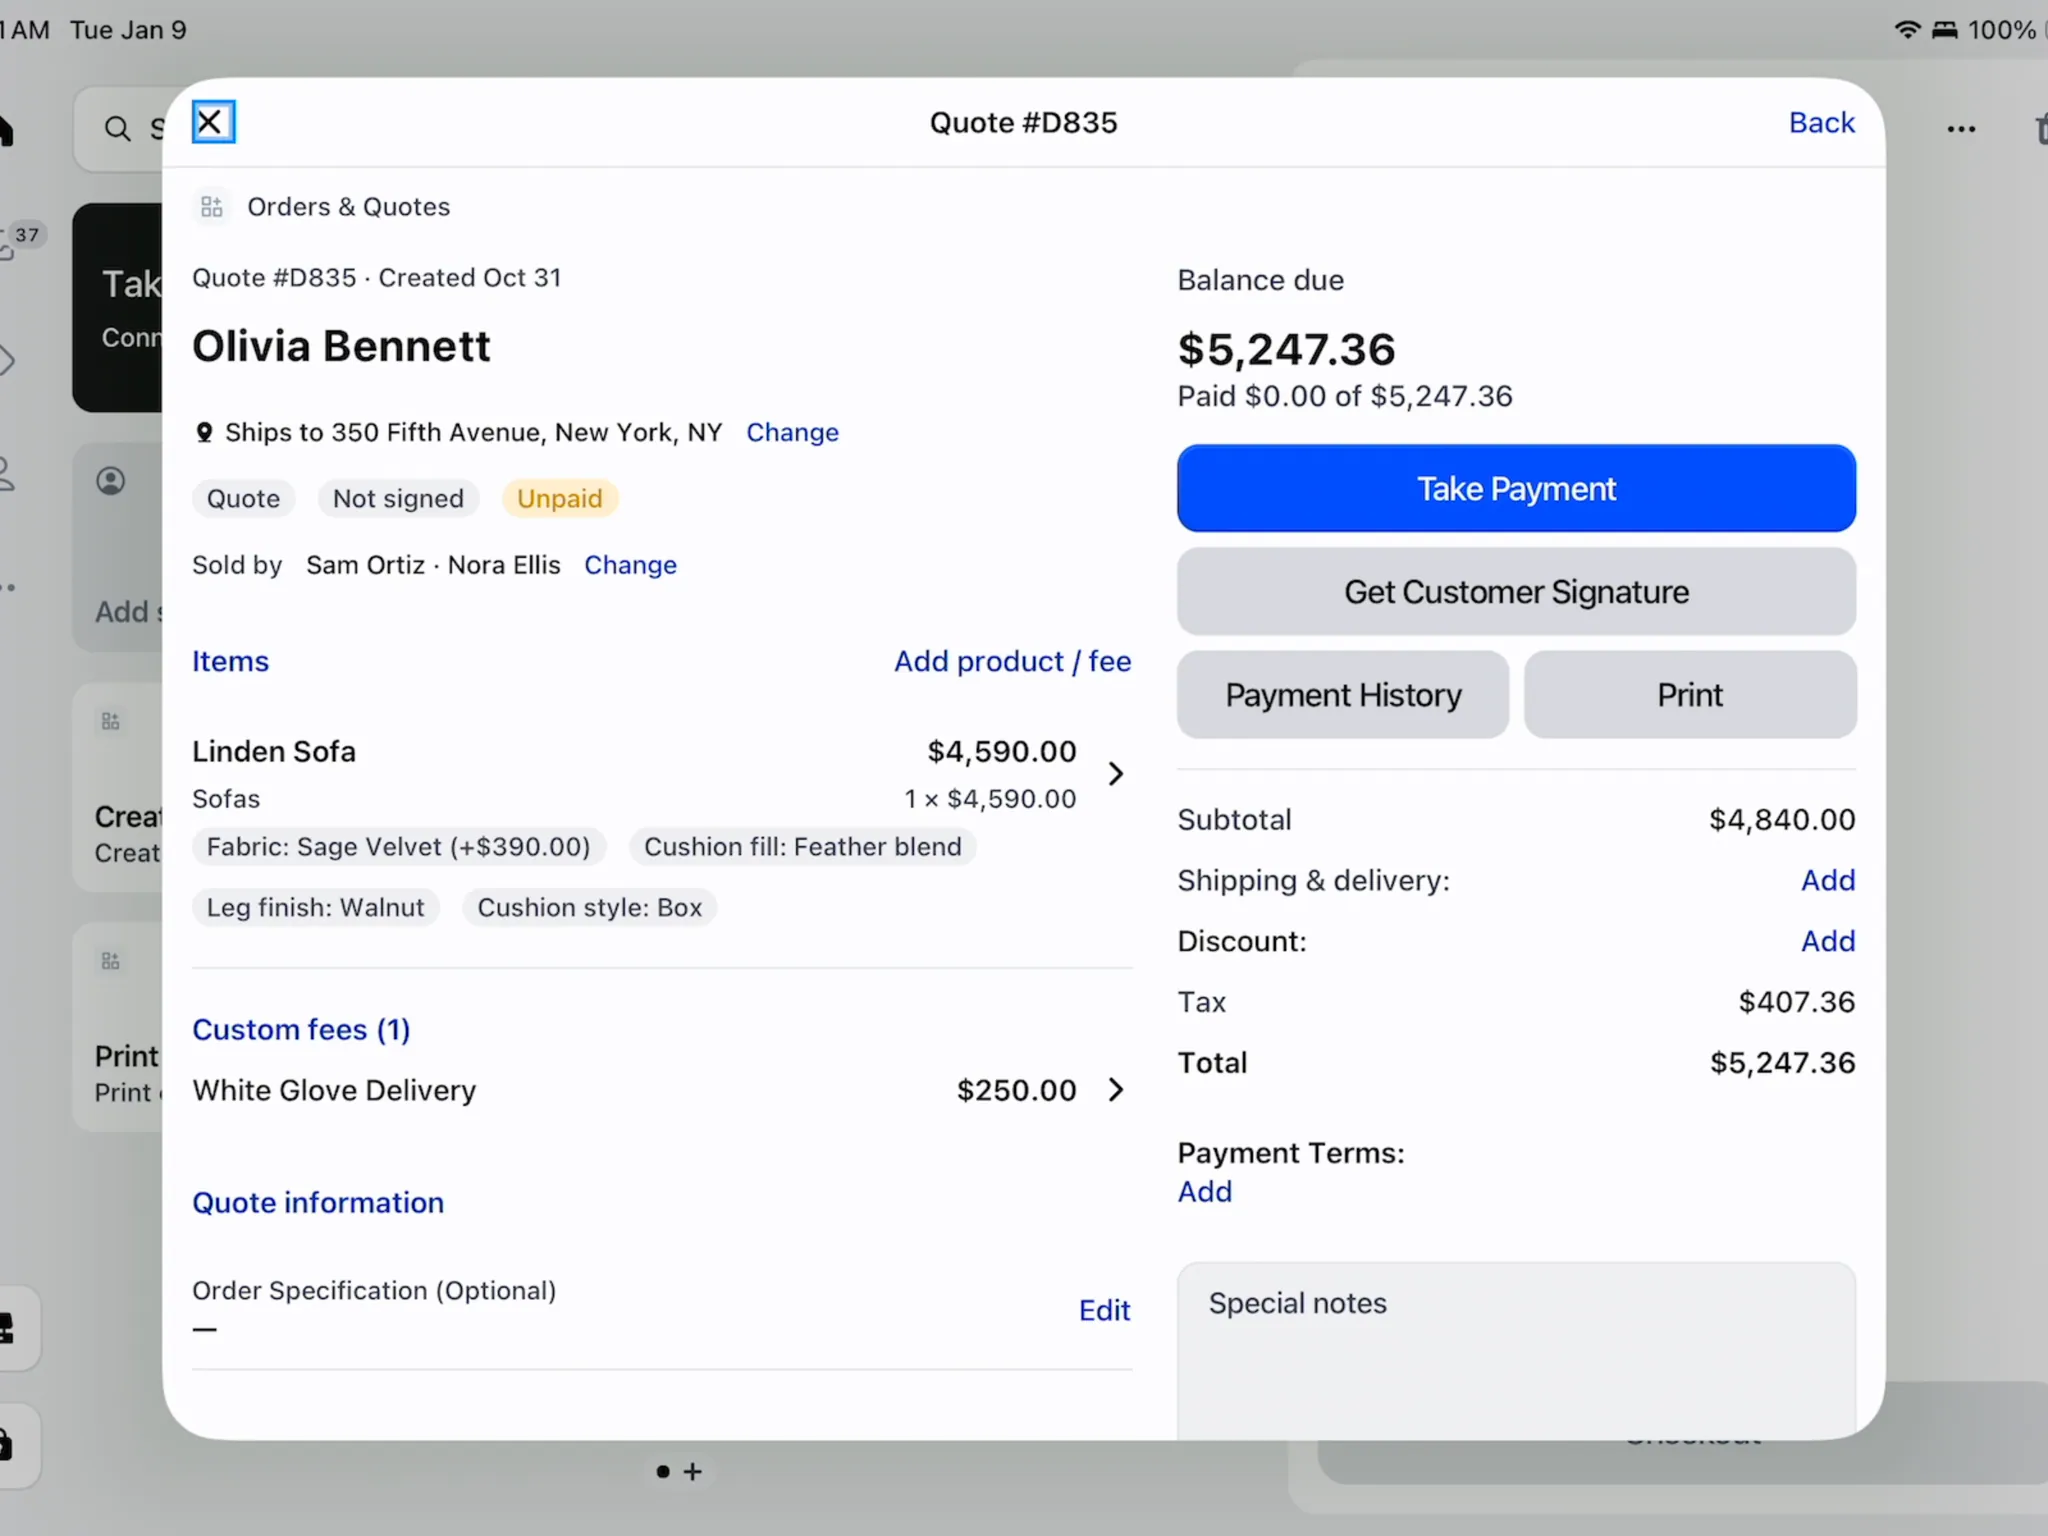
The showroom quote keeps Olivia's choices together. Step 3: Check the created record
Wait for the Shopify draft sync. Review the line's options and vendor, including Atelier Homeworks.
Check fees and shipping so delivery is described and charged as intended. The saved quote now records what Olivia is reviewing.
A quote is still an offer. Its saved state does not mean it has been signed, paid or placed as a Shopify order.
Agree the final details
Step 1: Handle Olivia's request
Olivia uses the portal to request another fabric. Open Customer change requests and read the requested change.
Use Apply in quote, save the change and inspect its request state. Send the updated quote when it is marked Saved, not sent.
Step 2: Arrange the back-office change
If Olivia sends a portal request while you are on the iPad, have the authorized app user review it.
Confirm the updated sale before continuing the showroom signature. The customer should sign the agreed version, including the final fabric choice.
Step 3: Send the signing request
Use Get a quote signed. The signature-request email offers Review and sign.
Olivia reviews the quote on her phone and signs. Check the record for Signed before treating the agreement as complete.
Step 4: Sign in the showroom
Open Get Customer Signature, then Sign on this iPad. Follow Sign in the showroom and hand the device to Olivia.
She reviews and signs the document. When the confirmation appears, return to the order and check its signature state.
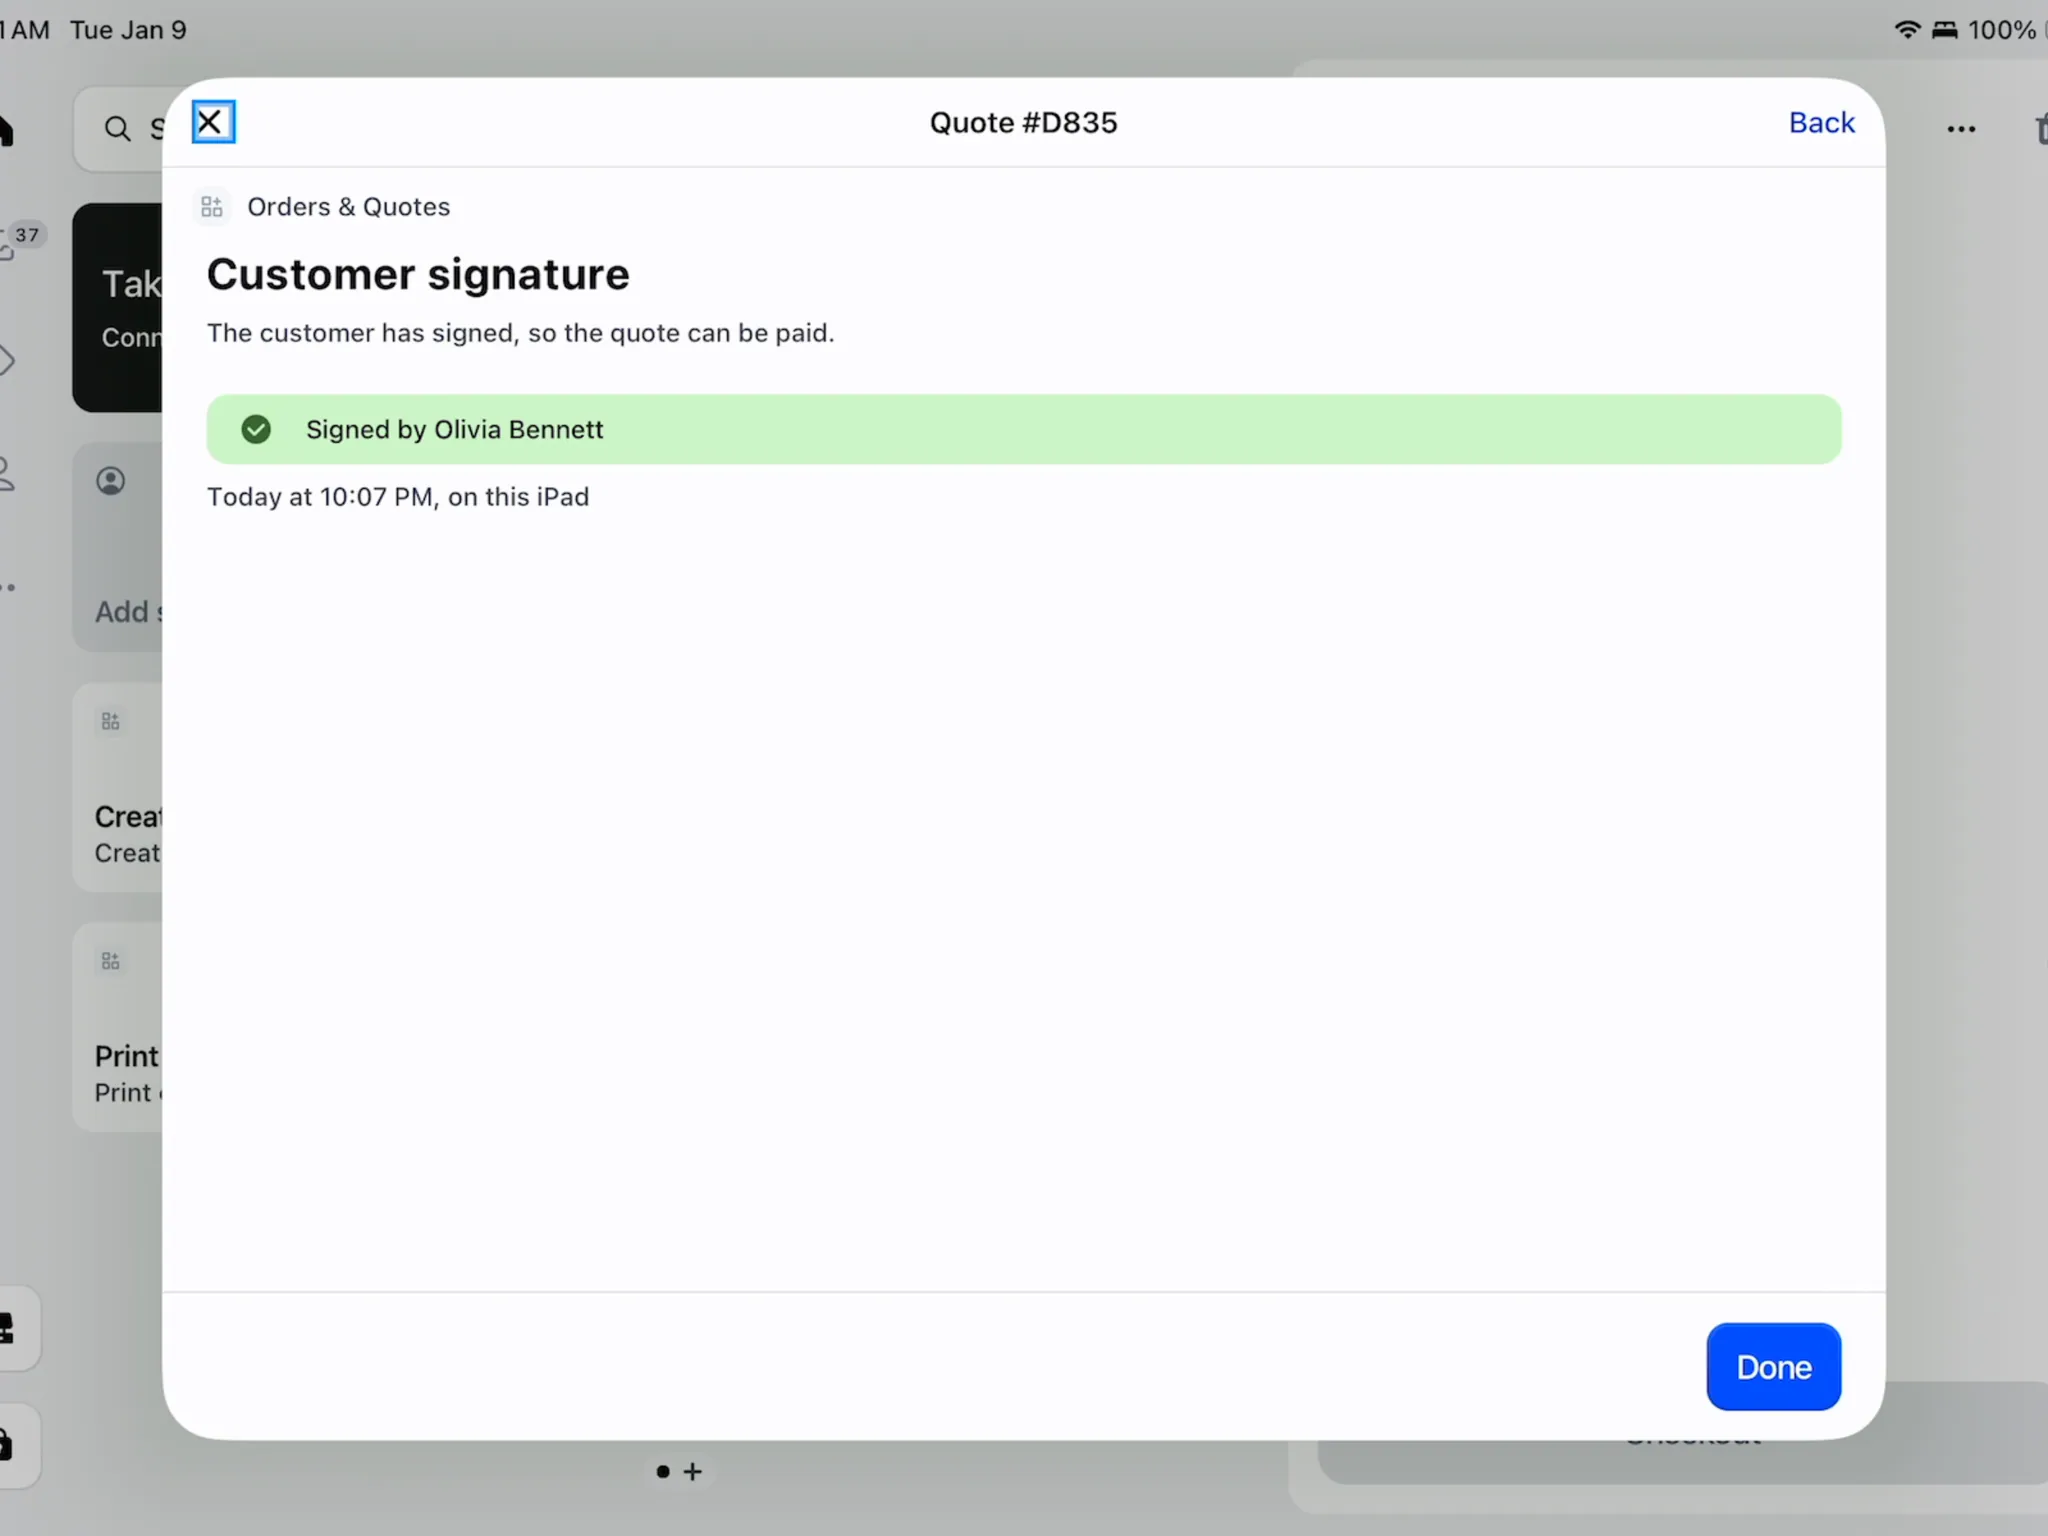
Confirm the signature before returning to the sale. An open question or request can still block signing. Check those items rather than repeatedly sending another signing link.
Collect the deposit
Step 1: Create the app deposit request
Follow Take a deposit and use Collect deposit for an eligible quote. Check the requested amount with Olivia.
This route creates a separate taxable Shopify order named for the deposit. After payment, that deposit is credited against the main draft.
Step 2: Collect the POS deposit
For the native deposit route, set the agreed percentage terms, then use Take Deposit. On Pickup or Delivery?, choose Delivery for the made-to-order sofa.
Review the address and Due now, then continue to Shopify payment. Check the recorded result when you return.
Shopify Plus
Native percentage deposits in Shopify payment terms and this POS deposit route require Shopify Plus. OrderPilot's separate deposit links work on any Shopify plan.
Step 3: Check what remains
Read the payment history and outstanding balance. Confirm whether the main sale is still a draft or has become a Shopify order.
Follow Turn a quote into an order for the appropriate placement route. A separate deposit order is not the main order.
On POS, use Print and brand POS receipts for the customer's receipt after the payment result is confirmed.
Order and receive the sofa
Step 1: Prepare the vendor purchase order
In the app, use the PO Workbench for Olivia's sale. Review Atelier Homeworks' card and the configured sofa line.
Create the purchase order, then check its vendor, destination, quantity and costs. In this example it is PO-10001.
Step 2: Send it to Atelier Homeworks
Follow Send a purchase order. Review the vendor message and PDF before sending.
Check the purchase-order send state afterward. Follow the customer order's actual status rather than assuming the send has already completed.
Step 3: Record freight and receive
Add inbound freight as an estimated charge using Add freight and duty.
When the sofa arrives, follow Receive a delivery at the warehouse. Record the accepted goods and check the units held for Olivia.
Receiving means the goods arrived from the vendor. It does not say Olivia received them, and it does not replace the final customer handover.
Collect the remaining balance
Step 1: Request the outstanding payment
Use Collect a payment for the remaining balance. The request email offers Pay now.
If the store received payment through another method, record it through the appropriate action. Check the updated balance and payment history.
Step 2: Check readiness to leave
Confirm that the required payment is complete and the sofa is ready for delivery. Review any serial-number requirements.
Keep the sofa in its waiting group until the actual handover. A booked delivery date alone is not completed delivery.
Deliver and close
Step 1: Record the customer handover
Follow Pickup, delivery and handover. When the sofa actually leaves for the completed handover, record the appropriate delivered units.
The units move to Taken, and Shopify fulfillment follows that recorded event. Check the resulting order state.
Step 2: Finish the purchasing costs
Review the actual freight and change the estimated charge to its final amount where appropriate. Complete the purchase-order finalization process.
Keep vendor costs separate from the customer's selling price. The purchase order and customer sale remain linked but serve different records of the transaction.
Recap
The first created quote produced a Shopify draft. The payment route determined whether a separate deposit order or the main placed order recorded the payment.
The vendor purchase order tracked the sofa being bought and received. Customer handover recorded the units leaving and their Shopify fulfillment.
Activity kept the sale's versions, messages, signature, payments and status changes. When a stage is blocked, open that stage's guide and inspect its stated reason.
Was this guide helpful?
Thanks. Tell us what was missing at support@meetorderpilot.com.