Set up a Dimensions option for custom sizes
Related guides
- Create options and valuesCatalog · 6 min
- Set option prices and track separate stockCatalog · 5 min
- Group options into bundlesCatalog · 6 min
- Create a product templateCatalog · 6 min
- Handle a customer's change requestQuotes and orders · 5 min
A Dimensions option lets someone enter a product’s required measurements. You define 2 or 3 measurement fields, their shared unit and the permitted ranges.
Use it when customers need to specify a custom size within limits. The option adds one flat price when measurements are entered; it does not calculate a price from area or volume.
Before you start
Understand shared options
Start with Create options and values. You need Manage the catalog to create and manage the size option.
Use a product option
Dimensions belongs to a product line. An order field cannot use this type.
Choose the measurements
Plan 2 or 3 parts, their limits and one unit used by every part.
Warning
The option named Dimensions supplied at installation is a Text option. Create a new option with Type set to Dimensions for separate size boxes and limits.
Dimensions cannot track stock. The tracking control is hidden, and importing Track stock does not enable it for this type.
Create the size option
Step 1: Create a Dimensions option
Go to SettingsProductsOptions and click Add option. Enter Table size, choose Dimensions, then click Add option.
The option editor opens with measurement settings. A new Dimensions option starts with Length, Width and Height.
Step 2: Name the measurement parts
Under Dimensions settings, enter each Measurement name. For a dining tabletop, keep Length and Width and remove Height.
Use distinct names of up to 40 characters. The settings now show one row for each measurement the customer will enter.
You can add a measurement until there are 3. You cannot remove another when only 2 remain.
Step 3: Set the allowed range
Enter each part's Minimum, Maximum and Step. For Length, use 60 to 120 with a step of 1.
For Width, use 36 to 48 with a step of 1. Blank limits mean None; a blank step means Any.
The settings now define the permitted measurements and increments.
Step 4: Set the unit and price
Enter Unit, such as in. This unit applies to every measurement.
Set Price, Cost and Lead time as needed, then Save. Lead time starts at 0; raise it when a custom size takes longer.
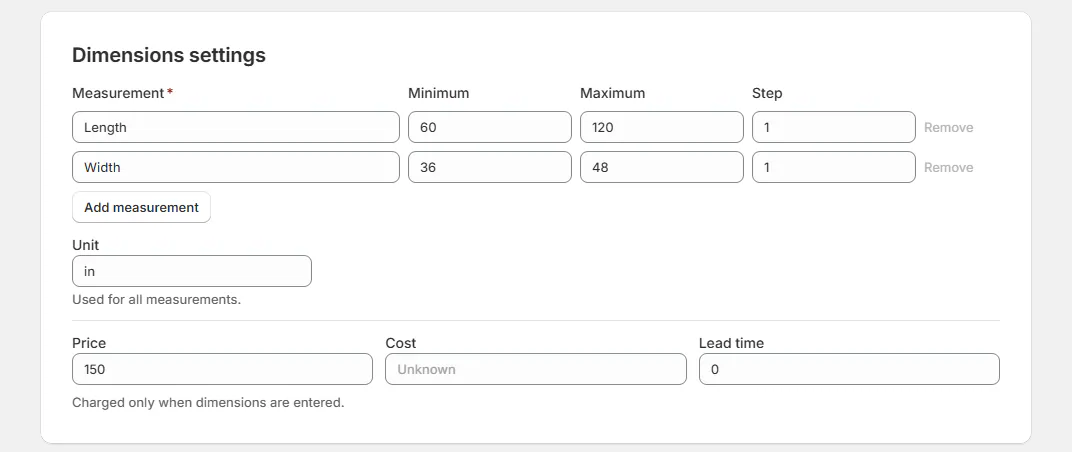
Dimensions settings with Length and Width rows, ranges, step and Unit The price is a flat charge when dimensions are entered. It is not multiplied by length, width or area.
For the difference between flat and measured pricing, see Option pricing and stock.
Put the size on a template
Step 2: Check an entered size
Add Arden Dining Table to Priya Shah's quote. Enter 96 for Length and 42 for Width.
The line shows both entered measurements. A length of 130 is outside the configured maximum and is refused.
What happens next
Staff see separate measurement boxes in the app and on Shopify POS. Shoppers see the same kind of entry in the online options block.
Entries are checked against the configured ranges on those screens, during saves and in the store cart. Keep ranges consistent with what the vendor can make.
Documents preserve the entered size as text, such as 96 x 42 in. Three-part sizes can read 96 x 38 x 30 in.
The size appears on PDFs, receipts, emails and Shopify line properties. The option's price is added once when a size is supplied.
Customers can request a change through the portal. Its change form provides one box per measurement for a proposed replacement size.
Example: Priya's dining table
Example · Harlow & Finch Interiors
Keep custom sizes within the vendor's range
Nora Ellis prepares Table size for Harlow & Finch Interiors.
- Create a Dimensions option with Length and Width.
- Set Length to 60–120 in and Width to 36–48 in.
- Use a step of 1 for both measurements.
- Attach it to Arden Dining Table.
- Enter Priya Shah's requested 96 x 42 in size.
The quote records an allowed size. A later request for 130 in needs a different approved configuration.
If something goes wrong
A measurement needs a name
Enter a label such as Length, and give each measurement its own name.
The limits are rejected
Enter numbers in the limits. A step must be greater than 0.
Add measurement is greyed out
A size has at most 3 measurements. Remove one before replacing it.
Remove is greyed out
A size needs at least 2 measurements.
Dimensions is unavailable for an order field
Create a product option instead.
The option shows one text box
Check its type. The supplied Dimensions option is Text.
A customer's size is refused
Compare every part against its range and step before changing the allowed limits.
Was this guide helpful?
Thanks. Tell us what was missing at support@meetorderpilot.com.