Talk to vendors and record what you pay them
Related guides
- Send a purchase order to your vendorPurchasing · 6 min
- Set sender details, replies, and email copiesEmails and messages · 4 min
- Reply to customers from the InboxEmails and messages · 5 min
- Send vendor payments, cost of goods and POs to QuickBooksSettings and integrations · 5 min
- Edit or cancel a purchase orderPurchasing · 6 min
Keep vendor replies, internal notes and payment records with the purchase order they belong to. Use the email log to check delivery, and the Vendor payments card to record money paid through your normal payment method.
Recording a vendor payment does not send money to the vendor. It records the amount, date and method so your team can see what remains due.
Before you start
Has the PO been sent?
Send the purchase order before replying through its conversation.
Are replies enabled?
Set up Receive replies through sender and reply settings. This needs a verified domain and the supplied DNS record.
Can you perform the action?
Send and cancel purchase orders controls replies. View purchase orders controls the email log. Enter costs and charges controls payment records.
A reply and a resend do different jobs. A reply continues the conversation without attaching a new PO PDF. Resending shares the purchase-order document again.
Talk to the vendor
Step 1: Open Conversation
Open the PO and click Conversation. Its tooltip reads Emails with the vendor, and its count identifies new replies.
Vendor conversation shows messages labeled Sent to vendor and Vendor reply. Open the original email when you need its full context.
The conversation shows the newest 50 emails.
Step 2: Check the reply's sender
Read the sender before acting on a requested change. Sender does not match the vendor on file means someone other than the saved vendor address replied.
Check the vendor's contact details if the sender is unfamiliar. Use vendor settings to correct an address when your team has confirmed it.
The reply remains visible for review; its sender badge is information you should resolve before treating it as an instruction.
Step 3: Reply to the vendor
Enter your message under Reply to the vendor, then send it. The confirmation reads Reply queued.
This reply attaches no PDF and does not change the PO status. To share changed quantities or specifications in the document, use the updated-PO sending flow.
Step 4: Leave an internal note
Choose Internal note and enter information intended for your team. Save the note through the conversation's note action.
Internal notes are never emailed to the vendor. Use this for Jo Park's warehouse reminder, keeping the vendor-facing answer in the reply.
Vendor conversations also appear under Vendors in the Inbox. PO rows have a PO label and a side panel with Open purchase order.
Check which emails were received
Step 1: Open the email log
In the PO's Activity card header, click View all emails. Emails for PO-10001, for example, opens with Email, Status and Opened columns.
Use All statuses to filter the log when looking for a failed or delivered message.
Step 2: Investigate a failed message
Check the email status and vendor address. Correct an incorrect address in the vendor record before using Resend email.
If no message exists, the dialog says No emails have been sent for this purchase order yet. A PO marked sent outside OrderPilot can have no sent email here.
Record a payment to the vendor
Step 1: Open Record payment
In Vendor payments, click Record payment. Record a vendor payment opens with the balance prefilled as Amount.
Use the amount actually paid, even when you paid only a deposit. Confirm it against your payment record before saving.
Step 2: Enter the payment details
Enter Amount and Date paid, then choose Paid by: Bank transfer, Check, Card, Cash or Other.
Add Reference, such as your transfer reference, and an optional Note. Reference allows 60 characters; Note allows 500.
The date cannot be in the future, and the amount accepts up to 2 decimal places.
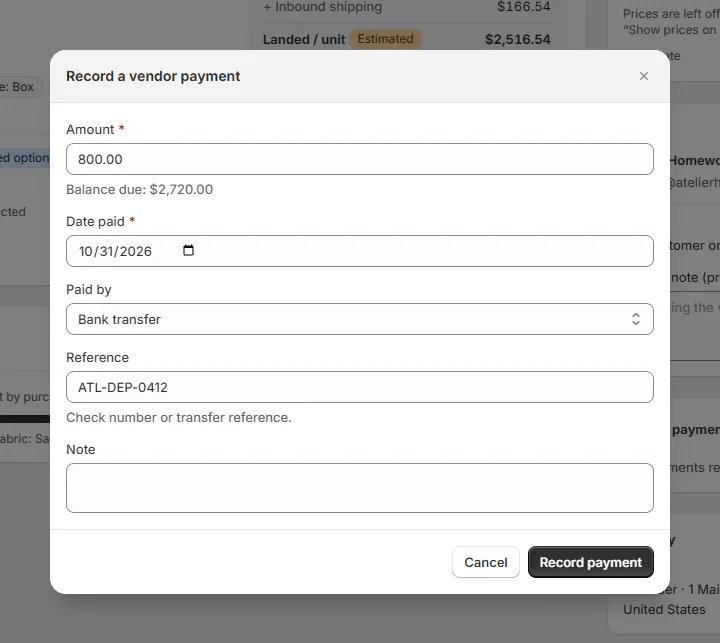
Record the payment method and reference with the amount. Step 3: Save and review the balance
Save the record. Paid and Balance due update in the card.
The balance uses the planned total until everything is received, then the received total. If you record more than is owed, the warning identifies the excess but allows the record.
An overpayment appears as Paid over the PO total. Check the amount before accepting that result.
Step 4: Remove an incorrect payment record
For a payment entered in error, choose Remove. Read Remove this payment?, then confirm Remove payment.
The record is deleted in OrderPilot. If already sent to QuickBooks, it is deleted there on the next sync. This action does not recover money from the vendor.
What happens next
Vendor replies add Vendor replied by email to Activity. Payment changes add Vendor payment recorded or Vendor payment record removed.
With QuickBooks connected, recorded payments follow the QuickBooks purchasing sync. A PO with payment records cannot be cancelled until those records are removed.
Keep valid payments recorded while resolving the commercial arrangement with the vendor.
Example: a fabric question and deposit
Example · Harlow & Finch Interiors
Keep the answer and payment together
Atelier Homeworks asks Jo Park to confirm the fabric on PO-10001.
- Open Vendor conversation and read the Sage Velvet question.
- Reply with Olivia Bennett's confirmed choice.
- Add an internal warehouse note separately.
- Record the deposit already paid by Bank transfer.
- Check Paid and Balance due against the payment reference.
If something goes wrong
Send the purchase order to the vendor first
Complete the initial send before replying from Conversation.
Vendor replies do not come back here yet
Ask the person responsible for email setup to enable Receive replies.
The payment amount is refused
Enter a valid amount with no more than 2 decimal places and check the displayed maximum.
The date is refused
Use the actual payment date, not a future date.
Cancellation is blocked by payments
Review the recorded payments and resolve incorrect entries before cancelling the PO.
Was this guide helpful?
Thanks. Tell us what was missing at support@meetorderpilot.com.