Set up warranty coverage
Related guides
- How warranty coverage worksWarranty and service · 5 min
- Set coverage exceptions for options and productsWarranty and service · 4 min
- Create and sell extended warranty plansWarranty and service · 4 min
- Require and record serial numbersWarranty and service · 4 min
- Check and change warranty on an orderWarranty and service · 5 min
Set the warranty your store offers, then add more specific terms for vendors, categories, and product templates. Check a product's result before using the rules for a new sale.
Terms use months. A blank value leaves that level unset, while 0 deliberately excludes coverage.
Before you start
Understand the rule order
Prepare vendors and categories
Create the vendors and categories that need their own rules.
Check permissions
Warranty settings need Manage shop settings. A template's own warranty needs Manage the catalog.
The Warranty coverage tab contains Warranty rules, Option coverage, and Check a product. Step pages identify their place in the 6-level rule order.
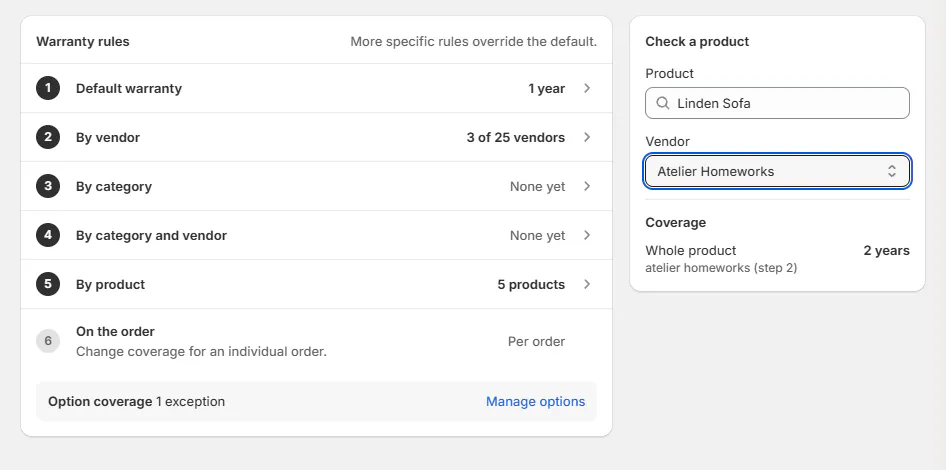
Most term fields save individually when you press Enter or click away. Watch Saving… finish before moving on. The template warranty dialog has its own Save action.
Set your default warranty
Step 1: Open the default
Go to SettingsProductsWarranty coverage and choose Default warranty. If no terms exist, Set default warranty opens the same starting point.
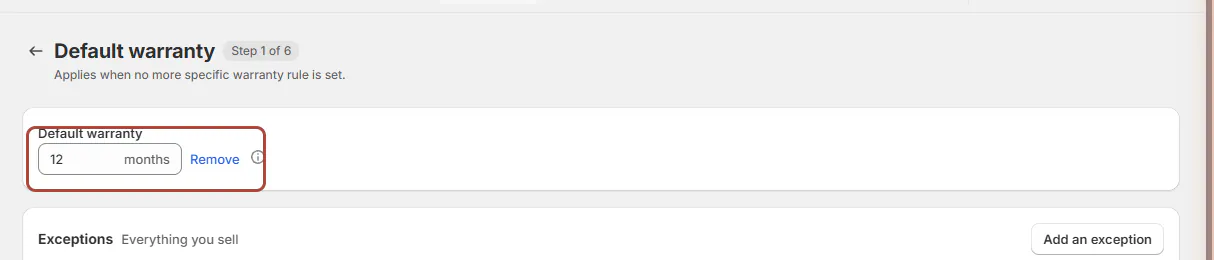
Default warranty page with 12 months set. Step 2: Enter the term
Enter the number of months, then press Enter or click away. The term saves for products without a more specific rule.
Use Set a term to start at 12 months. The available range is 0 to 1,200 months. Default quick picks are 12, 24, 36, 60, and 120 months.
Step 3: Check whether the default is intentional
Enter 0 when the store default should be Excluded. Leave it blank only when you intend to have no store default. The page identifies the missing default.
Note
No default leaves some products uncovered
No default warranty means products without another applicable rule have no standard coverage. A vendor or product term can still supply coverage.
For a store-wide option exception, use coverage exceptions. An option's exclusion and a whole-product default are separate decisions.
Give vendors, categories and templates their own term
Step 1: Set a vendor term
Choose By vendor, find the vendor, and enter its months or use Set a term. The row identifies whether it follows or overrides the store default.

By vendor table with Atelier Homeworks at 24 months. The table lists 20 vendors per page. No warranty from this vendor sets 0. Follow the store default removes the vendor-specific term.
Step 2: Add a category rule
Choose By category, then Add a rule. Choose Category, optionally choose Vendor (blank applies to all vendors), and enter Warranty in months; it starts at 12. Click Add rule to add the row; it stays greyed until a category is chosen.
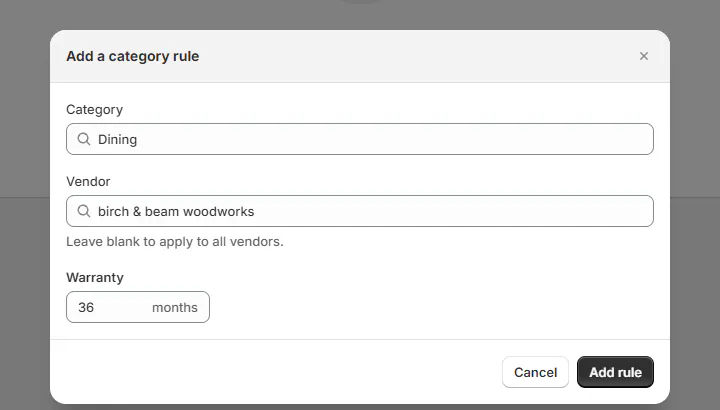
Add a category rule dialog for Dining from Birch & Beam Woodworks. Leave Vendor blank for all vendors. A category rule beats a vendor rule, while a category-and-vendor rule beats the general category rule for that vendor.
Step 3: Review existing category rules
Change Term in the rule table when the policy changes. Use Delete rule only when the category should return to the remaining applicable rules.
Rules reach subcategories. Where several category levels have rules, the deepest ruled category wins. Check the product preview instead of assuming the parent category controls the result.
Step 4: Open a template's warranty
Open the product template. Under Before an order is placed, open Warranty, click Edit, then Edit terms. The warranty dialog opens.
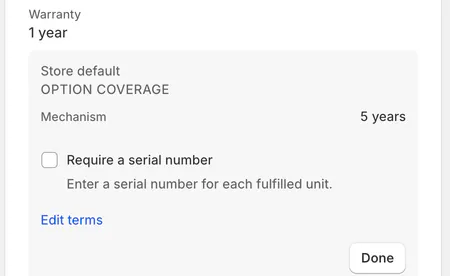
The template's open Warranty row with its source, Option coverage and Edit terms. The row summary shows the resulting term and any serial-number requirement. Its expanded view identifies the source and Option coverage.
Step 5: Save the template term
In the dialog, set Whole product. Use Preview for vendor to inspect how the chosen vendor affects inherited terms. Click Save and look for Warranty saved.
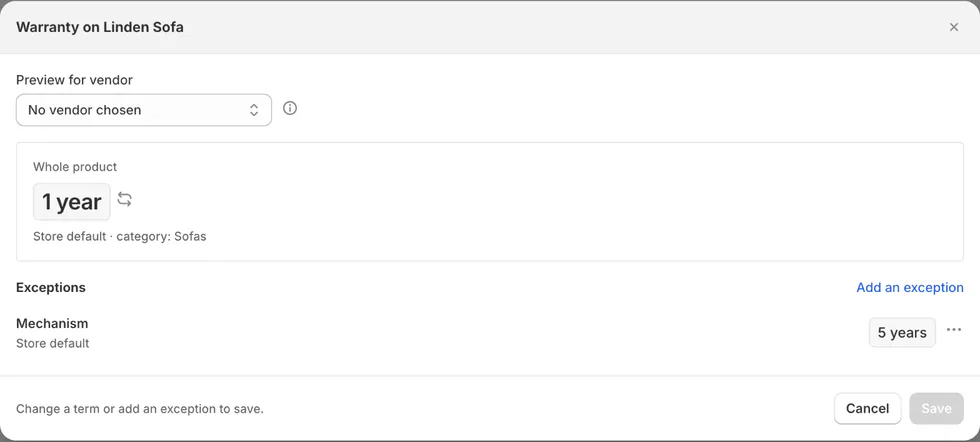
Warranty on Linden Sofa dialog with Whole product and Preview for vendor. Cancelling changed terms asks Discard warranty changes?. The template dialog's explicit save is separate from the automatically saved fields on the rule pages.
Use serial numbers for unit identification and extended plans for additional coverage sold with a line. Neither replaces the base warranty term.
Check what a product is covered for
Step 1: Choose the template and vendor
Return to Warranty coverage and find Check a product. Search under Product, then choose the vendor. No vendor skips the vendor-specific levels.
Step 2: Read the resolved coverage
Read Coverage for Whole product and each option. Each term names its source and step, or shows No warranty period set.
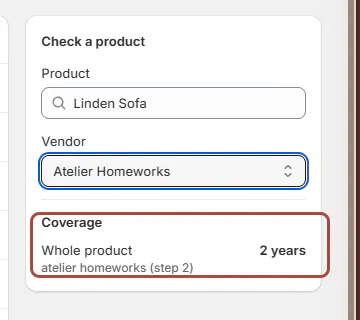
Check a product result for Linden Sofa from Atelier Homeworks. This is the same preview used when creating an order. If a term surprises you, follow its named source before changing another level.
Step 3: Use the correct check for Shopify products
Check a product searches templates. For a regular Shopify product, open By product and review its own term through coverage exceptions.
The distinction matters when a template and a catalog product have similar names. Check the kind of line you actually intend to sell.
What happens next
New lines use the applicable rules. Existing orders retain their saved terms. The line chips and order Warranty panel show the sale's result.
For bulk template work, Warranty months is available through template import and export. Review the resulting term before placing new orders.
Example: Harlow & Finch's first rules
Example · Harlow & Finch Interiors
Check vendor and template coverage
Nora Ellis sets the store's warranty rules.
- She enters a 12-month default.
- She gives Atelier Homeworks 24 months.
- She adds a Dining rule for Birch & Beam Woodworks.
- She sets the Arden Dining Table template to 60 months.
- She previews the Linden Sofa and sees Atelier Homeworks as its source.
- She previews the Arden Dining Table and sees its own template term.
If something goes wrong
Warranty settings didn't load
Click Try again.
A term is read-only
Check shop-settings permission, or catalog permission for the template.
A vendor term doesn't apply
Check that the line has that vendor and that a more specific category or product rule hasn't replaced it.
Old orders didn't change
Their terms are preserved. Use order warranty review for a specific sale.
Was this guide helpful?
Thanks. Tell us what was missing at support@meetorderpilot.com.