Create a quote or order
Where are you working?
Related guides
- Quotes, drafts and ordersQuotes and orders · 4 min
- Choose options and a vendor for each lineQuotes and orders · 6 min
- Add fees, shipping and discountsQuotes and orders · 5 min
- Quote faster: Sidekick, auto-save, barcodes and stock checksQuotes and orders · 4 min
- Set up trade customers and order taxQuotes and orders · 4 min
Build a quote or order by choosing its customer, location and products. Create it when the details are ready, or save a draft while the customer decides.
A draft stays in OrderPilot. Creating the quote or order also creates a Shopify draft order, ready for the next sales action.
Before you start
Choose the sale type
Use a quote for an offer the customer will review. Quotes, drafts and orders explains the stages.
Prepare the catalog
Have product templates or Shopify products ready. Your role needs Create and edit quotes and orders.
Check the location
Use an active selling location on your subscription. POS uses the register's location.
Prepare POS
Add the OrderPilot tiles and make the products available on the Point of Sale channel. Set up OrderPilot on POS
Create the sale in the app
Step 1: Open the create page
On Quotes, click Create quote. For an order, use Orders and Create order.
If Select brand and location opens (Select a Location when the store has no brands), choose the brand and the showroom, then click Confirm. The picker lists active selling locations; the made-to-order location is excluded.
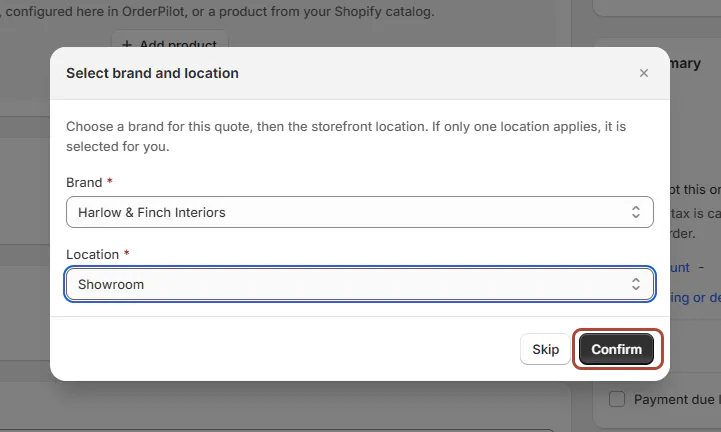
Choose the selling location for this sale. Step 2: Find or create the customer
Use Search customers... to find Olivia Bennett. Choose the existing profile before creating another.
For a new person, click Create new customer. Enter first name, last name and an email or phone number. Add addresses as needed; the customer becomes available to select.
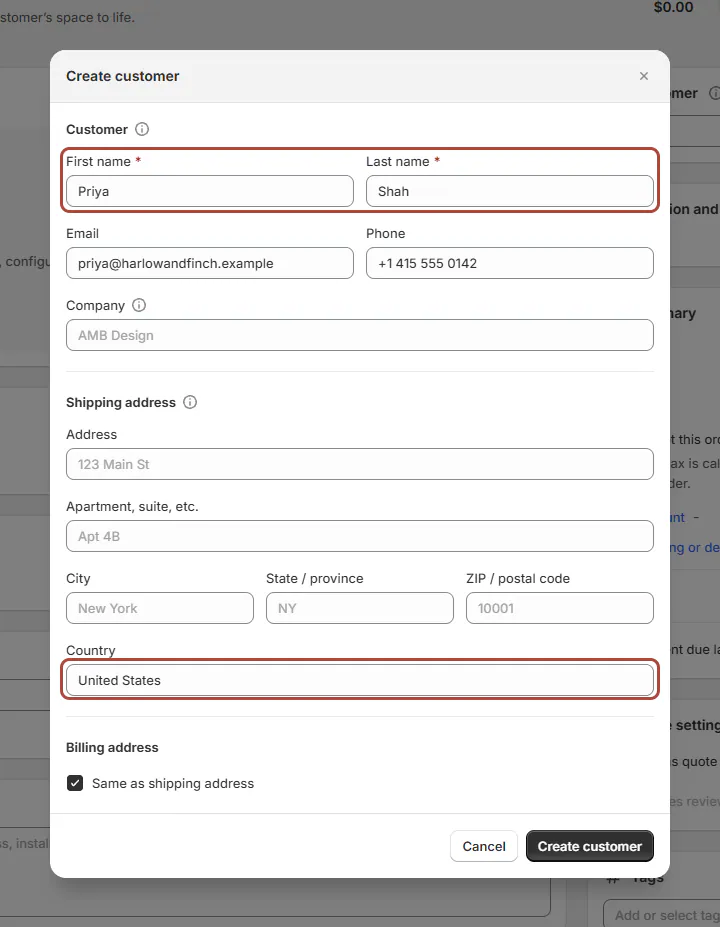
A new customer needs a name and contact detail. Step 3: Check the customer addresses
Review the shipping and billing addresses. Use Edit and Manage addresses to choose or add the correct address.
Country starts from the location when possible. Once you enter other address details, a country is required; a country alone creates no address.
Step 4: Add the products
Click Add product. Search by name, SKU, vendor or category, then choose Templates or Shopify products as needed.
Select the Linden Sofa template. Expand a Shopify product to choose its variant; a composition adds each piece as a separate line.
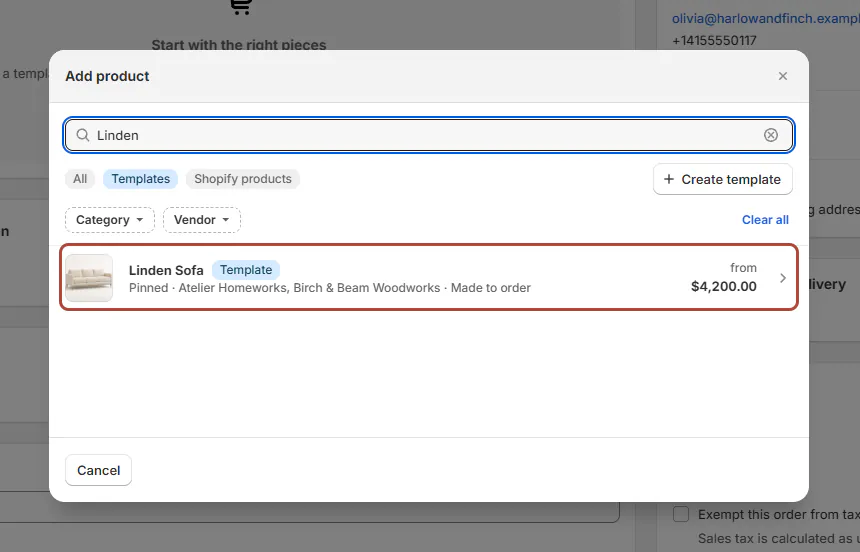
Choose the template before configuring its options. Step 5: Configure the sale
Choose options and a vendor, including Sage Velvet and Feather Blend. Set quantities, then add fees, shipping and discounts where needed.
Check the delivery promise under the summary. The configured lines and extras appear in the sale's total.
Step 6: Create the record
Check Mark as quote and the summary. Click Create Quote or Create Order.
If pickup and delivery are mixed, review Delivery and store pickup in one order before confirming. The saved record opens at its selected location.
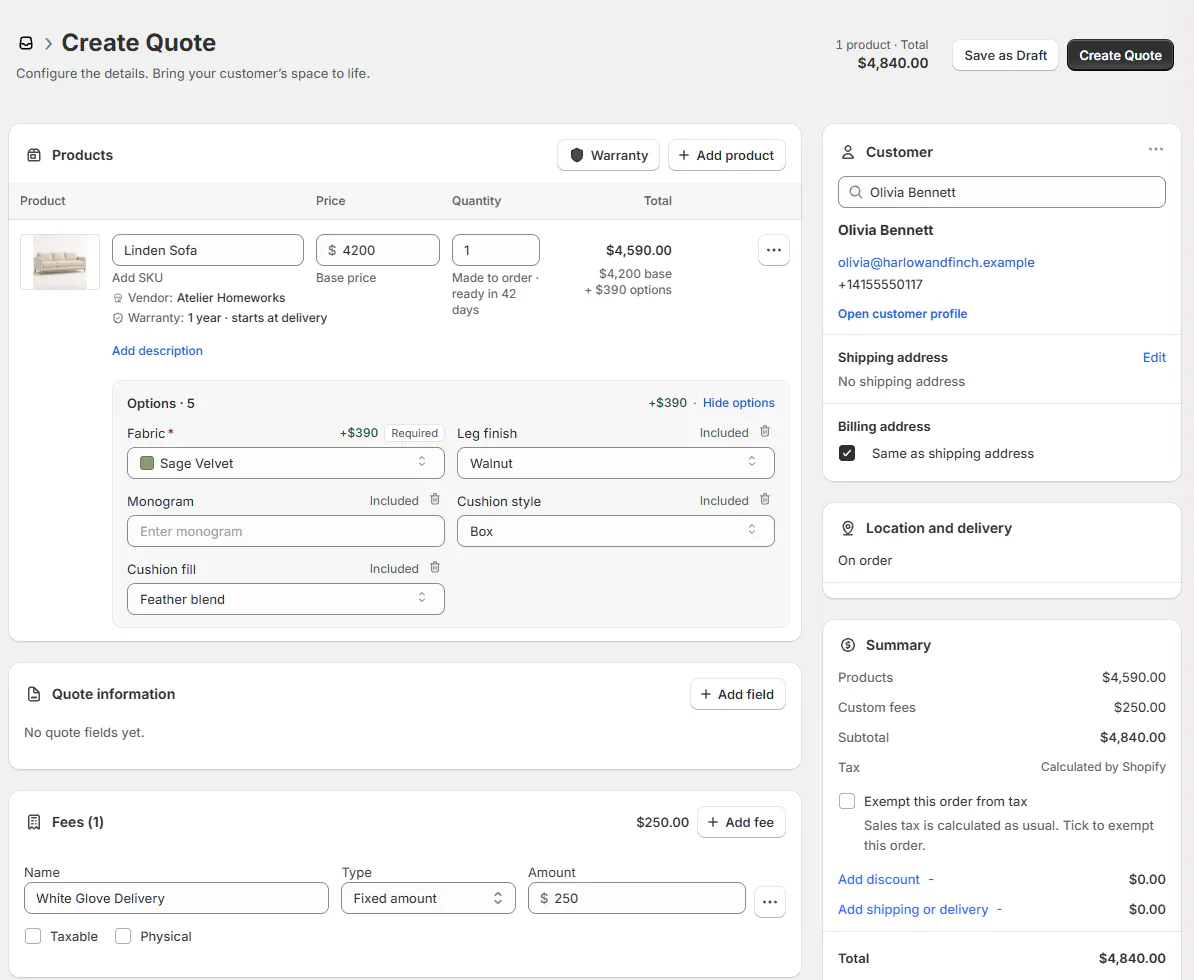
Check the configured sale before creating it.
Create the sale on POS
Step 1: Open a new sale
Tap Create Quote or Create Order, or use those actions inside Orders & Quotes.
New quote or New order opens at the register's location. Check Sold by before continuing.
Step 2: Add the customer
Tap Add customer. Search by name or email, or choose from Recent customers.
For a new person, tap New customer, enter the required details and tap Create customer. The selected customer appears on the sale.
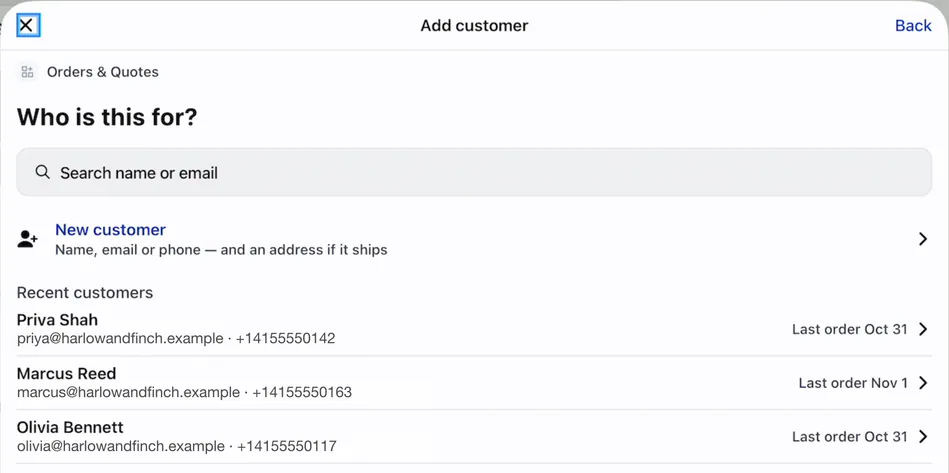
Find the customer before creating another profile. Step 3: Check where it ships
Review Ships to beneath the customer. Tap Change to select a saved address or Add a new address.
Use Save and ship here for a new address. It is added to the Shopify customer, and existing addresses remain.
Step 4: Add a product
Tap Add product / fee. Use All, Shopify products or Templates, then search or filter the list.
Tap the product, or choose its variant. The item screen opens so you can configure it.
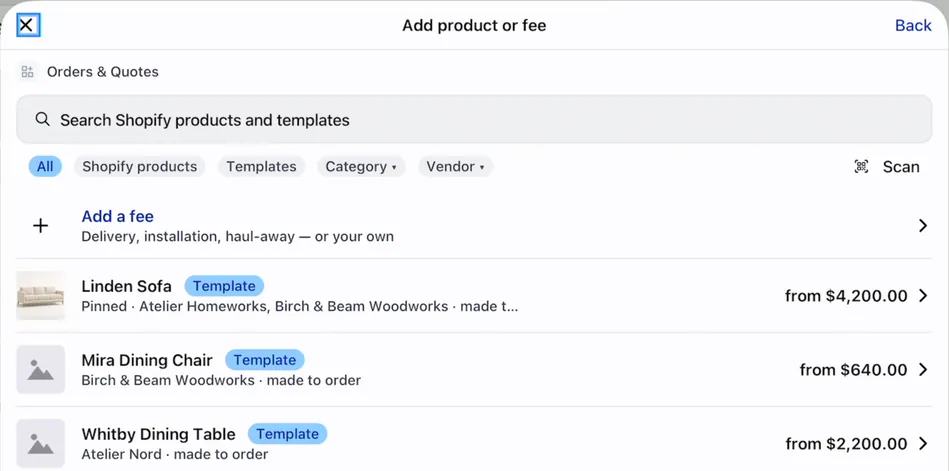
The picker separates products, templates and fees. Step 5: Set options and extras
Choose the options and quantity, then tap Add to quote or Add to order. Add the delivery fee and any agreed extras.
Fill required Quote information fields and check Special notes. Each configured item appears in the sale.
Step 6: Create the quote or order
Turn Mark as Quote on for a quote, or off for an order. Tap Create Quote or Create Order.
A quote opens on the order screen. An order continues to Take Payment; see Split orders when pickup and delivery differ.
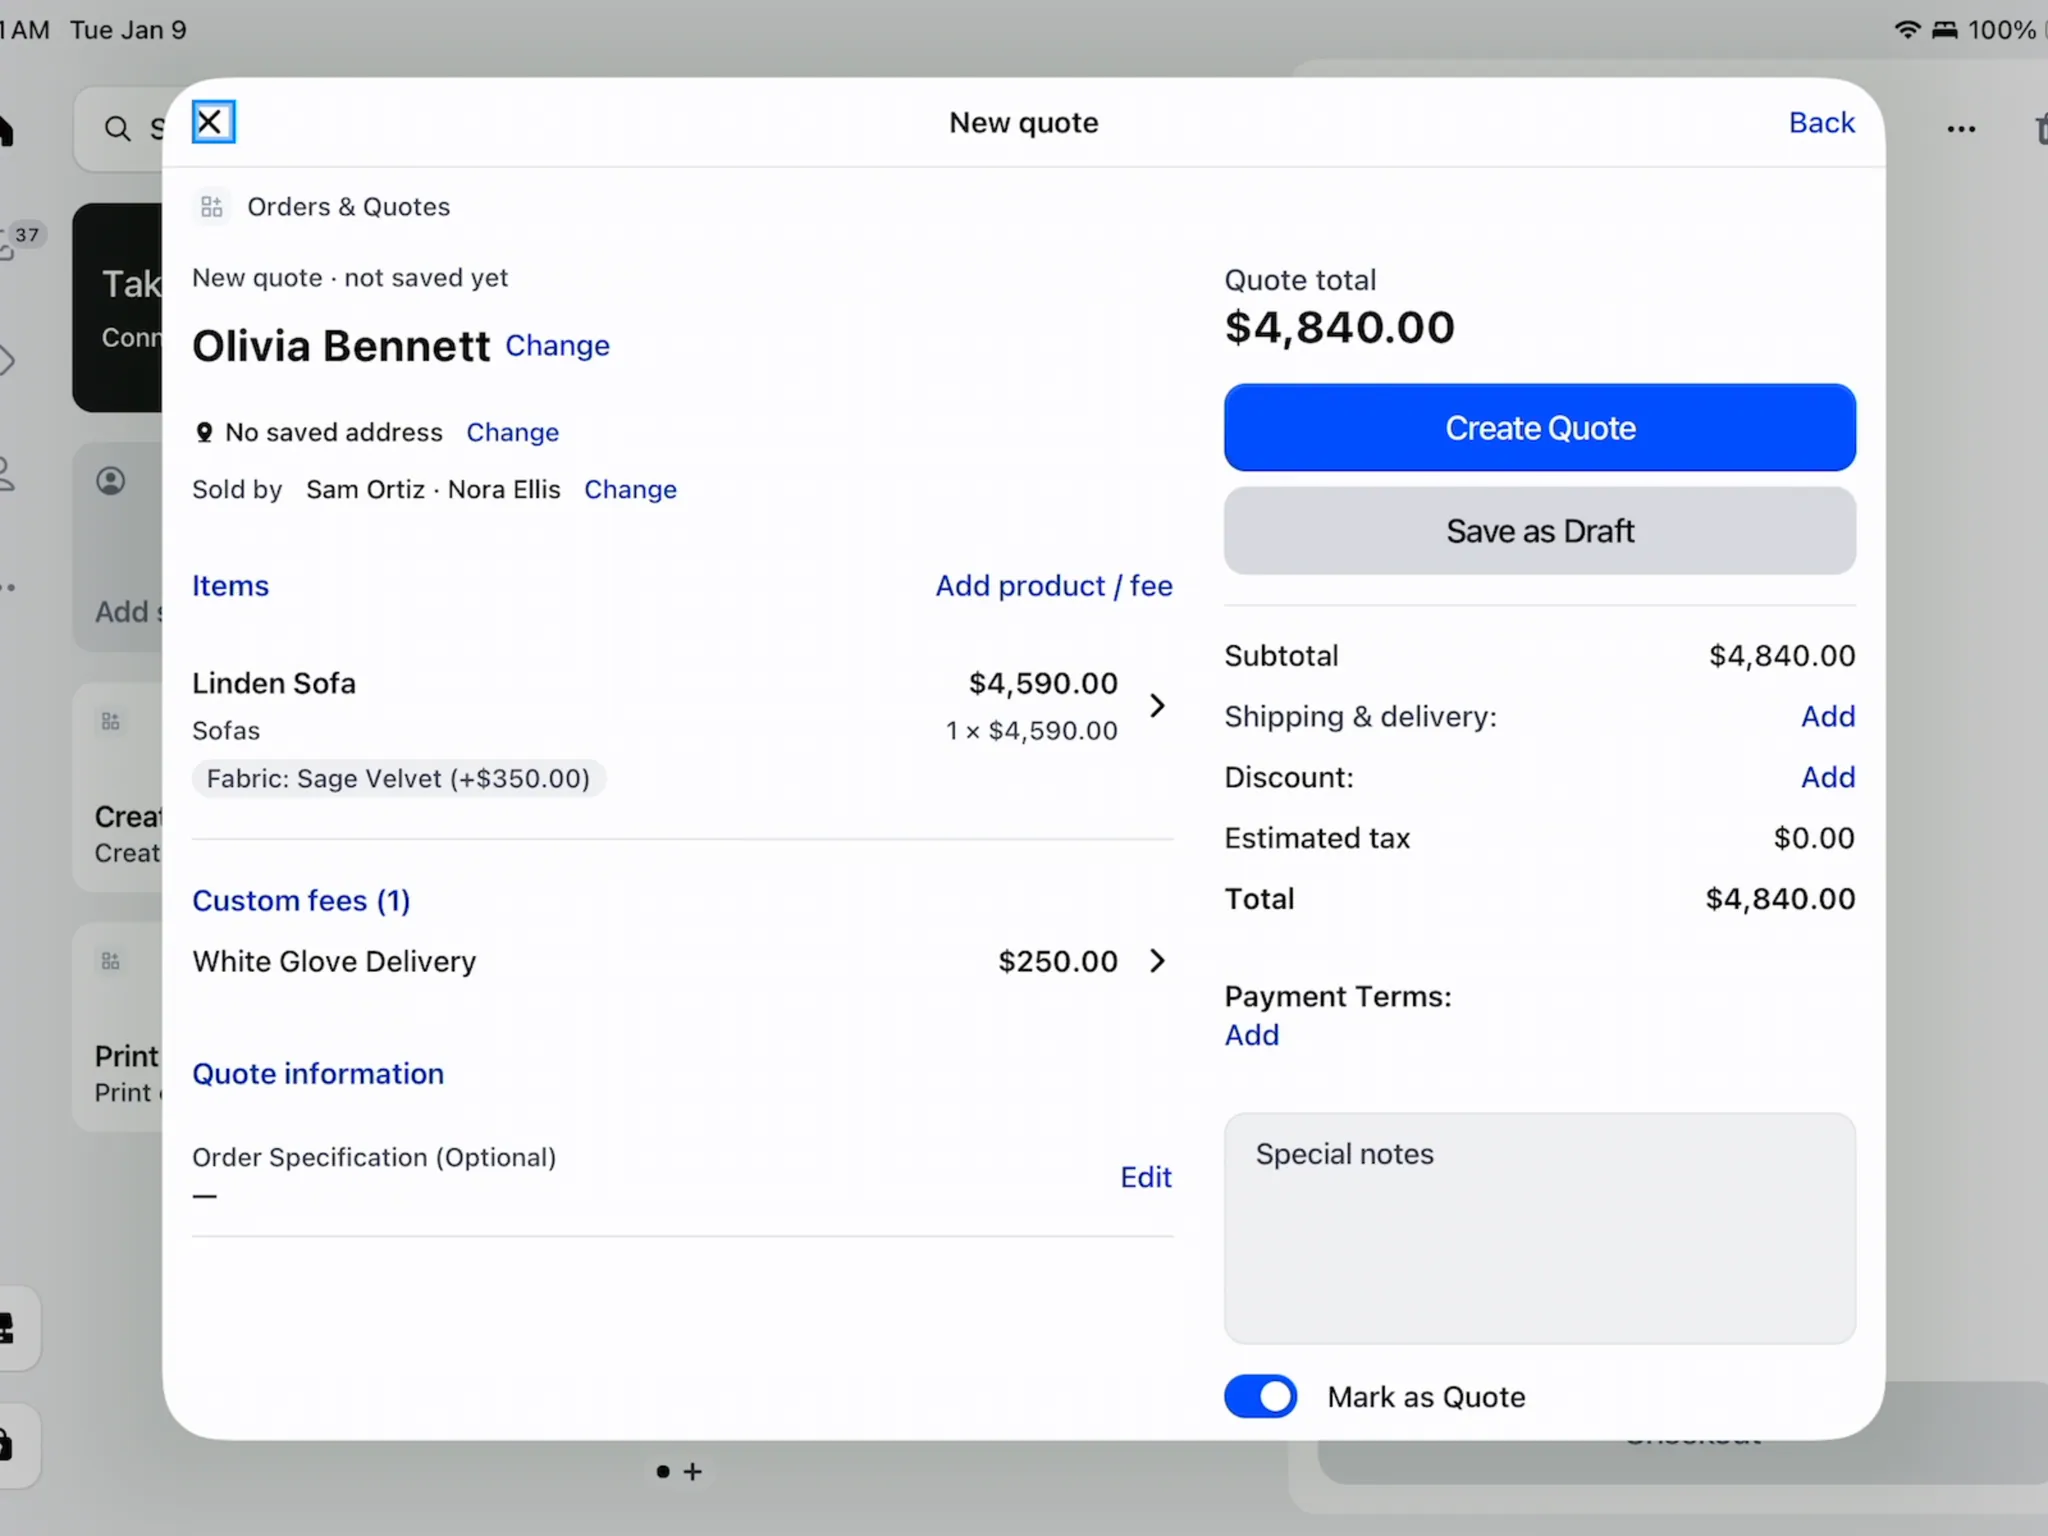
Review the customer, items and total together.
Save a draft and finish later
Step 1: Save the unfinished sale
Use Save as Draft once you have at least 1 product. A fee alone does not meet that requirement.
You can save without a customer. The draft stays in OrderPilot, ready to finish later.
Step 2: Reopen and complete the draft
Find the draft in Quotes or Orders. Add the customer, location and missing required details before creating it.
If an option is no longer offered, choose another value or Leave empty where allowed. The record becomes ready for Create Quote or Create Order.
What happens next
Created quotes and orders sync to Shopify as draft orders. Continue with Get a quote signed or Collect a payment.
Drafts have no payment or signature actions until created. Quote faster explains auto-save after the first save.
Example: Olivia's Linden Sofa
Example · Harlow & Finch Interiors
Create the configured quote
Olivia Bennett chooses her sofa at Harlow & Finch Interiors.
- Sam Ortiz selects Olivia and the showroom.
- Sam adds Linden Sofa, Sage Velvet and Feather Blend.
- Sam adds White Glove Delivery.
- Sam checks the quote and clicks Create Quote.
Example: the same sale on POS
Example · Harlow & Finch Interiors
Create from the showroom iPad
Sam Ortiz records Olivia's choices during the showroom visit.
- Sam taps Create Quote and adds Olivia.
- Sam adds and configures the Linden Sofa.
- Sam adds White Glove Delivery and checks Ships to.
- Sam leaves Mark as Quote on and creates the quote.
Important notes and tips
Customer details and product limits
The app supports a name with email or phone. POS displays Email as required; use the required fields shown.
POS phone numbers need a country code in E.164 form. US 555 numbers are rejected. For cast screenshots, use +14157151200 if a phone is necessary.
POS starts from the Shopify default address, so verify it even if you recently changed the app's address book. Editing POS customer details updates Shopify.
An order allows 50 product lines and 50 fees. Drafts relax required-option checks, but numeric bounds still apply.
If something goes wrong
Create is greyed out
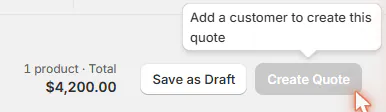
In the app, hover for the reason. On POS, read the line below the button. Check product, customer, location and vendor requirements.
A field says Required
Fill the named field. POS cannot scroll you to it automatically.
Product details are still loading
Wait for Shopify's details before adding more products or saving.
The location needs a subscription
Use Manage plan to add the location, or ask the billing administrator to finish a pending change.
Shopify sync failed: the email has an invalid domain
Shopify refused the customer's email address. Choose Edit customer from the customer card's menu, correct the address and save; the sync runs again.
The customer will not save
Check names, contact details and the address country. Keep notes below 5,000 characters and supply a shipping name when required.
The product is already on the order
Change its quantity on the existing line. Only active products on the POS channel appear in the POS picker.
You cannot delete the only address
Add another address first. Deleting an address also removes it from Shopify.
If you leave unfinished work, Stay on this page keeps the form open. Discard and leave discards the unsaved work.
Was this guide helpful?
Thanks. Tell us what was missing at support@meetorderpilot.com.