Create email templates and assign brand designs
Related guides
- Edit and publish your email designsEmails and messages · 5 min
- Choose which emails go out, and whenEmails and messages · 5 min
- Group locations into brandsSettings and integrations · 3 min
- Email blocks and merge fieldsEmails and messages · 4 min
- Email a quote or orderQuotes and orders · 5 min
An email group identifies a kind of message, such as a quote email or payment request. A template supplies that message’s subject, content and layout, while a theme supplies its visual styling.
A group can contain different templates for different brands. When sending, OrderPilot uses the applicable published design, allowing the same kind of message to carry the right branding.
For a status email, OrderPilot finds the email group, then the brand’s published version or the group’s default.
Before you start
Know how publishing works
Enable brand grouping
Use Group locations into brands before assigning brand designs.
Check access
Template setup needs Manage shop settings.
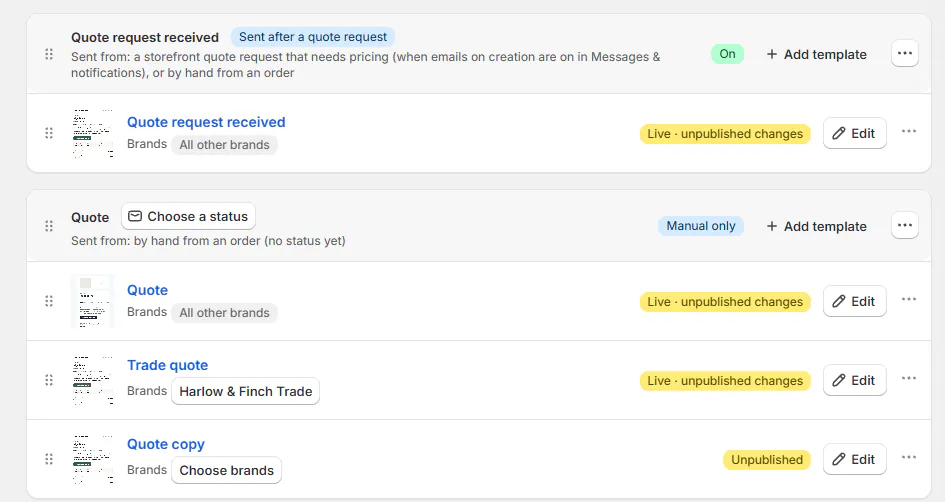
Built-in groups include Quote, Invoice, Quote follow-up, Request signature, Request payment, Signed copy, Purchase order, and Quote request received. A group can send on at most one status.
| State | What recipients get |
|---|---|
| Live | The published version. |
| Live · unpublished changes | The published version while draft edits wait. |
| Live · publish again | The existing published version until republished. |
| Unpublished | No published version from this template. |
Scheduled emails keep the version chosen when scheduled. Updating a draft doesn't restyle them.
Create a template or a group
Step 1: Open the new-template dialog
Go to SettingsBrandingEmails and click New template. Enter Name, choose Group, and choose Copy the design of when copying another design.
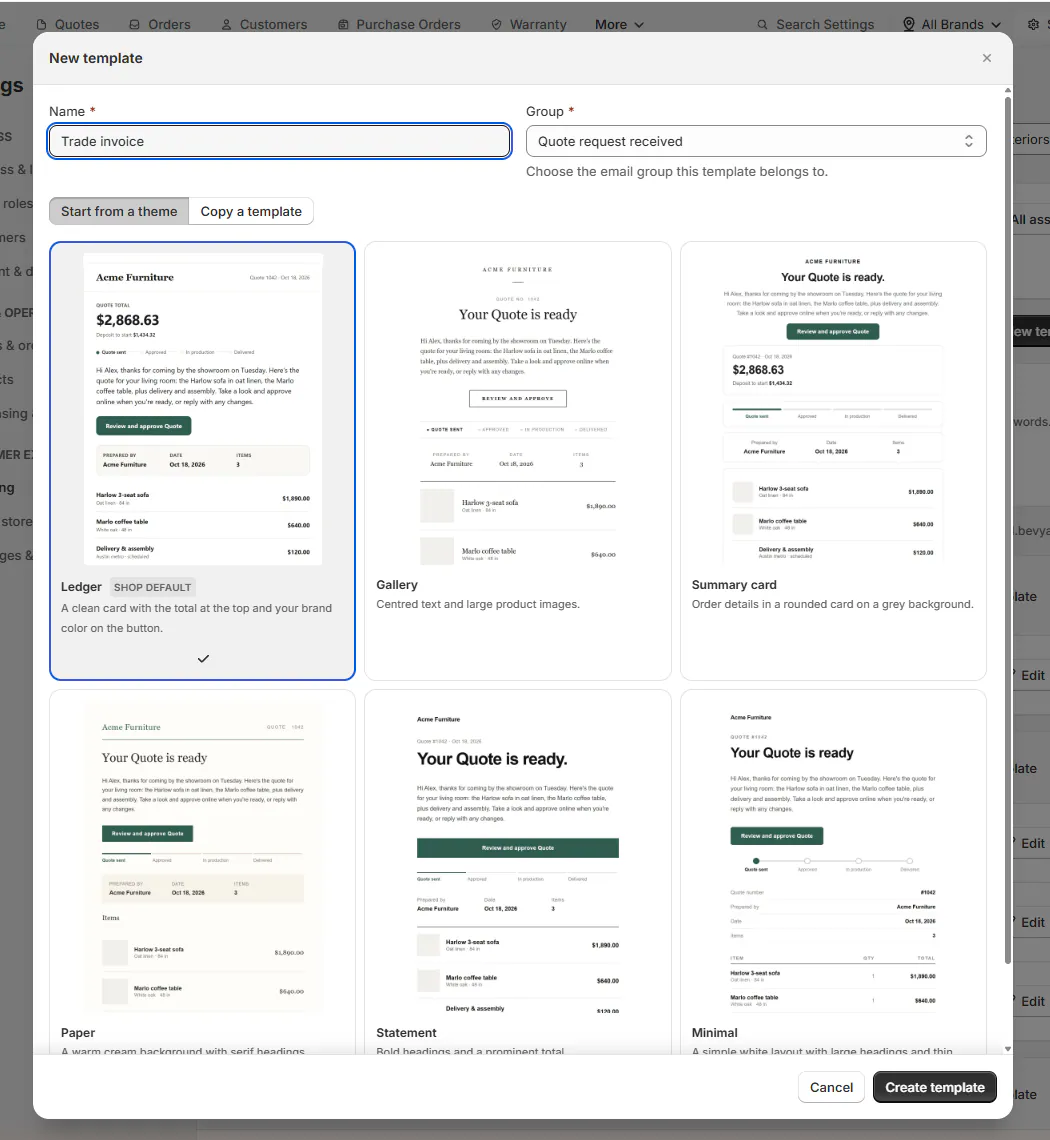
New template dialog. Step 2: Create and review the draft
Click Create template. A copied design starts unpublished with the same blocks, colors, and subject. New templates start with the default theme; copies retain the source theme.
Step 3: Create a separate group when needed
Click New group, enter Name, and choose When it sends. Select No status or the status that should trigger it, then click Create group.
Use a separate group when another status needs its own email. Sending rules explain how to assign that status without replacing an existing group's trigger.
Built-in groups remain available. You can rename them or change their status assignment, but cannot remove them.
Manage a template
Step 1: Open its row menu
Open the template's menu. Actions include Duplicate, Rename, Move to group…, Send test email, Brands…, Make it the default and Delete. A group's default template (brands All other brands) shows no Brands… or Make it the default, and its Delete is greyed.
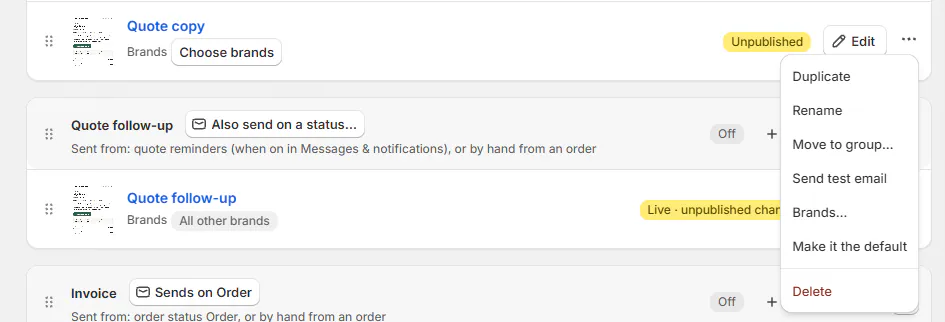
A template row's menu with Duplicate, Move to group…, Brands…, Make it the default. Send as plain text and Send with the design choose the sending presentation. Check that the selected option fits the type of message.
Step 2: Duplicate or move the design
For Duplicate, enter Name of the copy. The new copy starts unpublished with the same design, in the same group, and opens in the editor. For Move to group…, choose an eligible destination.
Signed copy, Purchase order, and Quote request received templates cannot move out of their groups, and other templates cannot move into those groups.
Step 3: Delete only an unwanted copy
Use Delete on a copy you no longer need and review the consequence. Built-in templates cannot be deleted; duplicate one to create an editable alternative.
Warning
Deleting removes the template's history
Deletion removes the copy and its version history. Assigned brands fall back to the group's default. Already sent emails remain unchanged.
Send a brand its own design
Step 1: Choose the brands
On the template row, click Choose brands, or the brand names beside Brands. Tick the brands that should use this design and click Save brands. The dialog lists any brands it will move from another template.
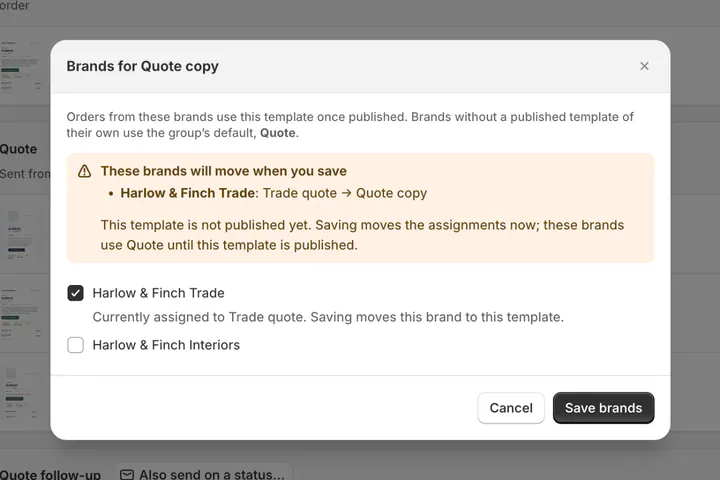
Choose brands dialog warning before replacing another template's brands. Step 2: Confirm replacements and publish
Review each brand's current and proposed template before confirming. Publish the design after checking it. Orders from that brand's locations can then use its published version.
A version with no selected brands can say This version sends to nobody until you pick its brands. Saving the design alone doesn't assign recipients.
What happens next
All brands identifies a design used across brands. All other brands marks the default fallback when a brand has no published design in that group.
Not in use can mean brand grouping is off. Until it is enabled, only the default sends.
Some actions keep their built-in template
Request signature, Request payment, signing, and storefront requests use their built-in template or its brand version. Making another copy the group's default doesn't replace those action-specific templates.
Example: give the trade brand its own quote
Example · Harlow & Finch Interiors
Publish a trade quote design
Harlow & Finch Interiors uses separate trade and showroom brands.
- Nora Ellis duplicates the Quote template.
- She names the copy for the trade brand and edits it.
- She selects the trade brand under Brands….
- She reviews and publishes the design.
- Marcus Reed's trade-location quote uses it; Olivia Bennett's showroom quote uses the default.
If something goes wrong
A copy doesn't send
Check that it is published, assigned to brands, and supported by that sending action.
Delete is missing
Built-in templates cannot be deleted.
A group won't accept a template
Signed copy, Purchase order, and Quote request received have fixed membership.
Two statuses need the same design
Copy the template into another group and assign that group's status.
Was this guide helpful?
Thanks. Tell us what was missing at support@meetorderpilot.com.