Connect statuses and add Next status buttons
Related guides
- How the status map worksStatuses and workflow · 7 min
- Automate your workflow: events, conditions and actionsStatuses and workflow · 5 min
- Test, publish and restore the status mapStatuses and workflow · 5 min
- Set up your statuses and customer groupsStatuses and workflow · 6 min
- Change an order’s statusStatuses and workflow · 5 min
Connect your statuses so the map knows the next move. Use a Next status button when staff should record a decision, such as a vendor's confirmation.
Connections stay in a draft until published. Drawing a line does not immediately move existing orders.
Before you start
Check access
You need Manage order and quote settings to edit the map.
Prepare the statuses
Create your stages, or add a missing status directly on the map.
Understand the connection
Read How the status map works for events, conditions and priority.
Use clear connection names that describe the action staff take. Vendor confirmed explains why a salesperson moves the order; a destination name alone explains less.
Draw a connection
Step 1: Open the status map
Go to SettingsQuotes & ordersStatuses and click Status map. Show the groups containing your starting and destination statuses.
The canvas displays those status cards and their existing connections.
Step 2: Add a missing status
If the destination does not exist, click Add status. Enter its name and choose the customer group.
Press Enter or click the map to add it. Esc cancels the addition.
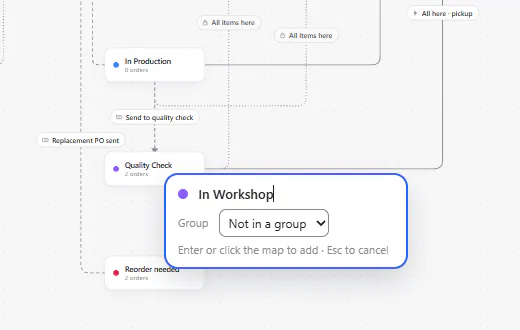
Add status on the map with the name field and group select Adding the status creates the card, but you still need to connect it. Choose the group according to what customers should see at that stage.
Step 3: Draw between the cards
Drag from any of the starting card's 4 dots to the destination card. For this example, connect Sent to Vendor to In Workshop.
The new connection opens in its editing panel.
The connection cannot start and end on the same card. Any status can be a starting point, but never a destination.
Step 4: Name the connection
The name starts as Next status, selected so you can type over it, such as Vendor confirmed. Review When, Unlocked when, Unlocked only if and Then.
A new connection starts as Staff press Next status, with Whole order, all conditions and the status-email option enabled.
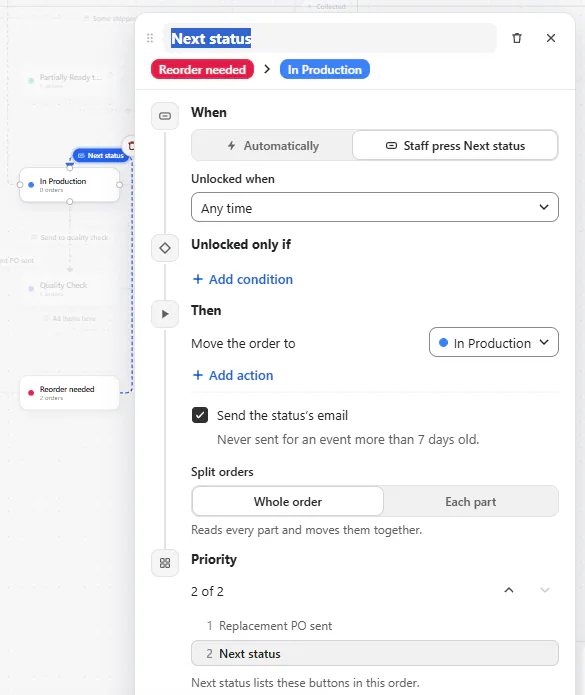
Connection panel of a new connection: the name selected, When set to Staff press Next status, Unlocked when Any time Do not assume those starting choices fit every workflow. In particular, check email behavior before publishing a customer-facing movement.
Step 5: Save the connection details
Complete When or Unlocked when, review Only if and Then, and click Done.
Wait for Draft saved. Your connection is recorded in the draft, ready to test.
For automatic movements or extra actions, use Automate your workflow.
Add a staff-controlled button
Step 1: Choose staff control
Open the connection and choose Staff press Next status under When.
The panel presents Unlocked when, which determines when staff can use the button.
Step 2: Choose when it unlocks
Choose Any time when only the conditions below should decide. Otherwise choose the event that must happen first.
Set Unlocked only if for additional requirements, such as full payment or a signature. The connection now records what the button waits for.
An always-available button is suitable for a staff judgment, such as confirming a phone call. Evidence-based steps can wait for the relevant condition.
Step 3: Check destination and order
Under Then, confirm Move the order to and its destination. Use Priority to place the button among the other choices.
Click Done. The draft records the button's destination and its position in Next status.
The supplied Vendor confirmed connection from Sent to Vendor to In Production provides an example of this pattern.
Step 4: Test and publish
Follow Test and publish the status map before making the button available.
Once published, the order page can show it under Next status when the order is at the connection's starting stage.
Remove a connection
Step 1: Select the connection
Click your connection on the map. Its panel opens with Delete connection in the header.
Only shop-created connections can be deleted. System connections allow changes to their actions and priority, while their movement remains protected.
Step 2: Delete and publish
Choose Delete connection, or press Delete or Backspace while it is selected. The draft removes the connection.
Publish the draft when you intend the removal to take effect. Until then, orders continue following the live map.
Check other routes out of that status before publishing. Removing its only staff button can leave no suggested next move.
What happens next
The top Next status row is the move the map checks first. Other choices appear under Can also move to, with backup staff buttons under More.
A greyed row explains its waiting condition on hover. Examples include the customer's signature, full payment or every PO item arriving.
Clicking an available button confirms Moved to the destination. Staff can follow Change an order's status for day-to-day use.
The manual status picker remains separate from the map's suggestions. A connection defines a supported route, not every status a permitted person can choose.
Example: record vendor confirmation
Example · Harlow & Finch Interiors
Move Olivia's sofa into the workshop
Nora Ellis prepares Harlow & Finch Interiors' workshop stage.
- Create In Workshop in the In production customer group.
- Draw Sent to Vendor to In Workshop.
- Name the connection Vendor confirmed.
- Set it to Staff press Next status, then test and publish.
- When Atelier Homeworks confirms Olivia Bennett's sofa, Sam Ortiz chooses Next status > Vendor confirmed.
The order moves into In Workshop when staff record the vendor's response.
If something goes wrong
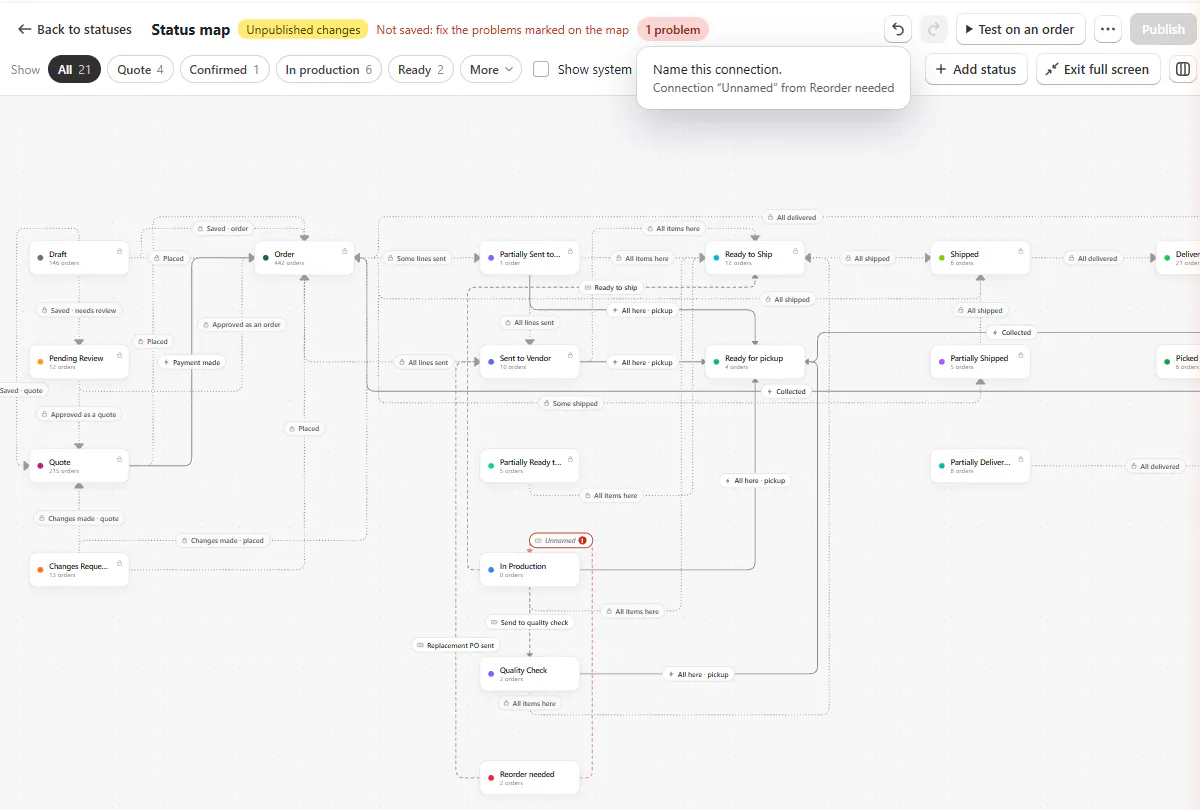
Name this connection appears
Enter a useful action name before publishing.
The connection points back to itself
Choose a different destination card.
Nothing can point into Any status
Use an actual status as the destination.
Pick when this connection runs appears
Choose the triggering event or staff-button behavior.
The destination is switched off
Activate that status or choose another destination.
The map warns about an endless loop
Add a meaningful condition or make one direction wait for a new event.
Nothing comes next from here appears
Check that a connection from this status exists in the published map.
The button is greyed out
Read its hover explanation and meet the stated requirement.
Was this guide helpful?
Thanks. Tell us what was missing at support@meetorderpilot.com.