Set up categories
Related guides
- How the catalog fits togetherCatalog · 6 min
- Create a product templateCatalog · 6 min
- How templates sync to Shopify productsCatalog · 5 min
- Set template locations, tax categories and servicesCatalog · 5 min
- Add terms to quotes and ordersPayments and signatures · 4 min
A category groups related product templates so your team can find and manage them together. Categories can contain subcategories, giving your catalog a structure that follows how your store organizes its products.
A category can also carry shared rules, such as warranty terms, signature requirements, deposits and commission settings. The options attached to each template determine the choices available when selling it; assigning a category does not add those choices.
Use options and bundles to define the product’s configuration.
Before you start
Check your access
You need Manage the catalog to create, edit, move or delete categories. Without it, the row menu offers View.
Plan the tree
You can have 500 categories, including subcategories, across 3 levels. Installation adds Default Category.
Separate groups from choices
Living room and Sofas are categories. Fabric and Cushion Fill are options attached through bundles or templates.
Category names must be unique under the same parent. Choose names your sales team recognizes, and keep enough room for future subcategories.
A category can hold rules without changing the product's available options. Review those rules before assigning several templates to a new category.
Create categories and subcategories
Step 1: Open Categories
Go to SettingsProductsCategories. The category tree opens, showing the existing groups and their positions.
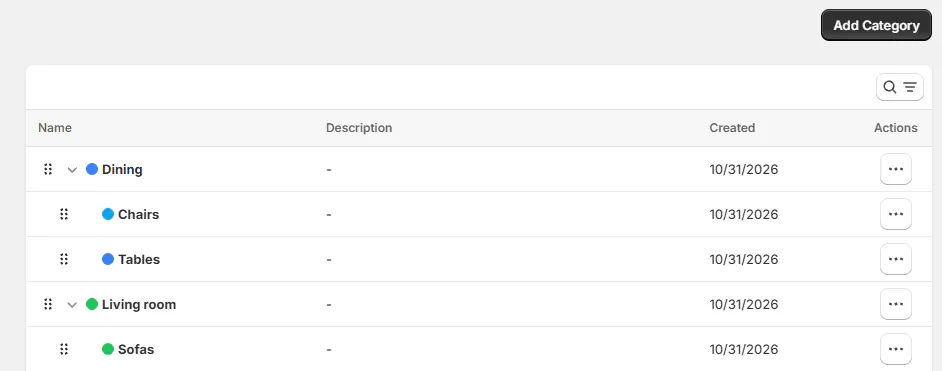
Categories group templates in a tree. Step 2: Enter the category name
Click Add Category. In Create New Category, enter Name. For a top-level category such as Living room, leave Parent Category empty.
To create Sofas beneath Living room, choose that parent. Add a Description if your team needs more context. The dialog shows the proposed name and parent.
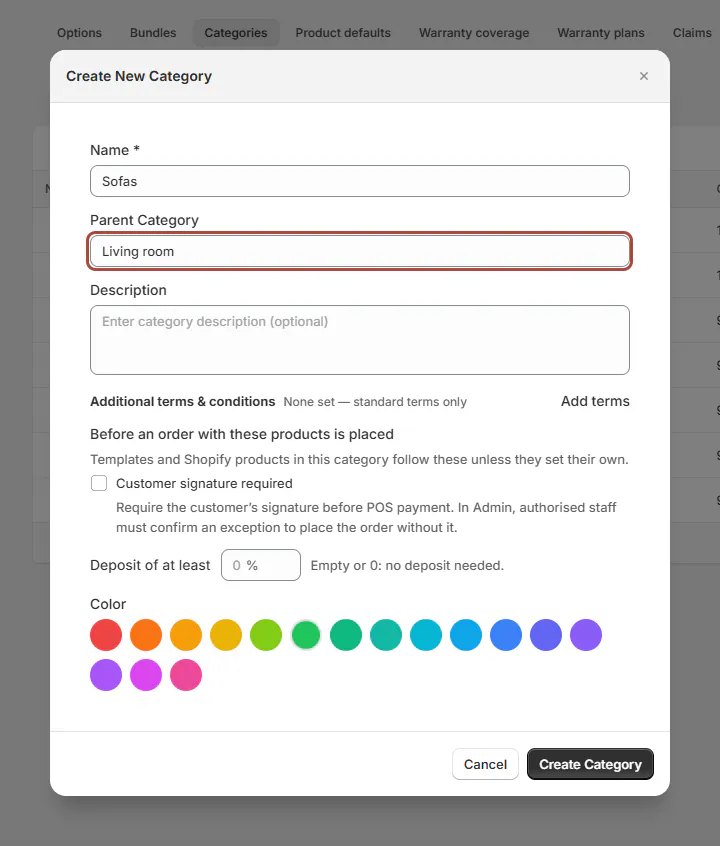
Choose a parent to create a subcategory. Step 3: Choose the category's rules
Click Add terms beside Additional terms & conditions if products in this category need their own wording. These print once after standard terms and before product-specific terms.
Under Before an order with these products is placed, set Customer signature required or Deposit of at least when needed. Empty or 0 means no deposit.
Choose Color. The dialog now contains the category's grouping details and any requirements you set.
For the consequences of these choices, read Terms on documents and Signature and deposit requirements.
Step 4: Create the category
Click Create Category. Category created successfully shows and the category appears in the tree.
To add a child later, open its parent's row menu and choose Add child. Complete the same dialog and click Create Category.
Add child is available on levels 1 and 2. A level-3 category cannot have another child.
Rename or move a category
Step 1: Edit the category
Open the category's row menu and choose Edit. In Edit Category, change the name, description, rules or color, then click Update Category.
The tree reflects the saved change. Renaming a parent also re-syncs the Shopify product type for templates in its subcategories.
Step 2: Choose a commission code
When editing an existing category, choose its Commission code if required. This saves as you choose it.
The code applies to category lines and subcategories without their own code, unless a line or template overrides it. See Set up commission.
Step 3: Move the category
Drag the row by the dotted handle at its left and drop it under the intended parent. Category updated successfully shows with the new position.
Where you drop it decides the level, and a drop just below a child can nest it one level too deep. To be sure, open the row menu, choose Edit and change Parent Category instead.
Check the entire branch's depth before moving it. You cannot move a category beneath its own descendant or exceed 3 levels.

Move a category by its row handle. Restore an earlier category version
The edit dialog's Activity card lists earlier versions with restore controls. See History and restore. Restoring closes the dialog so a later save cannot overwrite the restored version.
Delete a category
Step 1: Check what uses the category
Review its templates and direct subcategories before deleting. Decide whether those templates need another category and whether its children should become top-level groups.
Deletion does not check whether templates use the category. This review gives you a clear picture of what will lose its grouping.
Step 2: Confirm deletion
Open the row menu, choose Delete, and review Delete Category. Confirm only when you intend to remove that category.
The app confirms Category deleted successfully. Its direct subcategories move to the top level, and its templates lose that category.
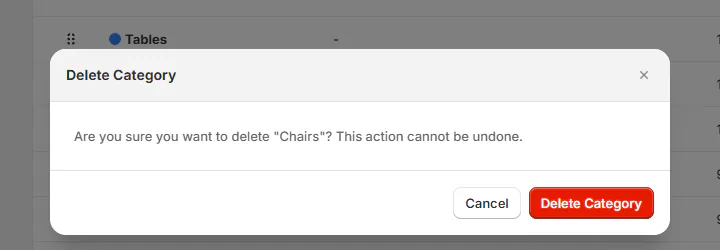
Check the category name before confirming deletion. Warning
Deletion cannot be undone. Templates lose the category, and their Shopify product type is re-synced or cleared.
What happens next
Choose the category under Organization > Category when you create a product template. Its Shopify product type follows that category.
Renaming or moving a category re-syncs templates in and below it. See Templates and Shopify products before reorganizing a large branch.
Category warranty rules are managed through warranty coverage. Additional terms and placement requirements remain available in the category dialog.
Tax category on a template is separate from OrderPilot's category. Read Template special cases when setting Shopify's product category.
Example: Harlow and Finch's category tree
Example · Harlow & Finch Interiors
Organize sofas and dining furniture
Nora Ellis organizes Harlow & Finch Interiors around the showroom's furniture groups.
- Create Living room, then add Sofas beneath it.
- Create Dining, with Tables beneath it.
- Move the existing top-level Chairs category beneath Dining.
- Assign Linden Sofa to Living room > Sofas.
- Rename Tables to Dining tables when that wording helps staff.
The tree follows the team's vocabulary, and affected templates re-sync their Shopify product types.
If something goes wrong
The name already exists
Another category has that name under the same parent. Choose a different name or edit the existing category.
Add Category is greyed out
Hover for the reason. At 500 categories, remove an unneeded category before adding another.
Add child is missing
The category is already at level 3.
A move is refused
Check the destination is not a descendant and that the resulting branch stays within 3 levels.
Shopify's product type changed
Renames, moves and deletions re-sync affected templates. Check the category before correcting the Shopify value.
Was this guide helpful?
Thanks. Tell us what was missing at support@meetorderpilot.com.