Handle a warranty claim
Related guides
- Set up warranty claims and staff accessWarranty and service · 6 min
- Book repair visits and print job sheetsWarranty and service · 4 min
- Replace, refund or credit a claimWarranty and service · 6 min
- Check and change warranty on an orderWarranty and service · 5 min
- Start, end or extend coverage by handWarranty and service · 4 min
A warranty claim records a specific problem reported about one or more sold units. It brings together the evidence, coverage decision and work needed to resolve the problem, such as a repair or replacement.
Warranty coverage records the terms agreed for the item. A claim uses those terms when your team decides how to respond. Keep one problem per claim so its evidence, decision and costs stay clear.
Claims are handled in the OrderPilot app. Use the order or coverage record to identify the actual unit before starting.
Before you start
Prepare claim settings
Follow Set up warranty claims.
Check permissions
Working a claim needs Manage warranty claims. Decisions need Approve and decline warranty claims.
Check delivery
The unit must be delivered or eligible with delivery not recorded. Unshipped or cancelled deliveries cannot start a claim.
Your order scope also applies to claims. Goodwill and a Covered decision when no claimed unit is covered need Override warranty coverage.
Start a claim
Step 1: Find the affected units
Open Warranty claims and click Start a claim. You can also start from an order's Warranty panel or a coverage lookup row.
In Step 1 of 2 · Which units, use Find the order. Search by order number, customer, product, or serial, then tick affected units from one order. Started from an order's Warranty panel, the step already shows that order's units.
Step 2: Describe the problem
Click Next. In Step 2 of 2 · The problem, choose Affected part and What went wrong. Enter Customer's description, then the problem start date where known.
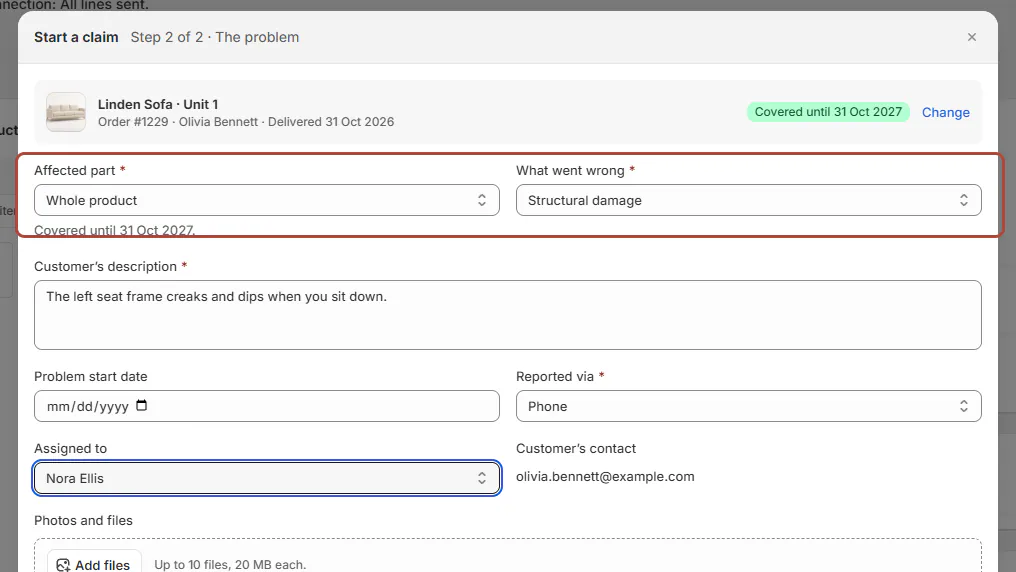
Start a claim step 2 with reason and description. Choose Reported via as Phone, Email, or In store, and select Assigned to. The description allows 5,000 characters.
Step 3: Attach evidence and start
Add Photos and files, up to 10 files initially and 20 MB each. Review Email followed by the customer's name a confirmation, then click Start claim.
Excluded or uncovered parts can still be reported. If delivery isn't recorded, approving the claim as covered asks for a delivery date.
A failed confirmation email doesn't undo the claim. If the result says the claim started but the email failed, open that claim instead of creating a duplicate.
Work and decide the claim
Step 1: Find the claim in the queue
Use the status tabs, search, and Assigned to, Vendor, Reported via, or Waiting on filters. Sort by Last updated, Claim number, or Date reported.
The queue lists 25 claims per page. Open for turns amber after 14 days. Use the age alongside the problem and waiting state to prioritize the work.
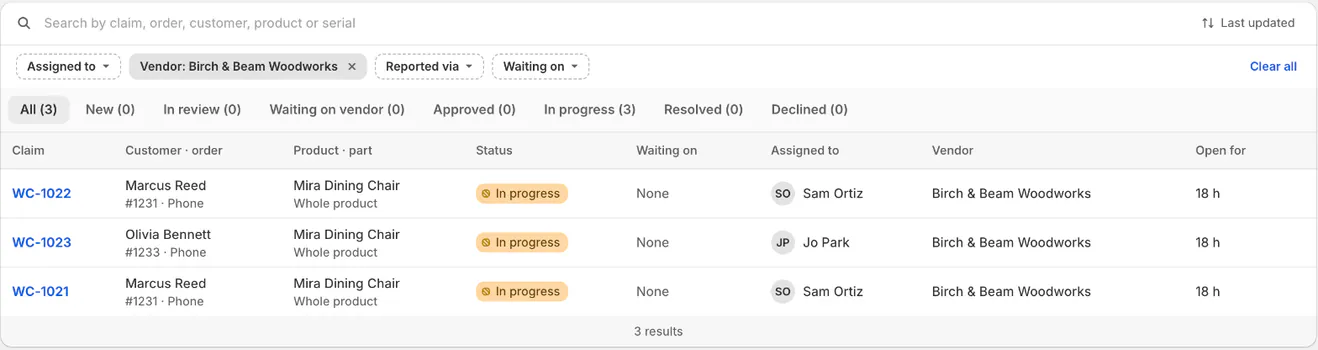
Filters narrow the queue; Open for shows how long each claim has been open. Step 2: Update responsibility and notes
Open the claim and set Status, Waiting on, and Assigned to as appropriate. Enter a team note through Add a note for the team…, then Add note.
The next-action button guides the work. A claim in review moves forward through its decision, not by skipping directly to another status.
Step 3: Ask the vendor when needed
Use Ask followed by the vendor name, or Skip: decide without asking (the reason under Why is optional). Asking the vendor needs Send and cancel purchase orders.
The vendor receives a photo link valid for 60 days. It exposes files only, without customer name, address, or prices. Share only files appropriate for the issue.
Step 4: Record the vendor's answer
Choose Approved, Approved in part, or Denied. Record What they'll do, Their reference, and What they said. The vendor tile preserves their response.
Skipping the vendor step doesn't prevent asking later. Keep the vendor's answer separate from your store's final decision.
Step 5: Decide coverage and the fix
Under Decide, choose Covered, Covered in part, Goodwill, Paid repair, or Declined. Select the fix and complete What's needed, including Kind, Who pays, and Price.
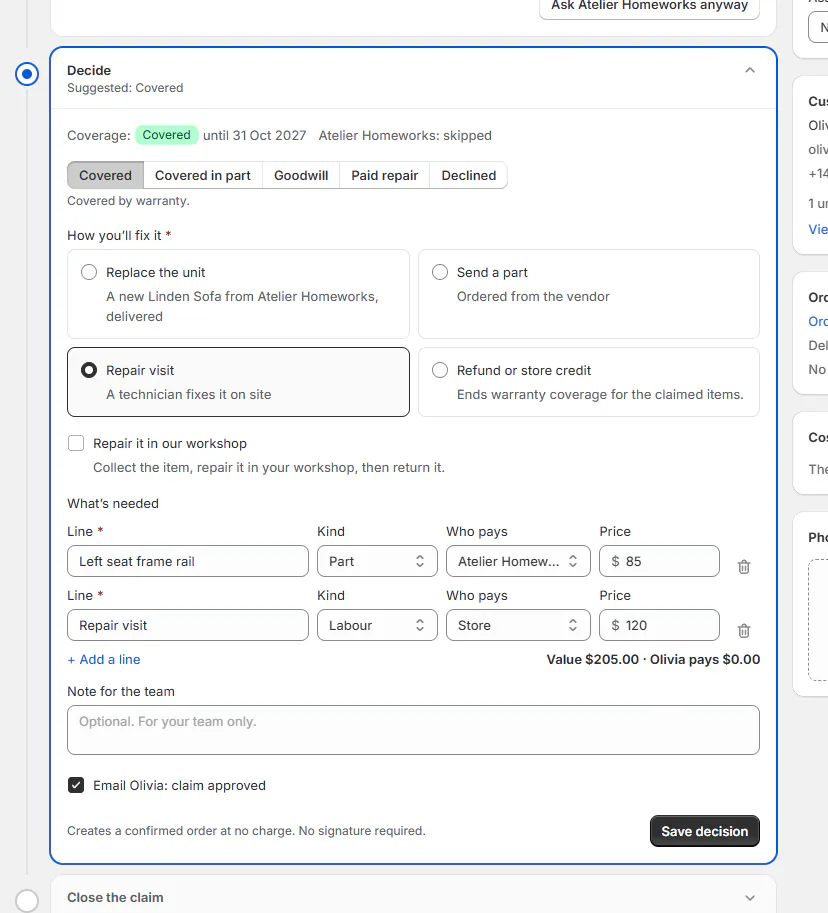
Decide tile with Covered, Send a part and who-pays lines. Pick one fix: Replace the unit, Send a part, Repair visit, or Refund or store credit. A repair can also be done in your workshop with Repair it in our workshop. Click Save decision after checking the customer, store, and vendor shares.
Suggested: Covered is a suggestion based on coverage at report time. It doesn't replace the decision. If delivery is missing, confirm the supplied delivery date or obtain an authorized alternative.
Step 6: Decline or request information when appropriate
For a decline, choose the reason and review the customer message before Decline and email. Open replacements, refunds, credits, or other unfinished actions may need completion or cancellation first.
Use the header email action for updates. To ask for details, open the first tile (Reported via …) and click Ask followed by the customer's name for more information. Tick Photos of the problem, The serial number, Proof of purchase, or When it started; the message rewrites itself. Customer emails need Email customers.
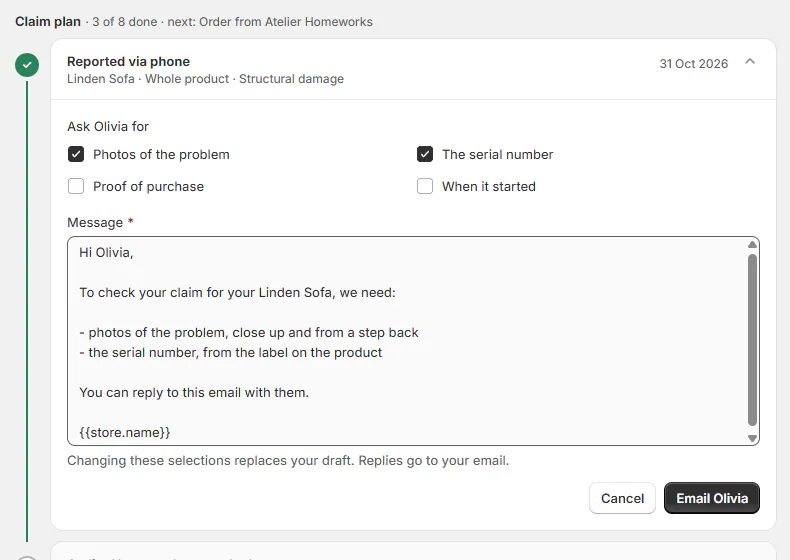
Ask Olivia for more information, on the claim's first tile. Step 7: Complete the chosen work
Follow repairs and job sheets for visits, or parts, replacement, and refunds for the other remedies. The claim identifies the next unfinished step.
A customer-paid warranty quote may need a signature and deposit before work can begin. A no-charge warranty order doesn't need either.
Close or reopen the claim
Step 1: Review completion
Open Close the claim when it says Every step is done. Check each payer's share and the recorded outcome. An open replacement prevents closure.
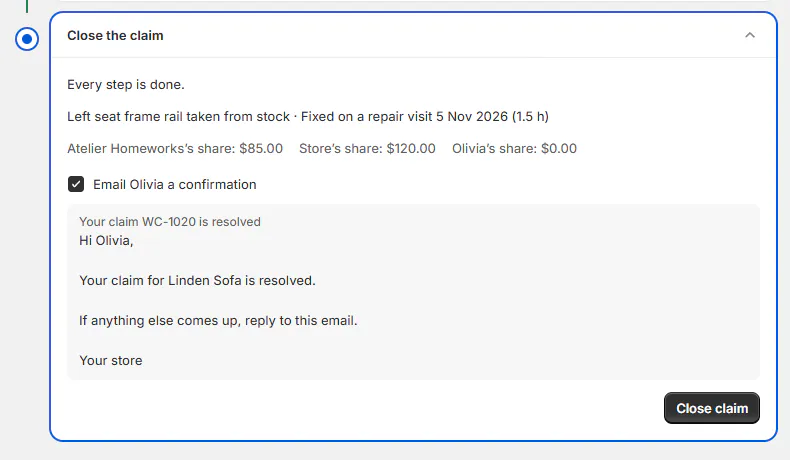
Close tile with every step done. Step 2: Resolve and notify
Review Email followed by the customer's name a confirmation, then click Close claim. The confirmation email says the claim is resolved.
Step 3: Reopen if further work is needed
Use Reopen claim in the resolved claim's Closed tile when authorized. This needs Approve and decline warranty claims. A changed decision is recorded in the claim history.
What happens next
The resolved claim remains searchable. Claim emails stay on the order's email log, and warranty analytics includes the claim within your access scope.
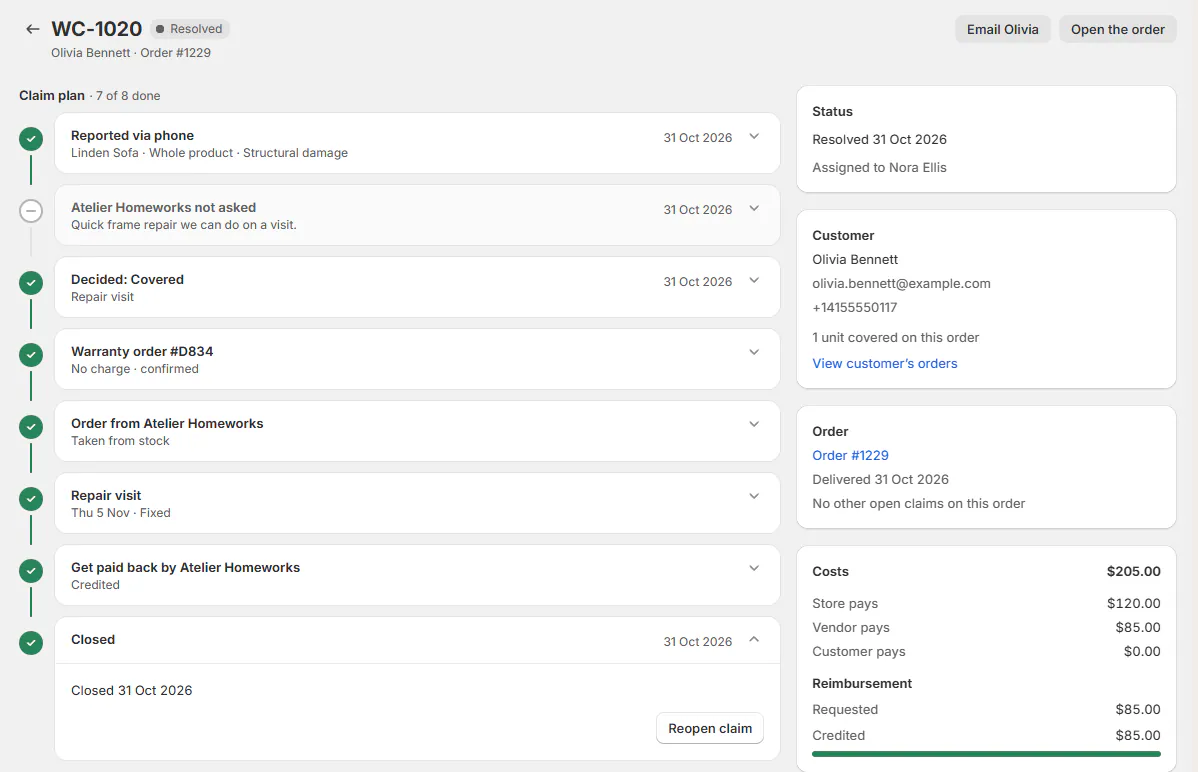
Example: repair Olivia's recliner
Example · Harlow & Finch Interiors
Take a mechanism claim through service
Olivia Bennett reports a failed Linden Sofa mechanism 14 months after delivery.
- Sam Ortiz starts WC-1001 with the correct unit and photos.
- Atelier Homeworks agrees to supply a part at its cost.
- An authorized colleague decides Covered with a part and repair visit.
- Jo Park receives the part and records the completed repair.
- The vendor's recovery is recorded, and the claim closes.
If something goes wrong
Start a claim is unavailable
Check access, an existing open claim, and whether coverage was stopped.
Delivery isn't recorded
Confirm actual delivery, then use the authorized coverage correction.
The customer cannot be emailed
Add their email to the Shopify customer record.
Close is blocked
Complete or cancel the remaining action identified by the claim.
Was this guide helpful?
Thanks. Tell us what was missing at support@meetorderpilot.com.