Create and manage roles
Related guides
- How roles and permissions workTeam and permissions · 6 min
- Give staff accessTeam and permissions · 7 min
- Hand over an order and choose who’s in the salesperson listTeam and permissions · 4 min
- Profit, commission and configuration reportsReports · 6 min
- Keep Shopify costs right and read your marginsInventory and costs · 5 min
Create a role for a job in your store, choose the records it can reach and review changes before applying them. A role change affects everyone assigned to that role.
Before you start
Can you manage roles?
You need Create and edit roles. You can grant only access you hold.
Do you need a different role?
Each person has one role. Review how permissions work before changing it.
Are you narrowing an administrator?
Duplicate Store administrator; its permission ticks cannot turn it into a limited role.
Changes apply when staff next load a page or open OrderPilot on POS. To block one person, suspend their access instead of disabling a shared role.
Create a role
Step 1: Open the role editor
Go to SettingsStaff & rolesRoles and click Create role. New role opens with Not saved yet.
To start from an existing role, choose Duplicate on its card. The editor opens Copy of that role, omitting permissions you cannot grant.
Step 2: Name and describe the role
Enter a unique Name, up to 60 characters, and an optional Description, up to 300 characters.
The description appears when someone chooses a staff member's role. Use it to explain the job the role supports.
Step 3: Choose app access
Under Where they can use OrderPilot, tick In Shopify admin, On Shopify POS, or both.
A new role starts with both enabled but no permissions. If both are off, the role cannot open OrderPilot anywhere.
POS applies its own restrictions, including always hiding vendor costs.
Step 4: Select permissions and save
Tick the individual permissions or permission groups needed for the job. Read dependency hints and the N of 48 selected count.
Set the record access described below, then click Save in the save bar. Role created confirms the new custom role.
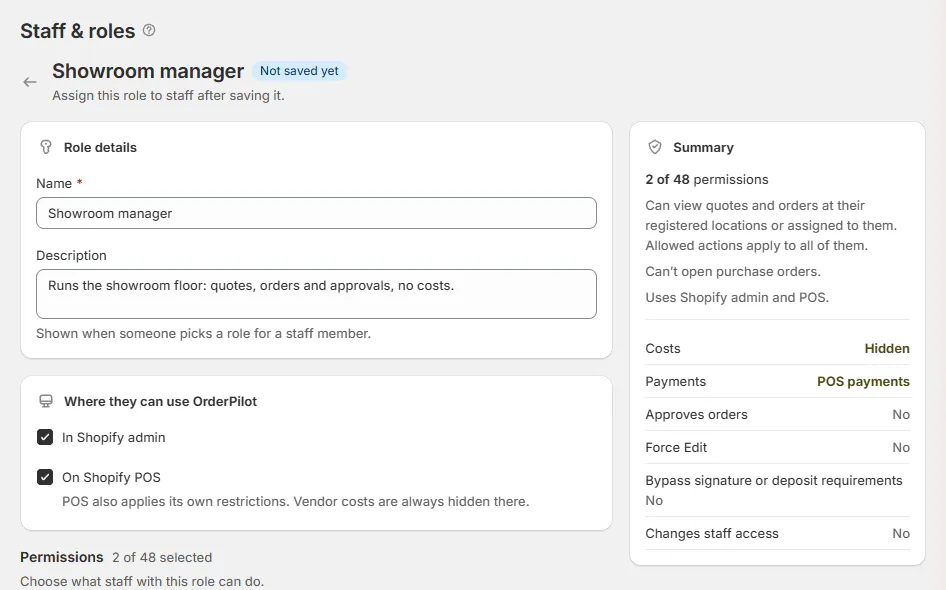
Choose where the role works before granting its actions.
Edit an existing role
Step 1: Open and change the role
Choose Edit role on its card. Change permissions, record scope or allowed surfaces.
The header identifies how many people hold the role and who last changed it. Use that count to check who will be affected.
Step 2: Review the changes
Click Save. If an assigned role's permissions, records or surfaces changed, Save changes to opens.
It names who holds the role and lists only what changed: They’ll be able to, They’ll no longer be able to, Which records or Where they can use OrderPilot. The change is recorded on the Activity tab under your name.
Click Save role to apply the reviewed change. Other saves can complete directly without this review dialog.
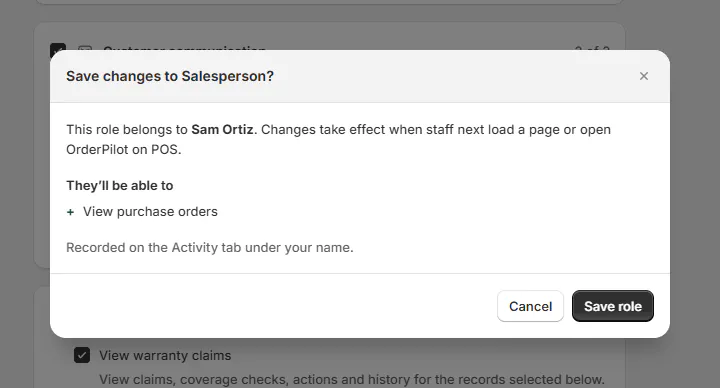
Review the access change before saving.
Choose which records the role reaches
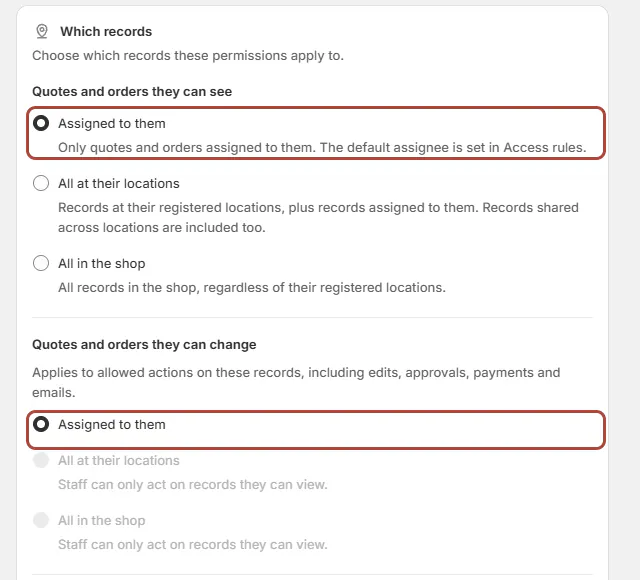
Step 1: Set the viewing scope
In Which records, choose Quotes and orders they can see: Assigned to them, All at their locations or All in the shop.
Assigned to them uses the order's owner, its primary salesperson. Being credited further down the list doesn't grant access. See assignment and salespeople for that distinction.
Step 2: Set change and purchasing scope
Choose Quotes and orders they can change. It cannot be wider than what they can see.
For Purchase orders they can access, choose At their locations or All in the shop.
Save and review the change. A wider viewing scope can let staff read records they still cannot edit.
If a choice is greyed out, first select the permission that enables that area. You also cannot grant a scope wider than your own.
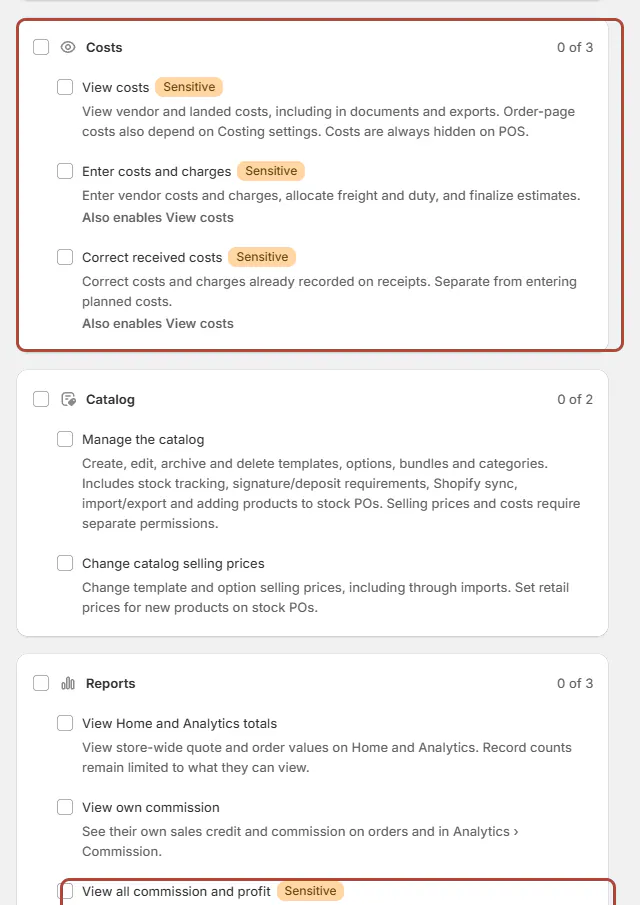
Hide costs from a role
Step 1: Remove the cost permissions
Untick View costs, Enter costs and charges and Correct received costs.
Also untick View all commission and profit, which enables View costs and View own commission. Check the resulting permissions before saving.
Step 2: Review the remaining work
Save the role and check its intended job. Staff can still receive goods with Receive items while cost columns remain hidden.
Receipt costs use the PO price when the person cannot enter costs. Customer-facing documents and POS do not expose internal order costs.
Without cost access, a PO email can go only to the vendor and default CC/BCC recipients.
Screen reference
Delete a role
Step 1: Clear its assignments
Move current staff to another role and clear any pre-assignments. If it is the default for people without a role, change that default in Access rules.
You cannot delete your own role while assigned to it. Ask another administrator to change your assignment first.
Step 2: Delete the unused role
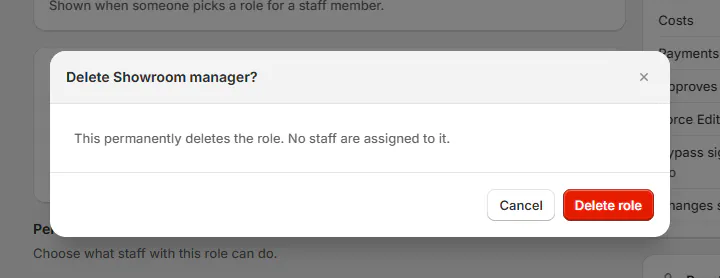
Choose Delete role from the role card's menu or at the top of the role page. Read the named confirmation before confirming.
Role deleted confirms removal. Deletion is permanent, and a deleted starter role stays deleted.
What happens next
Assign a new role through Staff. Changes to existing roles appear on Activity under the person who made them.
A role with no staff remains available as a custom role until assigned or deleted. It does not alter anyone's permissions by existing alone.
Example: a Showroom manager role
Example · Harlow & Finch Interiors
Give Nora review access without changing Sam's role
Harlow & Finch Interiors needs a manager who can review showroom orders.
- Duplicate Salesperson and name it Showroom manager.
- Add Approve, reject or request changes.
- Choose All at their locations for the intended scope.
- Save and assign it to Nora Ellis.
- Keep Sam Ortiz on his assigned-record Salesperson role without costs.
If something goes wrong
A permission is locked
Your role does not include it. Ask the store owner to grant the required access.
The role name already exists
Choose a distinct name before saving.
The editor says View only
Your current role cannot change this role.
Delete is blocked
Read whether staff, a pre-assignment, the default rule or your own assignment still uses it.
Store administrator permissions remain enabled
Duplicate it to create a narrower custom role.
Was this guide helpful?
Thanks. Tell us what was missing at support@meetorderpilot.com.