Fine-tune how options look and behave online
Related guides
- Put a product template on your online storeOnline store · 6 min
- Create options and valuesCatalog · 6 min
- Show or narrow options with rulesCatalog · 4 min
- Set up a Dimensions option for custom sizesCatalog · 4 min
- Style the options block with your theme and CSSOnline store · 4 min
Choose how each option appears online without changing its pricing or saved type. You can set a shared default, override one template, or hide a staff-only choice.
Start with a template already set up online. Changes need Manage the catalog.
Before you start
Prepare images and colors
Every offered value needs a color for Colour swatches, or an image for image-based looks.
Check option requirements
Add-on checkbox needs exactly 1 offered value and an optional choice.
Keep behavior separate
A look changes presentation. The option type still controls pricing, rules and what the order saves.
Choose a template's look
Step 1: Open the option row
Open the template's Online options and expand the option. Its Look choices appear as cards.
The looks the option type can use are offered; the others are greyed. A line under the cards says which look Follows the option gives, such as Automatic (Colour swatches).
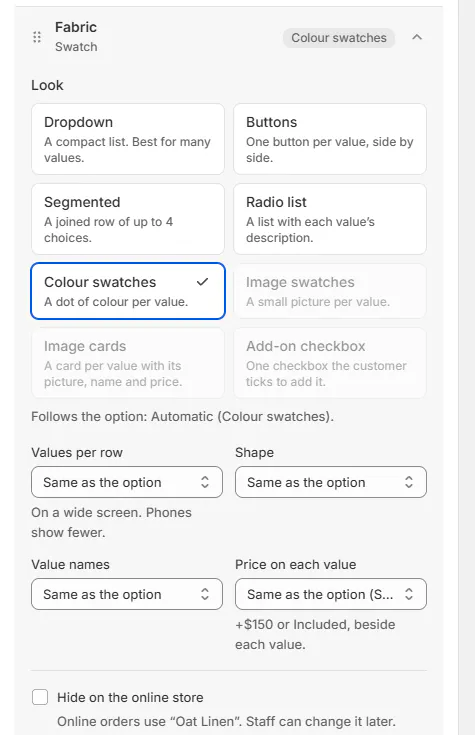
Look choices for a swatch option, with the ones it can't use greyed Step 2: Select a suitable look
Choose the look that suits the offered values and the amount of explanation customers need.
Available looks
| Look | Type and requirements | Presentation |
|---|---|---|
| Dropdown | Dropdown or Swatch | Compact list for many values. |
| Buttons | Dropdown or Swatch; up to 8 values | One button per value. |
| Segmented | Dropdown or Swatch; up to 4 values | A joined choice row. |
| Radio list | Dropdown or Swatch | List with value descriptions. |
| Colour swatches | Dropdown or Swatch; every value has a color | A color dot per value. |
| Image swatches | Dropdown or Swatch; every value has an image | Small pictures. |
| Image cards | Dropdown or Swatch; every value has an image | Picture, name, price and description. |
| Add-on checkbox | Dropdown or Swatch; 1 optional value | A checkbox to add the choice. |
| Number box | Number or Dimensions | Numeric entry; Dimensions gets a box per part. |
| Stepper | Number; step of 1 | Minus and plus controls. |
| Slider | Number; minimum and a higher maximum | A control within the permitted range. |
| Text box | Text | Single-line entry. |
| Text area | Text area | Several lines of entry. |
| Info block | Legacy Image | Read-only text and image. |
Info block shows the template's starting text and picture. It has nothing to select and does not block the line as an unanswered required choice.
Step 3: Adjust the presentation
Set Values per row, Shape, Value names and Price on each value where the look supports them.
Choose 2 to 6 values per row. Phone layouts below 750 px show no more than 3.
Save the page. The option row shows Custom look when the template sets its own presentation.
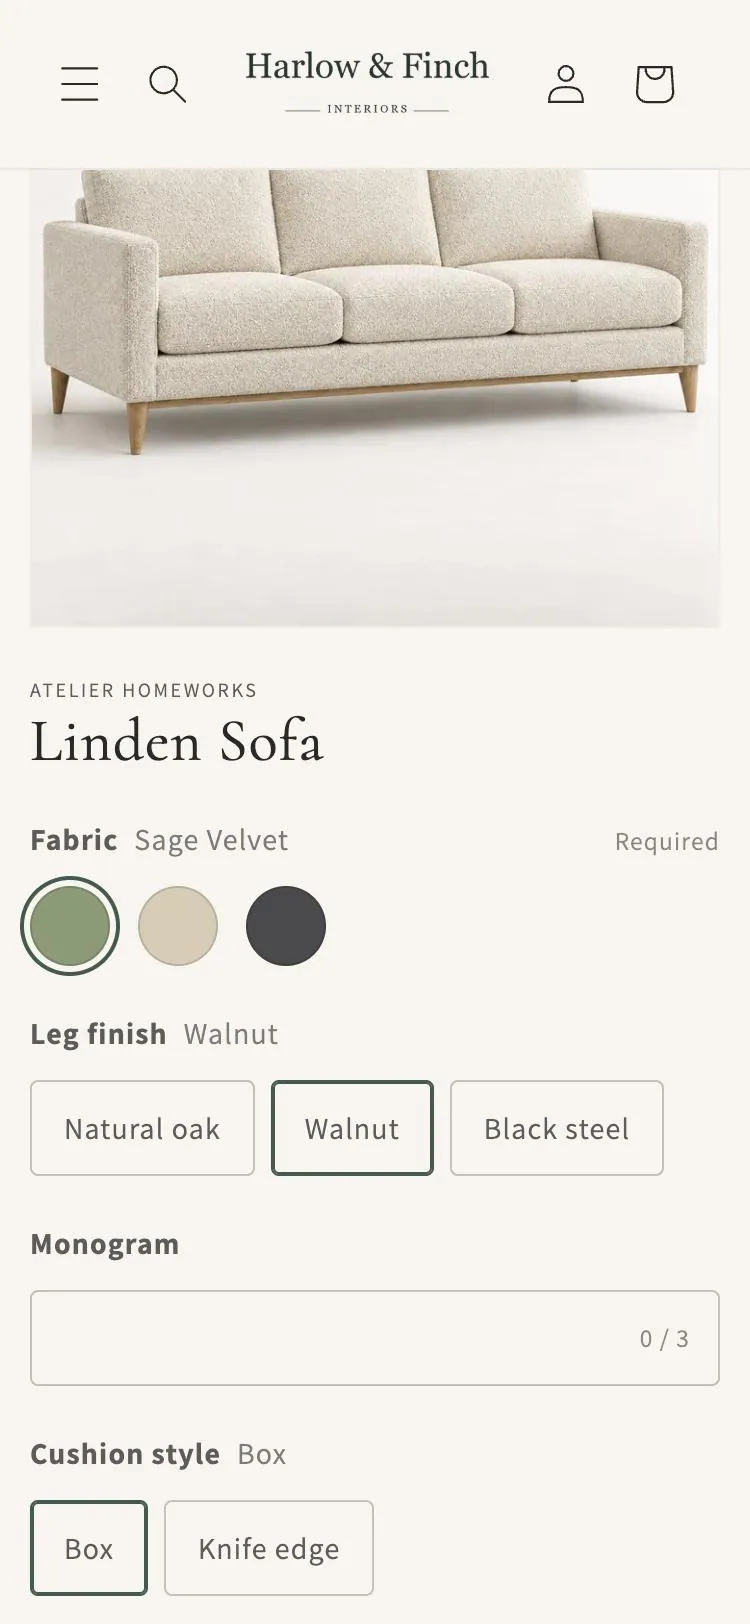
Fabric shows as round colour swatches; Leg finish and Cushion style as buttons. Row counts apply to color swatches, image swatches and image cards. Shape and value names apply to swatches; per-value pricing applies to choice looks.
Color and round image swatches wrap at their natural size until a row count is set. Square image swatches and cards use grids.
Set a shared default
Step 1: Open the shared option
Go to SettingsProductsOptions and open the option. Choose Default look online and its presentation settings.
The shared default is used by templates without their own look override.
Step 2: Add descriptions and a class
For Dropdown values, enter Description (online), up to 160 characters. Radio list and Image cards show these descriptions.
Enter Class name only if your theme styling needs it. Use letters, digits, hyphens or underscores, up to 60 characters.
Save the option. Templates using it are queued to sync the changed storefront presentation.
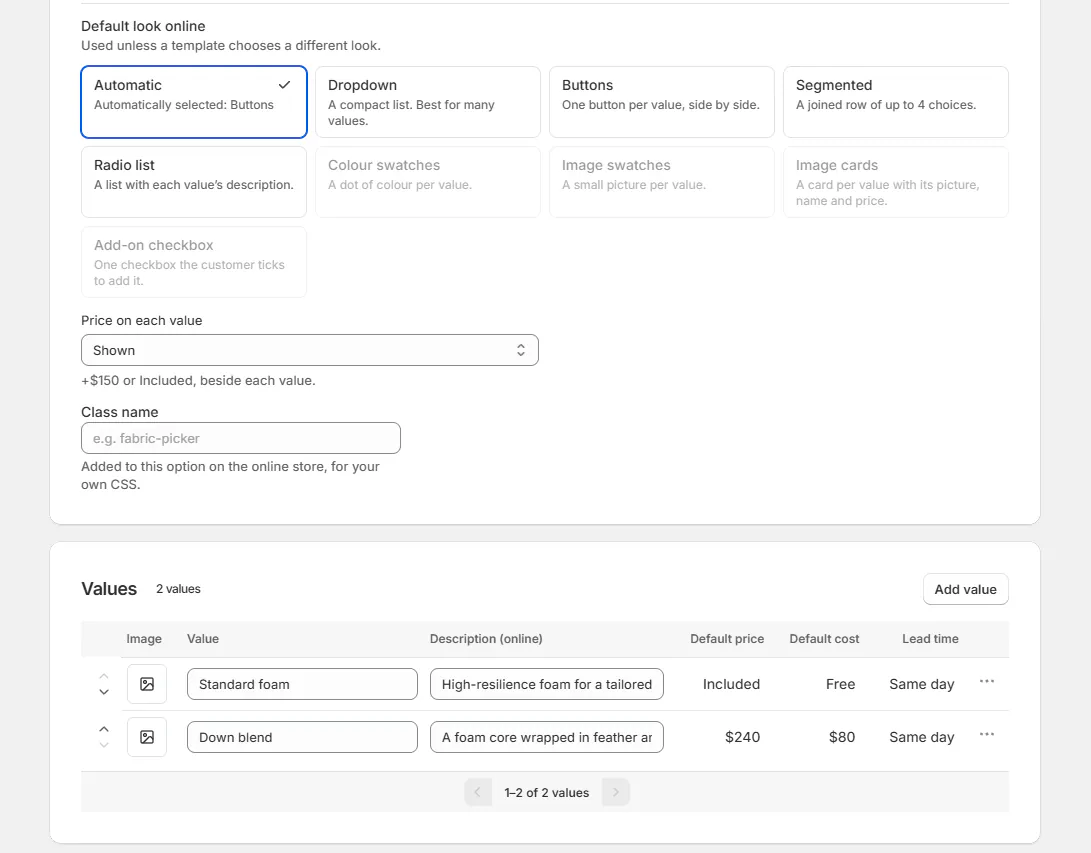
Option page with Default look online, Class name and value descriptions See Style the options block for using a class name.
Step 3: Check which setting wins
Open a template that uses the option. Its own look wins over the shared default; otherwise the option's default wins over Automatic.
If a stored look no longer fits its values or type, it remains saved but Automatic is displayed.
Automatic uses available swatches or images where suitable. Other Dropdown choices use Buttons up to 8 values, then Dropdown.
Hide a staff-only choice
Step 1: Check its starting value
Open the template option and review Starts as. A required option needs a starting value before it can be hidden.
Choose that value deliberately. Online orders use it even though shoppers do not make the choice.
Step 2: Hide it online
On Online options, turn on Hide on the online store. Read whether the help says online orders use a value or leave it blank.
The row shows Hidden online as soon as you tick it, with a note on what online orders get. Save to keep it; staff can complete or change the choice later.
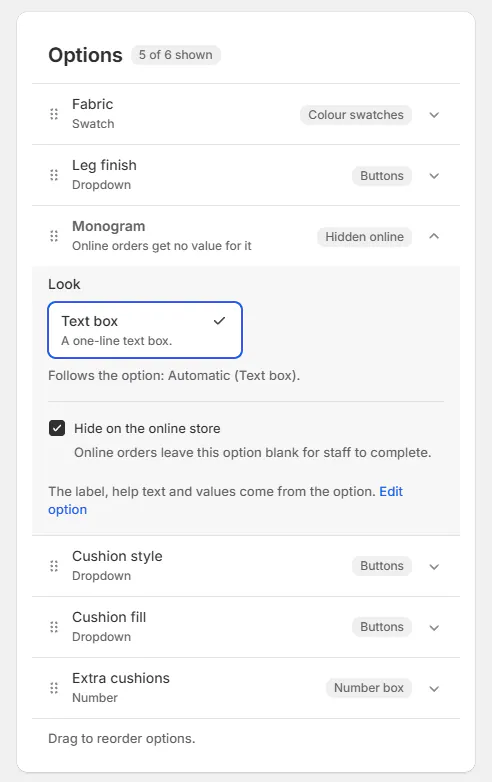
An option row with Hide on the online store ticked and the Hidden online badge Warning
Hiding an option is not a way to keep its price confidential. The page still contains pricing needed to calculate its total.
Customers can ask about a staff-only option through the portal, but cannot change it there themselves.
Share a design
Step 1: Choose the configuration
On the product page, choose the desired options. Review the configuration before copying its link.
The page now contains the choices the design link will refill.
Step 2: Copy or share the link
Choose Copy design link or Share. Share opens the device's sharing interface when available and otherwise copies the link.
The link carries the design rather than storing a saved price. It can contain up to 16,384 characters.
Step 3: Check the opened design
Open the link to confirm the choices. It reports Design loaded with current prices or, for quote-only products, Your saved choices are loaded.
If a choice is no longer available, the page asks for a replacement.
What happens next
Template changes sync that template; shared option changes sync the templates using it. Shopify's storefront cache can delay the visible result.
A saved design uses current prices when opened. It does not preserve a previous quote or guarantee a discontinued choice.
Example: fabric and a staff-only crew
Example · Harlow & Finch Interiors
Present customer choices and retain staff defaults
Nora Ellis adjusts Harlow & Finch Interiors' online products.
- Set Linden Sofa's Fabric to round Colour swatches.
- Show names under every swatch.
- Give Arden Dining Table's Install crew a Standard starting value.
- Hide Install crew online for staff to adjust later.
- Copy Olivia Bennett's Mira Dining Chair design with her selected finish.
The shopper sees the product choices, while staff retain the operational setting.
If something goes wrong
A look is greyed out
Read its requirement and check value count, images, colors or numeric bounds.
Add-on checkbox is unavailable
Make the option optional and offer exactly 1 value.
One template kept its old look
Its Custom look overrides the option's default.
Hide on the online store is unavailable
Supply a starting value for the required option.
Saved choices are unavailable
Choose replacements before submitting the configuration.
A description is rejected
Keep it within 160 characters.
A class name is invalid
Use the allowed characters and stay within 60 characters.
Was this guide helpful?
Thanks. Tell us what was missing at support@meetorderpilot.com.