Put a product template on your online store
Related guides
- Set up your theme for OrderPilotOnline store · 6 min
- Fine-tune how options look and behave onlineOnline store · 6 min
- How OrderPilot works on your online storeOnline store · 6 min
- Fix a problem on your online storeOnline store · 5 min
- Manage product templatesCatalog · 5 min
Choose what shoppers can do with one template, then arrange its online options and buttons. Publish a product for exploring, quote requests or the available ordering route.
An active template can be available to staff while hidden online. Treat those sales channels as separate choices.
Before you start
Finish theme setup
Follow Set up your theme and enable product templates online.
Prepare the template
Create and activate it. A draft sends nothing to Shopify.
Check access and saved changes
You need Manage the catalog. Save the template before opening Online options.
New templates take their initial online settings from Defaults for new templates. Changing those defaults does not replace each existing template's choices.
Without catalog permission, Online options opens view-only. The page's controls explain the restriction.
Choose the online mode
Step 1: Open Sales channels
Open the template from Products. In Sales channels, click Manage.
The Sales channels dialog opens with the template's online mode and Online options controls.
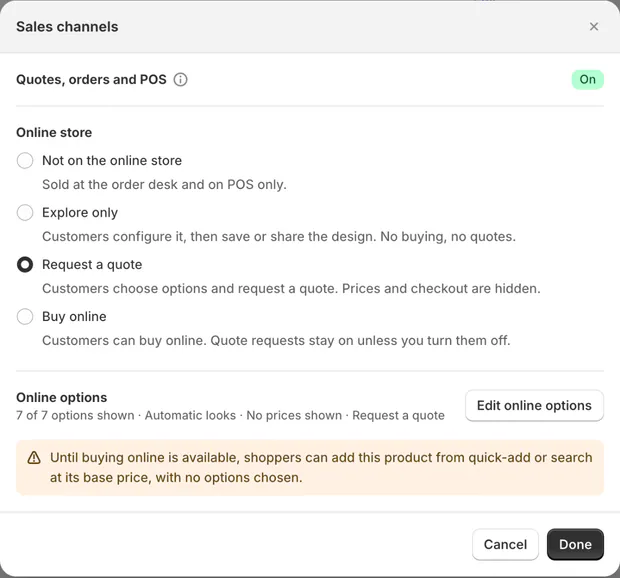
Sales channels dialog with the online mode choices Step 2: Choose what shoppers can do
Under Online store, choose the mode that fits this product.
Mode Intended use Not on the online store Sell it through the order desk and POS only. Explore only Show configuration and price so customers can save or share a design. Request a quote Let customers choose options and request pricing without visible prices. Buy online Allow the supported online ordering route, with optional quote requests. Click Done, then save the page. The card shows the saved mode and publication badge.
While Shopify-cart buying is unavailable, Buy online product pages show Request a quote. The quote cart's separate Place order route can remain available.
Step 3: Read the publication state
Check whether the card says Not on the online store, Not published or Live on the online store.
For Not published, read the reason. The template must be active and the store-wide template switch must be on.
Warning
While configured Shopify-cart buying is unavailable, collection quick-add or search can add the bare product at its base price without options. Review those theme entry points before offering the product.
See Online store problems for this route and other missing-option issues.
Set the online options
Step 1: Open Online options
In the Sales channels dialog, choose Edit online options. If the dialog contains unsaved mode changes, choose Done and save the template first.
The Online options page opens with Options, Price and lead time, Buttons and Preview.
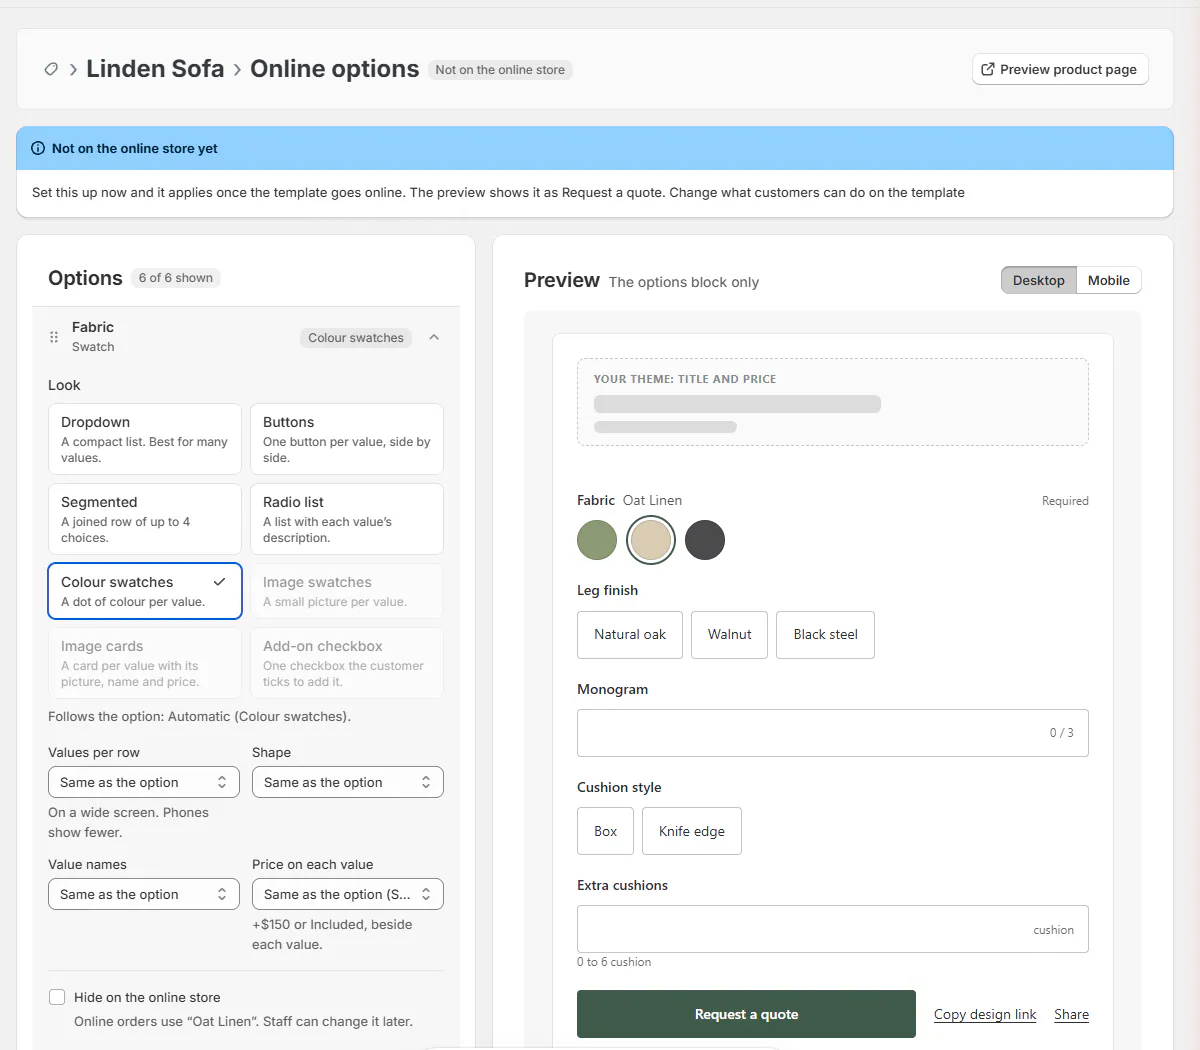
Online options page with option rows, Price and lead time, Buttons and the live Preview Step 2: Arrange the choices
Drag option rows by their handles into the order shoppers should use. Open a row to choose Automatic or an available look.
The new order is the template's option order everywhere, including staff screens. A rule-dependent option cannot be moved above the choice it depends on.
If a drop is put back, read the reason and preserve the controlling option's earlier position.
Step 3: Choose price and lead-time display
Under Price and lead time, set Price line under the options to Options and total, Total only or No price line.
Review Show lead time. It shows the longest duration among selected option values, not the order's full delivery promise.
For Request a quote, price controls are greyed out because the mode hides prices. This is expected, not a missing permission.
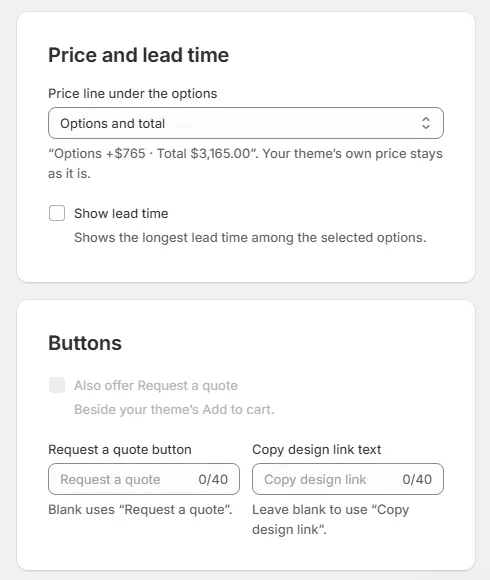
Online options Price and lead time and Buttons cards Blank option lead times add nothing to the displayed duration. For vendor build, transfer and delivery calculations, see Set up lead times.
Step 4: Set button wording
Under Buttons, review Also offer Request a quote. This choice applies to Buy online; other modes explain why it is unavailable.
Set Request a quote button and Copy design link text if needed. Each accepts up to 40 characters; blank uses its default.
Share cannot be renamed. Check that button wording still describes what happens when the customer uses it.
Step 5: Check the preview and save
Try the options in Preview. Confirm required choices, offered values, price treatment and button labels.
Save the page. The preview itself adds nothing to a cart; a preview quote action reports Preview only: nothing was added.
If the template is hidden online, the preview shows it as Request a quote. You can prepare its appearance before publishing it.
For individual looks, staff-only choices and design links, use Fine-tune options online.
Check the product page
Step 1: Open the published product
From the template header, use the eye labeled View on the online store. It is unavailable until the product is live.
On Online options, the header link reads View product page when live or Preview product page otherwise.
The product opens so you can compare the shopper's actual page with the editor preview.
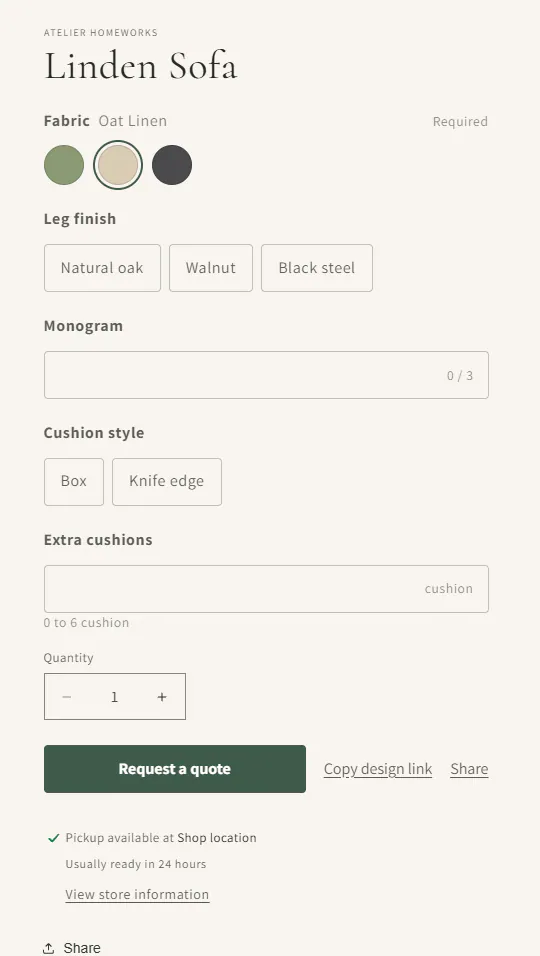
The Linden Sofa product page with the options block above the buttons Step 2: Check the configured route
Confirm the options appear above the intended buttons. Choose a valid configuration and check the button wording and destination.
Allow for catalog sync and Shopify's storefront cache when comparing a recent edit. The live page can lag behind the saved editor.
Do not use a stale page to conclude the save failed. Check the template's sync state before changing the same settings again.
What happens next
The catalog sync publishes the template's product and option information. A daily check repairs publication drift.
Template pictures go to Shopify on the next sync in their template order. Media added directly in Shopify remains after them.
Online options saves do not create a template Activity row. Record important presentation choices in your team's normal catalog process.
The same storefront settings are available through template CSV import and export.
Example: sofa requests and table orders
Example · Harlow & Finch Interiors
Give each product the right online route
Nora Ellis prepares Harlow & Finch Interiors' furniture.
- Set Linden Sofa to Request a quote.
- Place Fabric first as Colour swatches and Cushion Fill as Buttons.
- Check that price controls explain the quote-only mode.
- Set Arden Dining Table to Buy online.
- Check its available route on the live product page and quote cart.
While Shopify-cart buying is unavailable, the table page offers Request a quote and eligible quote carts can offer Place order.
If something goes wrong
Not published appears
Check the store-wide switch and template activation.
Online options are too large
Offer fewer values or shorten names and descriptions, then save.
Price controls are greyed out
Request a quote mode intentionally hides prices.
The quote-toggle control is unavailable
Check the mode's explanation; it is configurable for Buy online.
A button label is rejected
Keep it within 40 characters.
Edit online options waits
Finish and save changes on the main template page.
Options are missing online
Check theme setup, sync state and storefront caching.
Was this guide helpful?
Thanks. Tell us what was missing at support@meetorderpilot.com.