Bring in your locations
Related guides
- Business details and what each location printsSettings and integrations · 6 min
- Group locations into brandsSettings and integrations · 3 min
- Find your way around OrderPilotGet started · 7 min
- Manage your subscription and covered locationsSettings and integrations · 5 min
- Order a new unit or sell from stockInventory and costs · 6 min
A location represents a place your business operates from, such as a showroom or warehouse. Locations help organize sales, stock and staff access. Each location can also have its own contact details, terms and logo on documents.
Locations are created and edited in Shopify. OrderPilot receives those changes automatically, and you can refresh its list when something looks out of date.
If parts of your business trade under different names, you can group locations into brands. A brand groups the locations that share that business identity.
Before you start
Are your locations in Shopify?
Set them up in Shopify admin first. OrderPilot's location settings add app-specific details; they do not create your selling locations.
Can you manage store settings?
You need Manage shop settings to sync locations and edit their display details or terms.
Do you use several brands?
Brand grouping is optional. Use a flat location list unless your business needs separate brands.
Only active selling locations can be chosen for selling. Your shop can use a different word for locations, so the tab and field labels may use that word.
Group locations into brands covers the optional grouping setup. A location belongs to 1 brand or to Unassigned.
How locations and brands work
- 1Shopify locationShopify supplies the location and its active or inactive state.
- 2OrderPilot detailsAdd the location's document information, terms, wire instructions, logo and default product image.
- 3Optional brandGroup locations under a trading name, color and image when your business needs it.
Business details and documents explains which information appears on paperwork. Keep the Shopify location and its document display details distinct when checking an address.
| Level | What it contributes |
|---|---|
| Shop | Shared business details and the shop's brand color. |
| Location | Document details, terms, wire instructions, logo and a fallback product image. |
| Brand | A grouping name, color and image for its locations. |
| Color fallback | The location's brand color, otherwise the shop's color, otherwise the default green. |
| Document logo fallback | A location's own logo takes priority over its brand image on purchase orders and specification sheets. |
Location information appears in the top-bar picker, documents and receipts. Your team also uses location groups for staff access, email-copy recipients, email template brand choices and specification-sheet locations.
A location's default product image fills in when a product has no image. It can appear in product pickers, POS, PDFs, emails and the signing page.
Sync your locations
Step 1: Open the location list
Go to SettingsBusiness & locationsLocations. With brand grouping enabled, the tab reads Brands and locations and shows a board instead of a flat list.
Step 2: Refresh from Shopify
Click Sync from Shopify in the flat list, or Sync Locations on the brands board. Wait for Locations synced from Shopify before checking the updated rows.
Step 3: Read the location row
Find the showroom or warehouse you refreshed. Check its address, phone and Active or Inactive status. Inactive locations stay listed, but they cannot be chosen for new work.
Step 4: Open the location's actions
Under Actions, click Edit to find Edit terms & conditions, Edit display info, and Add default product image or Change default product image. Choose the job you need; its editor opens.
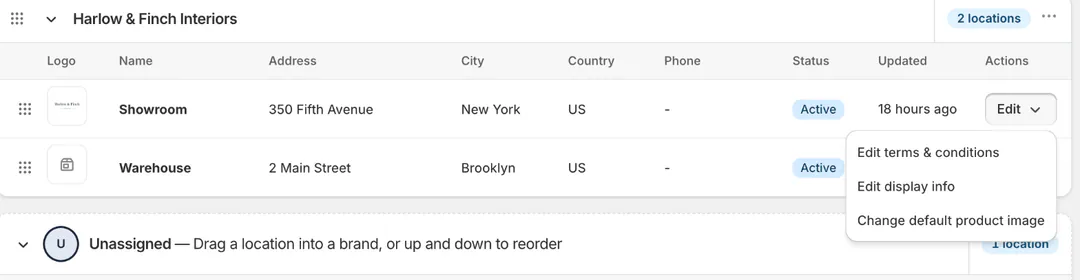
Each location's menu opens its terms, display details and fallback image.
Read the table and terms summary
| Column | What to check |
|---|---|
| Logo and Name | The location's identity. |
| Address, City and Country Code | The address imported for that location; the brands board labels the country column Country. |
| Phone | The location's contact number. |
| Status | Whether the Shopify location is active. |
| Updated | When the location information was updated. |
| Actions | The location-specific editors; view-only roles see View actions. |
The Terms & payments tab summarizes each location's Terms & conditions, Receipt terms, Wire instructions and Note before signature. Each cell says Set or Not set.
Note
The Made-to-order location card is available to roles with Manage shop settings, Manage billing, and Manage order and quote settings. Its locations carry the Made-to-order location · Free badge.
These locations hold Order New commitments. Selling, physical receiving and transfers require subscribed locations; Order New and selling from floor stock explains the difference.
Put locations in your own order
Step 1: Open the brands board
Open Brands and locations. The board shows your brands and an Unassigned group, with handles for moving brands and location rows.
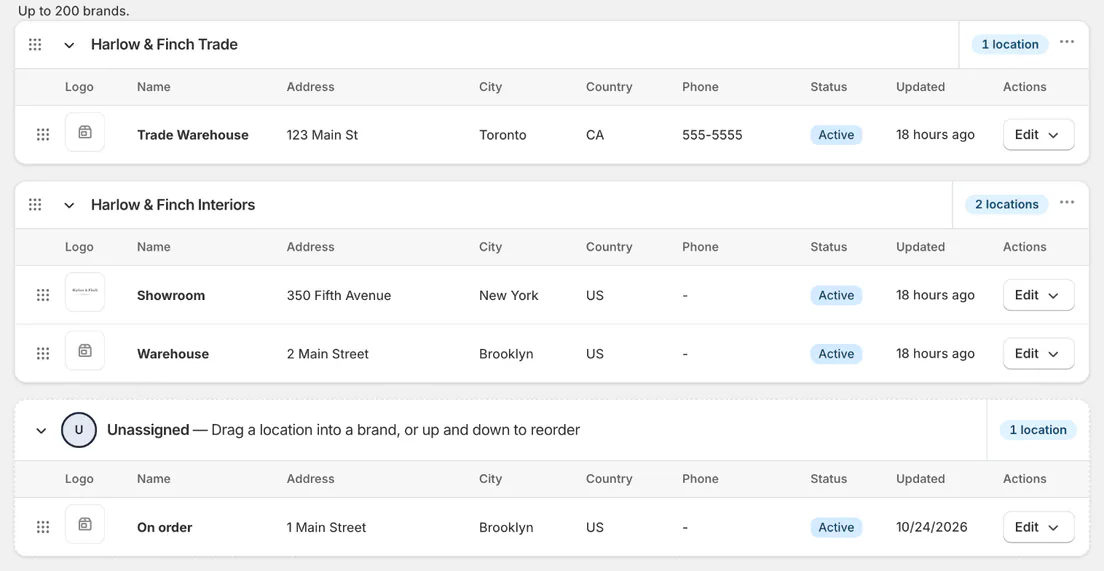
The board groups each location under one brand or Unassigned. Step 2: Move a brand or location
Drag a brand by its handle above or below another brand. Drag a location within its group to reorder it, or move it to another brand. The board shows the new position.
Step 3: Check that the order saved
Drop the item and look for Brand order saved or Location order saved. The saved order then appears in the location pickers and related brand choices.
Keyboard and list behavior
Focus a reorder handle and press Space to pick it up, then use the arrow keys.
Only the brands board has reorder handles; the flat Locations list cannot be reordered this way. New locations go to the end of their group, and view-only roles see greyed handles.
The saved order is used in the top-bar picker, Staff & roles, the CC/BCC scope picker, specification-sheet location picker and email template brand choices.
What happens next
Set each location's document details, then add its terms on documents. Check the location's own information before relying on a brand or shop fallback.
Use brand grouping if you trade under several names. Your subscription and the locations it covers explains which locations are included for selling.
Example: a new warehouse
Example · Harlow & Finch Interiors
Bring the Warehouse into Harlow & Finch
Nora Ellis has added Harlow & Finch Interiors' Warehouse in Shopify.
- Open Business & locations in OrderPilot and choose the locations tab.
- Click Sync Locations on the brands board and wait for the success confirmation.
- Find Warehouse and check its imported address and active status.
- Place Warehouse under the store's brand, then position the brand where the team expects it in the picker.
- Open the location's display details to prepare the paperwork it will use.
If something goes wrong
No locations yet appears
Click Sync from Shopify or Sync Locations to bring in the Shopify locations.
Sync failed appears
Try the sync again. If it keeps failing, contact support@meetorderpilot.com.
A location is missing from the top bar
Check that it is active in Shopify and included in your staff location access. A made-to-order location is not a selling location.
Failed to save the order appears
The board restores the previous order. Try moving the item again and check for the success message.
Terms & payments says No locations yet
Open the locations tab and sync first, then return to set the terms.
Was this guide helpful?
Thanks. Tell us what was missing at support@meetorderpilot.com.