Style each customer page
Related guides
- Set up your brand kitBranding · 6 min
- Branding settingsBranding · 4 min
- The customer portalCustomers and portal · 5 min
- Set up portal access and message alertsCustomers and portal · 4 min
- How OrderPilot works on your online storeOnline store · 6 min
Give each customer page the look and wording it needs, using the shared brand kit as the starting point. Preview the result before saving.
The portal, quote-request page and Request sent page share fonts, corners, buttons, background and custom CSS. Each keeps its own logo position and content.
Before you start
Prepare the kit
Complete Set up your brand kit. Branding needs Manage shop settings.
Prepare the product block
Follow Set up your theme before styling product-page options.
Separate access from appearance
Customer portal access is controlled through Portal access, not through the design editor.
The editor provides desktop and phone previews; the phone preview is up to 390 px wide. Open in new tab lets you inspect the draft.
Style the customer portal
Step 1: Set the shared look
Open SettingsBrandingCustomer portal. Under Look, choose fonts, Corners, Buttons and Background.
Corners can be Square, Rounded or Pill. Buttons can be Filled or Outline.
The preview updates to show the shared customer-page appearance.
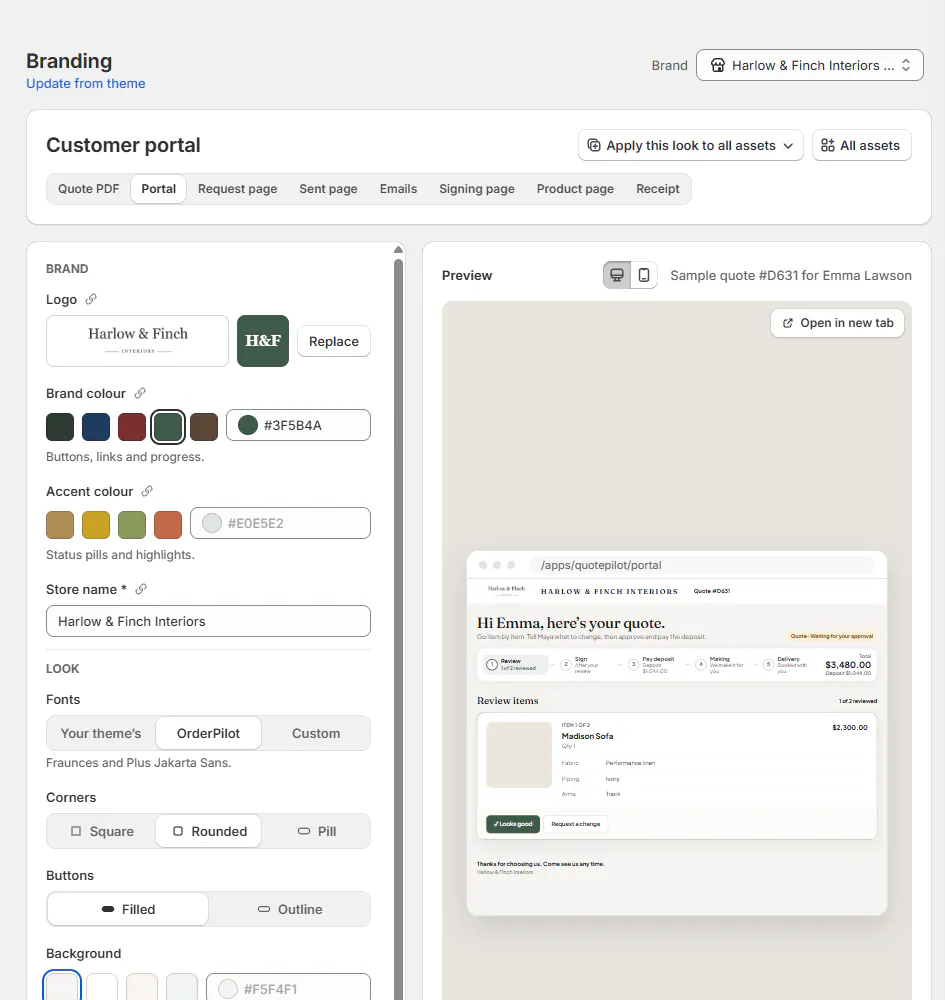
Branding › Customer portal with options and live preview Step 2: Add the portal content
Under Content, enter Footer message, up to 500 characters. Leave it blank for the default message.
Set this page's Logo position under the logo, then save. The footer appears at the customer's account-page bottom.
Warning
The background must keep the portal's gray text readable at a 4.5:1 contrast ratio. A background that is too dark is refused.
Changing logo position here leaves the request pages' positions alone. Changing the shared Look affects all 3 customer pages.
Style the request pages
Step 1: Choose the surrounding theme
Open SettingsBrandingQuote request page. Set Show your store's header and footer as intended, then save.
The quote-request and Request sent pages use that surrounding storefront presentation.
The request page's brand color covers its send button, links and step dots. Its accent covers status and price tags.
Step 2: Write the confirmation message
Open SettingsBrandingRequest sent page. Enter Thank-you message, up to 300 characters, then save.
The message appears in a soft box after the customer submits a request. Its brand color styles the buttons and confirmation check mark.
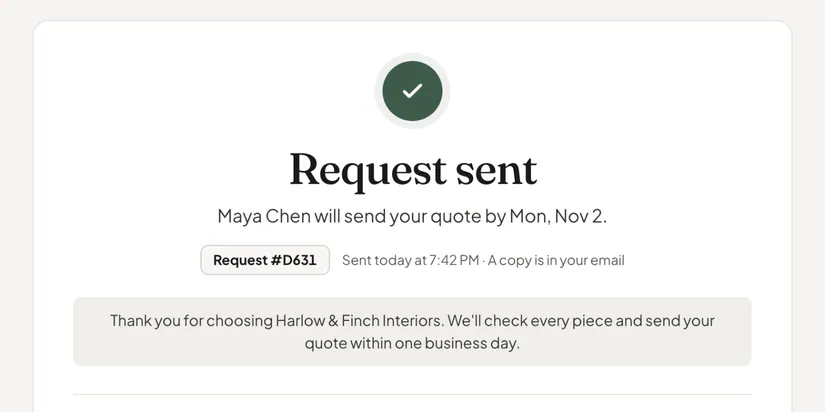
Request sent page with the thank-you message box Use wording that explains the customer's next step or expected response. The message belongs after submission, not on the product's quote button.
Brand the signing page
Step 1: Choose the surrounding look
Open SettingsBrandingSigning page. Under Look, review Same as the Quote PDF and Buttons.
When on, the setting uses the sales order theme. When off, customer-page fonts surround the document.
The document itself remains the Sales order PDF theme. Change that document under Quote PDF.
Step 2: Add an agreement line
Under Content, enter Agreement line, up to 200 characters of plain text. Save the page.
Your line appears before the standard agreement, which remains in place.
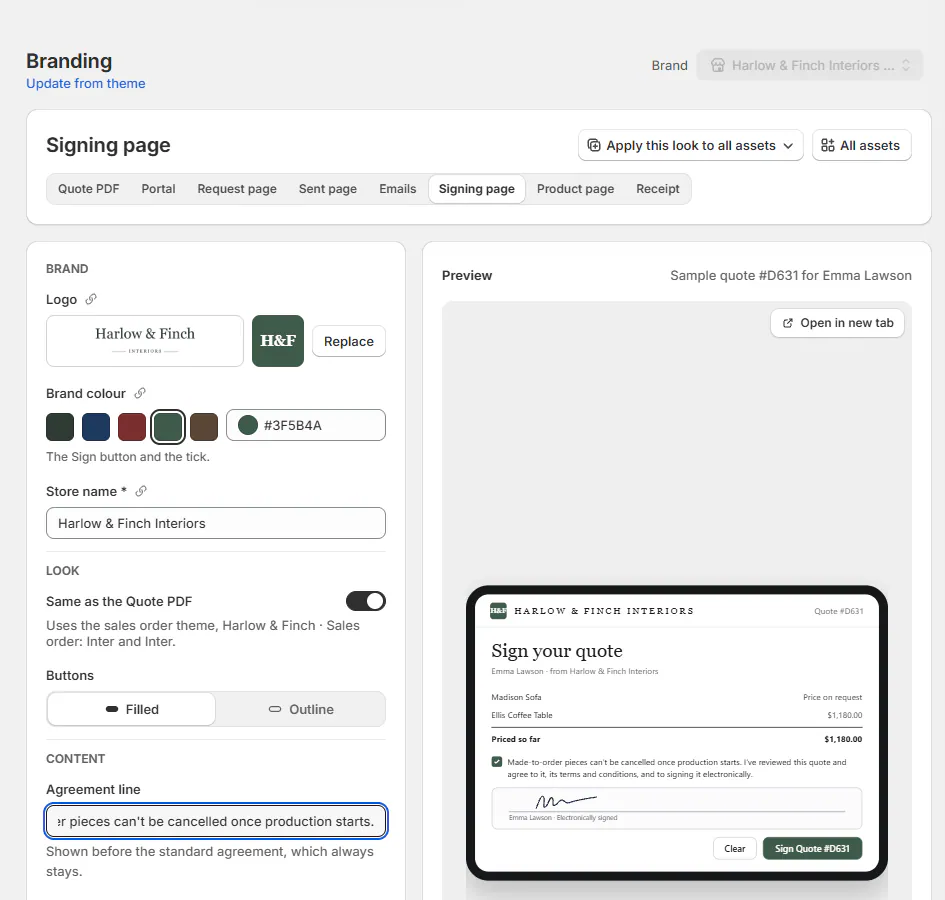
Branding › Signing page with the agreement line and the page preview The brand color styles signing controls and the tick. The line also appears during showroom signing.
Style the product page and pop-up
Step 1: Choose the product controls
Open SettingsBrandingProduct page and pop-up. Review the available look choices.
Field Choices Corners Square, Rounded, Pill. Buttons Filled, Outline. Swatch size Small, Medium, Large. Selected ring Thin, Thick. Gap Tight, Normal, Roomy. The preview shows both the options block and pop-up.
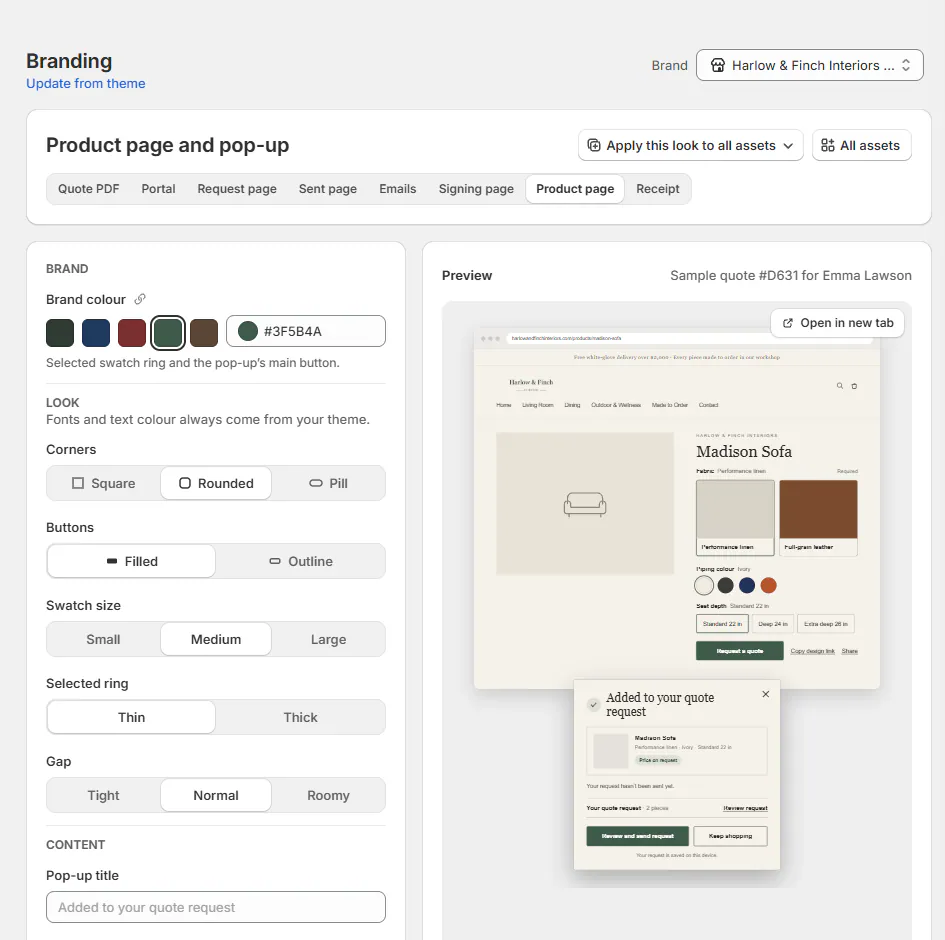
Branding › Product page and pop-up with block and pop-up previews Step 2: Set the pop-up title
Under Content, enter Pop-up title, up to 60 characters. Save after checking both previews.
Saving the storefront-style changes also needs Manage order and quote settings, alongside Branding access.
Product-page fonts and text color come from the theme. A separate Online store accent overrides the shared brand color.
See Style the options block for shared style fields and advanced customization.
Add customer-page CSS
Step 1: Open the shared CSS section
At the end of Customer portal or either request page's options, expand Custom CSS.
The section describes Extra CSS for every customer page and shows In use when rules are present.
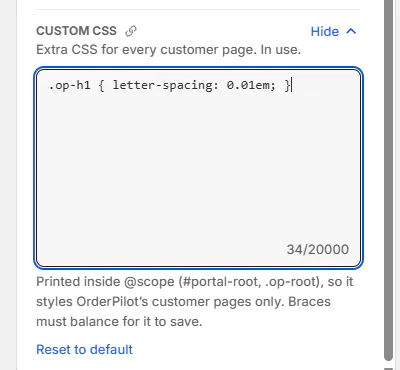
The folded Custom CSS section open with 'In use.' Step 2: Enter and save the rules
Enter up to 20 KB of CSS and save. The rules are scoped to
#portal-rootand.op-rootacross those 3 pages.Check each page after saving, because the rules are shared. A portal-specific change can also affect a matching element on a request page.
Warning
This field does not style the product-page options block. Use Online store's Custom CSS for that separate area.
What happens next
Saved customer-page settings apply to the portal and request pages. The header-and-footer setting controls how the request pages sit within your storefront.
The signing page retains the sales order document and adds your agreement line before the standard wording. Product-page styling follows the storefront publication and cache cycle.
Branding product presets and Online store style fields edit the same style. The preset display represents the nearest matching choice for a custom value.
Example: a consistent customer journey
Example · Harlow & Finch Interiors
Match the request, portal and signing pages
Nora Ellis styles Harlow & Finch Interiors' customer pages.
- Choose Rounded corners and Filled buttons.
- Add the showroom's approved hours to the portal footer.
- Enable the store header and footer around request pages.
- Write the Request sent thank-you message.
- Use the Quote PDF look for signing and add the store's approved agreement line.
- Choose larger swatches for the product presentation.
Olivia Bennett encounters the same store identity from request through signing.
If something goes wrong
The background is refused
Choose a lighter color that keeps the gray text readable.
CSS exceeds the limit
Reduce it below 20 KB.
Options-block styling does nothing here
Move that rule to the Online store CSS field.
The product page still looks old
Allow its published configuration and Shopify cache to update.
The block ignores the brand color
Check whether Online store style has its own accent.
The standard agreement cannot be replaced
Use the additional agreement line; the standard text stays.
Customers cannot open the portal
Check Portal access separately from Branding.
Was this guide helpful?
Thanks. Tell us what was missing at support@meetorderpilot.com.