Deliver purchase orders to a warehouse
Related guides
- Purchasing and costing settingsPurchasing · 5 min
- Create purchase orders in the workbenchPurchasing · 8 min
- Send a purchase order to your vendorPurchasing · 7 min
- Receive a deliveryPurchasing · 6 min
Deliver purchase orders to a warehouse while keeping received stock at the PO's location. Save the warehouse's name and address, choose a default, then check each vendor's destination before creating or sending a PO.
A warehouse here is a delivery address. It does not create another Shopify stock location. The PO's Received into stock at line identifies where its goods count as inventory.
Before you start
Have the receiving address
Use the name and address the vendor should print on the delivery.
Check your access
Adding a warehouse needs Manage purchasing settings or Prepare purchase orders. Editing or deleting one needs Manage purchasing settings.
Choose the stock location
Physical receiving needs the PO's subscribed location. A warehouse address does not replace that location.
Read How purchase orders work if you have not created a PO yet. Warehouse delivery works for customer purchasing and standalone stock purchases.
Save a warehouse and default
Step 1: Open Delivery
Go to SettingsPurchasing and accountingPurchase orders and costingPurchase orders. Find Delivery and its Warehouses list.
An empty list says No warehouses yet. This is where you save destinations outside the store.
Step 2: Add the warehouse
Click Add warehouse. In New warehouse, enter Name and Address, then click Add warehouse.
Both fields are required. The address prints under Deliver to, with each address line on its own line. The warehouse saves separately from the surrounding settings page.
You can keep up to 50 warehouses. The saved name becomes a choice on purchase orders and vendor cards.
Step 3: Choose the starting destination
Set New purchase orders deliver to:
Choice Starting destination Store (the purchase order’s location) The store location; this is the default. Warehouse The selected Default warehouse. Ask each time Staff choose the destination before creating each PO. With Warehouse, choose Default warehouse. Until one is selected, new POs ask where they should be delivered. Save the settings page after changing its defaults.
An order whose shipping says white glove or warehouse delivery starts at a warehouse once one exists, regardless of this default. This reads the order's shipping or delivery title.
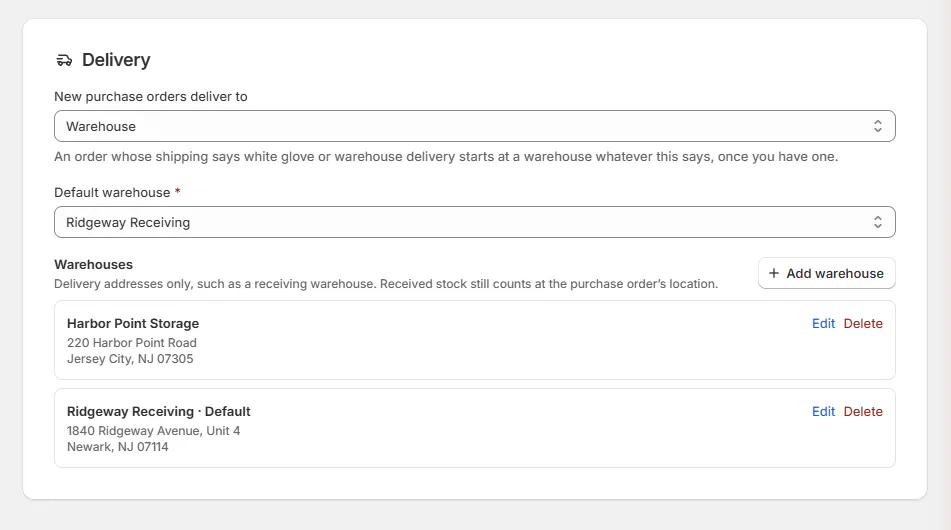
Choose the default destination without changing the stock location.
Choose delivery in the workbench
Step 1: Check the stock location
Open the purchase order workbench and choose Fulfillment Location. This determines where stock counts and where the workbench checks availability.
Select the customer orders or prepare a standalone purchase. Keep the stock location deliberate even when the truck will go elsewhere.
Step 2: Set each vendor's destination
Click Edit on a vendor card. Under Deliver to, choose Store · the purchase order's location, a Warehouse · its name, or New warehouse….
New warehouse… lets authorized staff save an address without leaving the purchasing flow. Check the resulting delivery address, then save the vendor card.
Delivery address shows a warehouse’s address on one line, separated by commas. Leave it unchanged to preserve its original lines on the PO and PDF.
Received stock counts at the selected location either way. Different vendor cards can have different delivery destinations.

Choose the store or a saved warehouse for this vendor's PO. Step 3: Create the purchase orders
Select the vendor cards and click Create purchase orders, then confirm. If Ask each time has left a destination unselected, the button explains which vendor needs a choice.
The Creating purchase orders dialog shows progress. One success shows 1 purchase order created and “Opening it…” before opening the PO.
For several, the results list offers Open beside each, plus Back to order or Go to purchase orders. Review any failed vendor and retry it from the purchase order list.
Change delivery on an existing PO
Step 1: Edit the Delivery card
On the PO page, click Edit in Delivery. Choose Store or Warehouse under Delivery type, then check Location and Deliver to address.
Choosing Store, or another Location, fills Deliver to address with the full address saved in Shopify. A location without a street or city leaves your typed address in place.
Customer and dropship delivery are chosen on Edit PO. Use Edit or cancel a purchase order for those choices and other changes.
Click Save. A warehouse PO shows Warehouse and Received into stock at, keeping its destination and stock location visible.
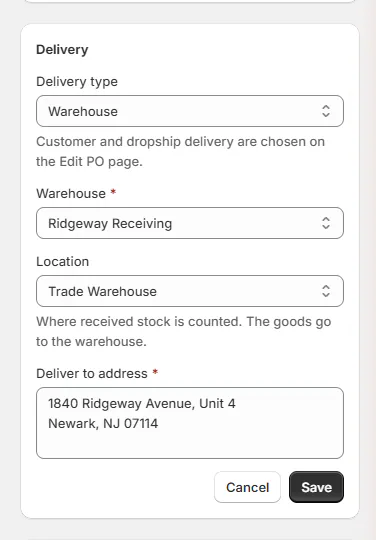
Save the destination and check where received stock will count. Step 2: Decide whether to send the update
On a PO already sent, saving delivery asks whether to send the vendor the updated purchase order. Review the email before sending, or leave the update unsent.
With no vendor email saved, the confirmation says delivery was saved but the update was not sent. Open Preview PDF, then Download, and share the document through your normal process.
Send a purchase order to your vendor explains sending permissions and the vendor's copy.
What happens next
The PDF's Deliver to prints the warehouse name and address. Before sending, check those details against the destination the vendor should use.
When the goods arrive, receive the delivery against the PO. Stock still counts at its location, even though the physical delivery went to the warehouse address.
Editing a saved warehouse does not rewrite addresses on existing purchase orders. Review and update an existing PO's Delivery card when its destination needs to change.
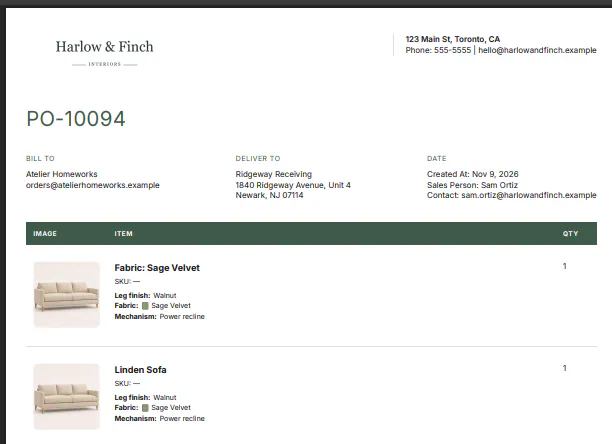
Example: a sofa goes to receiving
Example · Harlow & Finch Interiors
Deliver elsewhere, keep the stock location
Jo Park prepares Atelier Homeworks PO-10001 for Olivia Bennett's Linden Sofa.
- Keep Showroom as the PO's stock location.
- Select Warehouse · Ridgeway Receiving under the vendor card's Deliver to.
- Create the PO and open its page.
- Check Received into stock at reads Showroom.
- Preview the PDF and confirm the warehouse name and address before sending.
The vendor delivers to the receiving warehouse. Receipt records the stock at Showroom.
Important notes and tips
Use Edit in the Warehouses list to change a saved name or address. The warehouse form reminds you that existing purchase orders keep their saved addresses.
Delete asks Delete followed by the warehouse name. Delete warehouse removes it from the delivery list; existing POs keep their addresses.
If something goes wrong
Create purchase orders asks for a destination
Open the named vendor card and choose Deliver to, then save it.
Warehouse has no default selected
Choose Default warehouse, or choose each PO's destination when prompted.
Add warehouse is greyed out
Check whether the list already has 50 warehouses. The name and address are also required in the form.
Edit or Delete is missing
Your role needs Manage purchasing settings.
An old PO has the previous address
Change that PO's Delivery card; editing the saved warehouse does not change existing POs.
The vendor did not get the delivery change
Saving and sending are separate. Review the update prompt or share the downloaded PDF.
Was this guide helpful?
Thanks. Tell us what was missing at [email protected].